In Client and Record Management (which you'll find as the first administrative option in the Welcome menu), selecting the AREA OPTIONS menu at the top lets you gives you access to several tools. As with all control panels, be sure to hover over the question mark icons within the control panel in order to find suggestions and more information about each configuration option.
Add New Client
When a client first creates an account, they do so by filling out the registration form in order to answer the questions that you define in Form Setup: Registrations. As an administrator, you can also create an account for a client. To do so, simply fill out this form and select the "CREATE ACCOUNT" button.
Note that administrators have to provide a unique email address (that isn't already attached to an existing account) and a first name and last name when adding a new client. Questions marked with a + are required when clients are creating their account, but are optional when administrators are creating an account for a client.
In addition to the questions that you've defined for the registration form, this tool has a couple of additional functions:
PASSWORD: All accounts on WCONLINE have to be secured with a password. This field is where you'll enter the password for the new account. Passwords must be at least ten characters long. Beneath this field, WCONLINE provides a unique ten digit password that can be copied and pasted into the password field.
NOTIFY CLIENT: If this option is selected, then WCONLINE will send the client an "account created" email once the account is successfully created. That email cannot be customized and reads as follows (with the information in brackets replaced with information from your system):
Dear [CLIENT FIRST NAME],
An account has been created for you at [CENTER NAME AS SET IN GLOBAL SYSTEM SETTINGS]. Your credentials are listed below:
URL: [SITE URL]
EMAIL: [CLIENT EMAIL ADDRESS]
PASSWORD: [PASSWORD AS ENTERED]
Sincerely,
[CENTER NAME AS SET IN GLOBAL SYSTEM SETTINGS]
View Deactivated Accounts
This tool shows accounts in Client and Record Management that are currently deactivated.
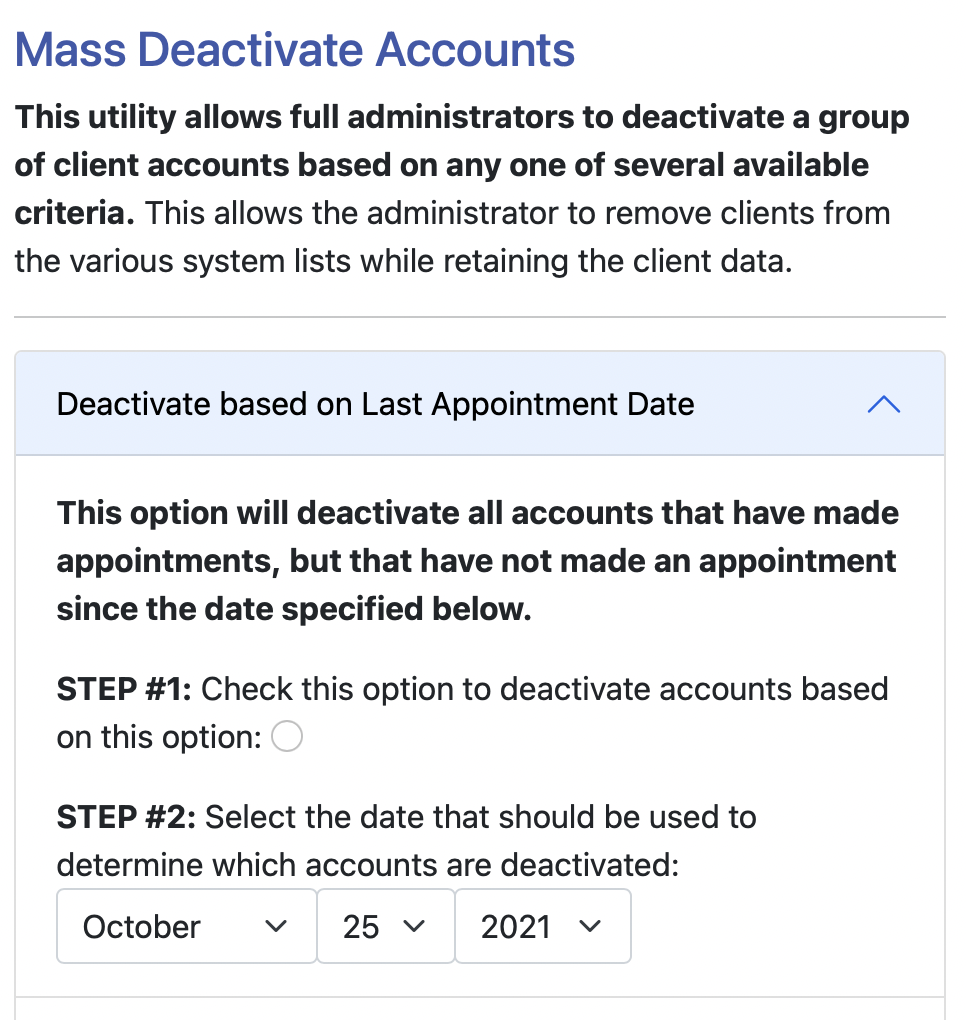
Mass Deactivate Accounts
 This utility allows full administrators to deactivate a group of client accounts based on the date of a client's last appointment, the date the client registered for an account, or on the value of a registration question with drop-down answer. This allows the administrator to remove clients from the various system lists (such as the list of client accounts on the appointment form) while retaining the client data. For example, clients who haven't made in appointment in several years could be deactivated via this utility so that they no longer have access to the system, so that they don't appear in client selection lists (like the list used by administrators to schedule an appointment for a student), and so that they no longer receive mass emails.]
If a client whose account has been deactivated attempts to log in, he or she will receive instructions to contact the system administrator. Deactivated accounts can be re-enabled at any time by editing a client's profile in Client & Record Management, or you can re-enable all deactivated accounts via the option at the bottom of this form.
OPTION #1: DEACTIVATE BASED ON LAST APPOINTMENT DATE: This option will deactivate all accounts that have made appointments, but that have not made an appointment since the specified date.
To use this option, check the box in "step 1" and then select the date that should be used to determine which accounts should be deactivated. For example, if you set the date to "February 1, 2016," then all clients who have made at least one appointment but who haven't made an appointment since February 1, 2016 will be deactivated.
OPTION #2: DEACTIVATE BASED ON REGISTRATION DATE: This option will deactivate all accounts that have not updated their registration profile since the date specified below. If a client hasn't ever updated their profile but registered after the date specified, then that client's account will not be deactivated.
To use this option, click on the "option #2" title to expand the option. Then, check the box in "step 1." Next, select the date that should be used to determine which accounts should be deactivated. For example, if you set the date to "February 1, 2016," then all accounts that haven't updated their profile since February 1, 2016 will be deactivated.
OPTION #[X]: DEACTIVATE BASED ON [REGISTRATION FORM QUESTION]: If clients answer questions on your registration form (as set in Form Setup: Registrations by selecting from a drop-down menu, then you can use their selection as a way to deactivate accounts. For example, if you collect "graduation year" on your registration form and have students select from "2015," "2016," "2017," "2018," "2019", "2020," "2021," "2022," and "2023" to answer that question, then you could use this option to mass disable all clients who have answered that question as "2015."
To use this option, click on the "option" title next to the registration question that you wish to use. This will expand the section. Then, check the box in "step 1." Finally, choose the answer that should be used to determine if an account should be deactivated (i.e. select "2015" in the example above).
Once you've made your selections to define what accounts should be disabled, select the "deactivate indicated accounts" button to apply the changes to the system.
REENABLE ALL ACCOUNTS: If you would like to re-enable all accounts that have been disabled, select the link near the bottom of the MASS DEACTIVATE ACCOUNTS tool. Once selected, WCONLINE will re-enable all accounts that have been disabled either manually or through this tool. Accounts that were disabled as a result of your no-show policy (as set in Global System Settings) will not be re-enabled through this option.
Mass Domain Update
This tool allows full administrators to quickly update the domains attached to all registered accounts. This is useful if an institution is, for example, moving from email addresses that end in @thecollege.edu to those that end in @theuniversity.edu.
Using this utility changes how clients log in, as it changes the email address attached to every matching account. These changes cannot be automatically reversed or undone.
Sections in this Chapter
SECTION 1: Client and Record Management Overview
SECTION 2: Account Options
SECTION 3: Area Tools