 The appointment form is filled out when making an appointment. Typically, the form is used for collecting appointment or meeting-specific information (such as the client's course, instructor, and assignment details).
In order to make a new appointment, clients select an open or white space on the Calendar Display or select "reserve" after having searched for an appointment on the Standard Display. In order to make an appointment, the client simply reads through and fills out the appointment form. If a client tries to make an appointment and is unable to do so, they should carefully read the explicit error message displayed in the alert box at the top of the appointment form for additional information.
Clients who already have an appointment scheduled can access that appointment by selecting it on the Calendar Display, by selecting it from the list of their appointments in the My Appointments section of the menu bar at the top of the page, or by selecting it from the list of their appointments within the Standard Display.
Administrators work with appointments in much the same way--using the Calendar Display or Standard Display to view and open existing appointments or to make new appointments. While clients can only make appointments for themselves and can only access their own appointments, administrators can make appointments for any client and can access and modify any existing appointment on the system. The appointment form also offers administrators additional functionality, such as the ability to move appointments, make appointments recurring, or mark appointments as missed, walk-ins, or placeholders.
Making a New and Editing an Existing Appointment
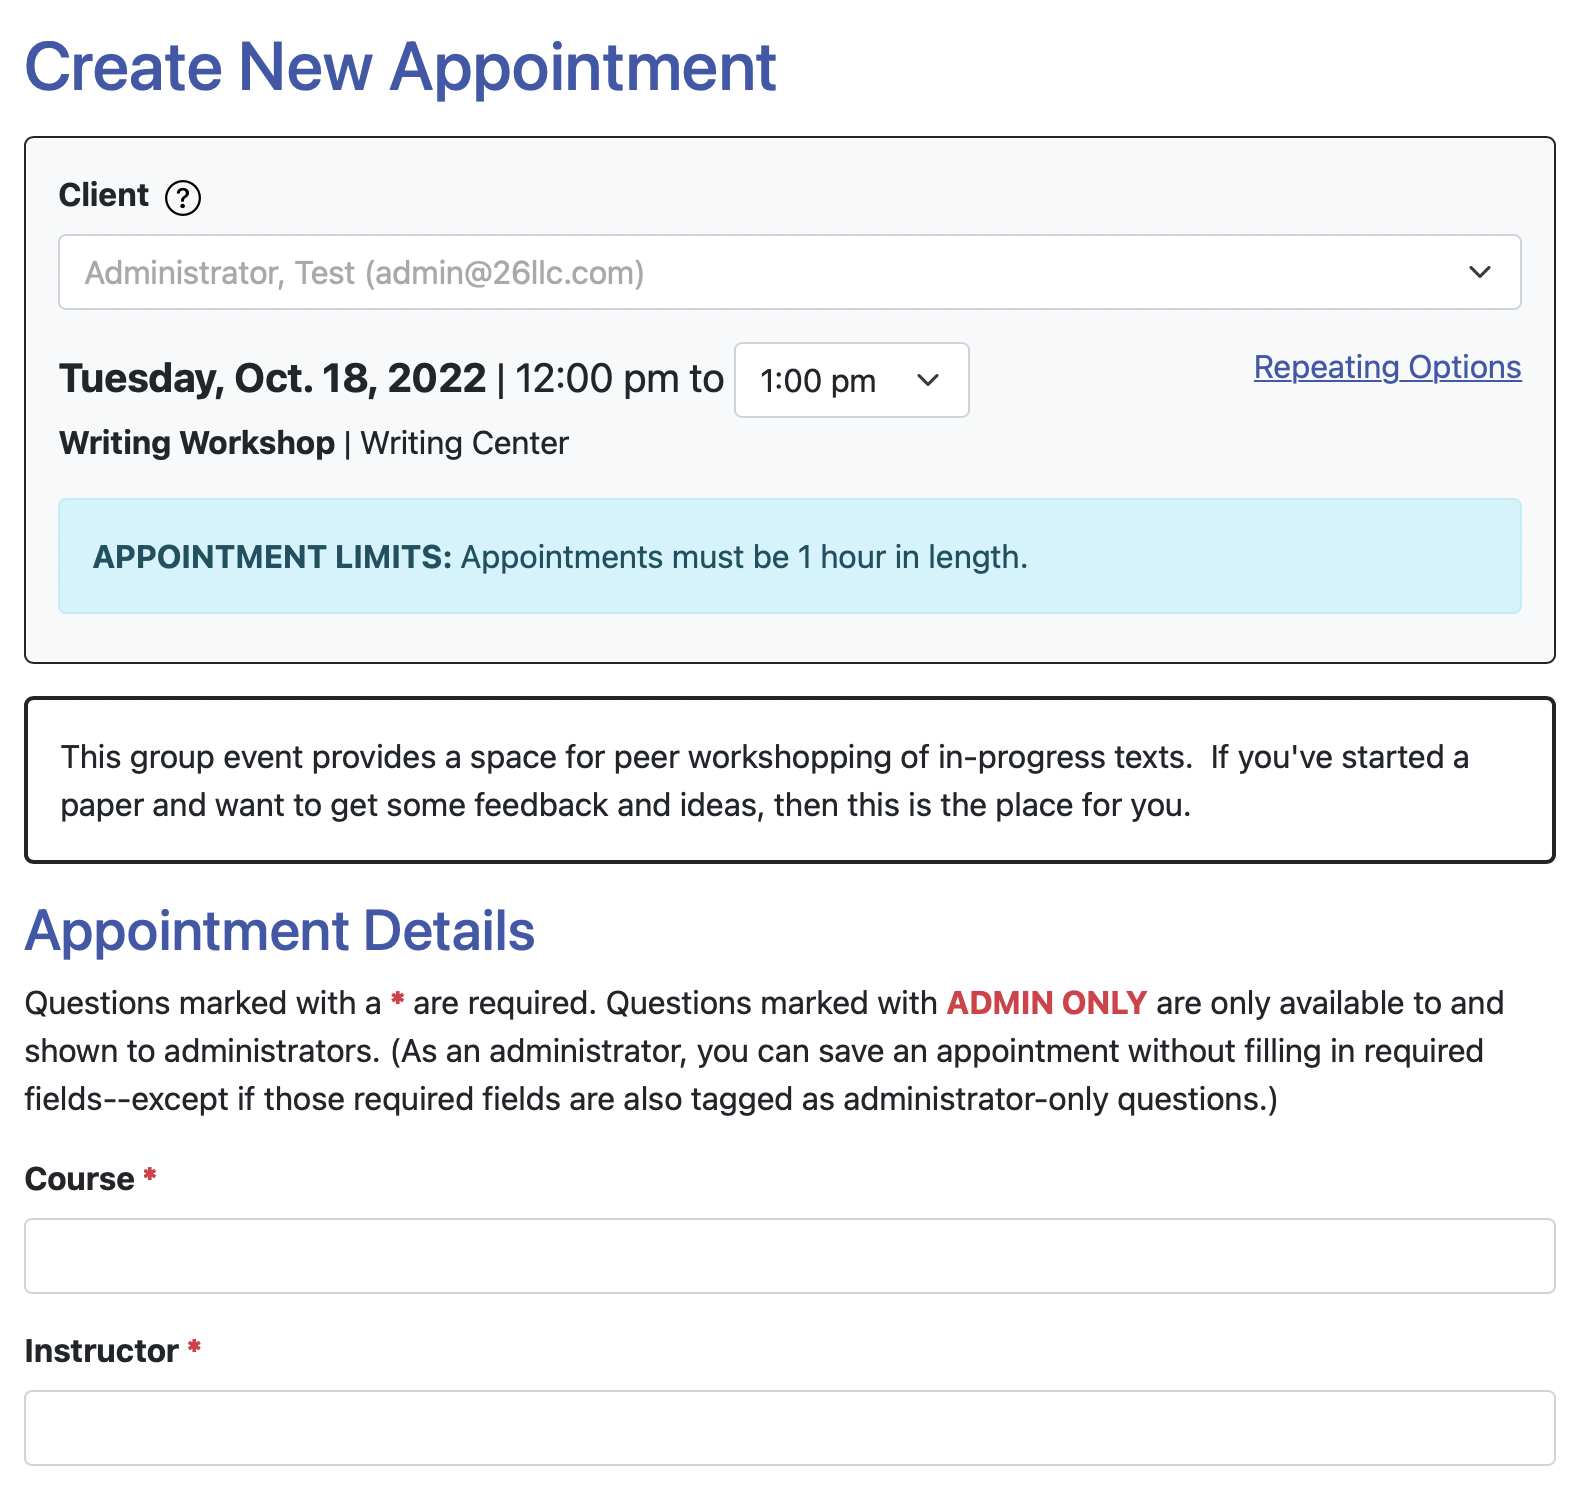
Once a client or administrator selects an available time or slot, they'll be presented with the appointment form. That form is divided into several sections as presented below from the top to the bottom of the form. Since the form offers additional functionality to administrators, options and sections only shown or available to administrators are labeled and highlighted as ADMIN ONLY. Once the form is complete, selecting "create appointment" saves the appointment or selecting "save changes" saves the changes to the appointment (or presents explicit errors if the appointment cannot be saved).
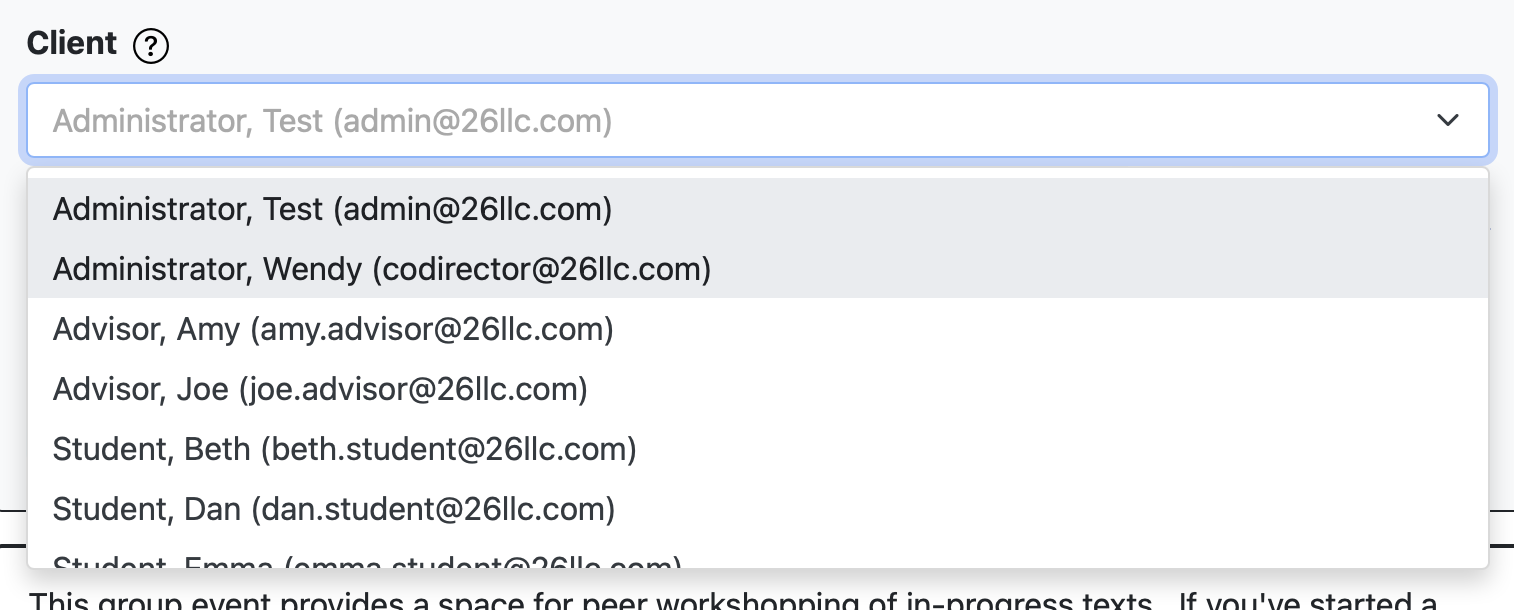 CLIENT SELECTION: ADMIN ONLY: While clients can only make appointments in their own name, administrators can make appointments for themselves and for any client on the system. If you are making an appointment for yourself, ignore this section. If you want to make an appointment for a client, begin typing the client's name or email address in this field and then select the client from the resulting display. If a client hasn't registered, use the ADD NEW CLIENT tool at the top right of the schedule or at the top right of Client and Record Management to add the client to the system before making an appointment for the client.
APPOINTMENT DATE: The appointment form will show the date that was selected when opening the appointment form and will preselect the appointment times based on the selected appointment slot. While full administrators can make appointments of any length, basic administrators and clients can only make appointments that fall between the MINIMUM and MAXIMUM ALLOWABLE APPOINTMENT LENGTH settings for each staff or resource in Staff and Resource Management and are presented starting and ending times accordingly. If SLOT SCHEDULING ONLY is set to YES in Schedule Management for the schedule, then this section of the form will show a slot number instead of appointment times.
REPEATING OPTIONS or REPEAT APPOINTMENT: ADMIN ONLY: While clients can only make one appointment at a time, administrators can make repeating appointments either for themselves or for clients. Administrators can also modify existing single appointments into a repeating appointment. To do so, an administrator selects the "Repeat Appointment" link near the top of the appointment form and then fills out the resulting display. For example, to make the appointment repeat every Tuesday through December 21, 2023, the administrator will change the display to read "Repeat every 1 week until December 21, 2023."
STAFF OR RESOURCE: The staff or resource area displays the name of the staff or resource as selected when selecting the available appointment slot. This section of the appointment form also displays the results of the MINIMUM and MAXIMUM APPOINTMENT LENGTH, RESOURCE BIO OR RELATED INFORMATION, LOCATION, and DISPLAY EMAIL ADDRESS settings in Staff and Resource Management.
MEET ONLINE? If a staff or resource is available for eTutoring or online meetings (as defined by the MODALITY setting in Staff or Resource Management) then the appointment form will display a section that allows the client to select the type of appointment that they want. The language used in this area can be configured via the "Language Options" section of Global System Settings.
APPOINTMENT FORM QUESTIONS: The next section of the appointment form asks the questions that have been configured in Form Setup: Appointments. While clients cannot submit the appointment form without completing required questions, administrators do not have to answer required questions (unless an administrative-only required question has been added in Form Setup: Appointments).
APPOINTMENT FOCUS: If SELECT BY FOCUS is set to REQUIRED in Schedule Management, then the next section of the appointment form will ask clients to select the focus for their appointment. If this is a group appointment slot with other existing appointments, then this field will display the focus selected by the first client who made an appointment in the slot (since all appointments in a group time slot where the focus is required must share the same focus).
FILE ATTACHMENTS: If ENABLE FILE ATTACHMENTS is set to YES in Schedule Management, then the next section of the appointment form will allow clients to upload three files to their appointment. (Additional files can be added when editing the existing appointment, but files can only be added three at a time.) When uploading a file, the client will select a file and optionally give the file a title. The types of files allowed is set via the ALLOWED FILE TYPES FOR UPLOADS option in Global System Settings.
ADMINISTRATIVE OPTIONS: ADMIN ONLY: Near the bottom of the form, administrators are offered options for marking the appointment as a walk-in/drop-in, as a missed (or no-show) appointment, or as a placeholder appointment. The next section of this manual provides extensive information about these specialized appointment types. The NOTIFY CLIENT checkbox determines whether or not appointment confirmation email are sent to the client once the form is saved. Appointment confirmation emails are configured in the SCHEDULE-RELATED EMAILS section of Schedule Management.
Clients and administrators can also edit existing appointments by selecting the appointment and then selecting the "EDIT" button. Once finished editing an appointment, clients select the "Save Changes" button to save those changes. Note that, while administrators can edit any appointment at any time, clients cannot edit appointments that occurred on past days, that are with administrative-only resources, or that are on administrative-only schedules (as set in Staff and Resource Management and Schedule Management). A client's ability to edit can be further restricted by using the RESTRICT APPT. CHANGES? setting in Schedule Management.
Editing an appointment presents nearly the same form and options as the "add a new appointment" form, except that the fields on the form are populated with the information that was added when adding the form. Other differences while editing a form are:
CLIENT NAME: ADMIN ONLY: While a client can only see their own appointments, an administrator can open and edit any appointment. As such, administrators will see the client's name at the top of the form. Selecting that name will show the administrator the client's entire registration profile.
MOVE APPOINTMENT: ADMIN ONLY: In addition to the ability to mark an appointment as a walk-in, missed appointment, or as a placeholder, administrators also have the option to move an appointment to another day and/or staff or resource. To do so, an administrator simply adjusts the information presented at the top of the appointment form. As long as that resource and date is available, the appointment will be moved once the changes are saved. (If you offer a combination of face-to-face, online, and eTutoring appointments, moved appointments remain their original type. This means, for example, a student who expects to meet online can still click on a link to an online meeting, even if their appointment is moved to a face-to-face and/or eTutoring staff or resource.)

REPEATING APPOINTMENT MODIFICATIONS: ADMIN ONLY: If the appointment was made as a repeating appointment by an administrator, then administrators will see an option within "Administrative Options" that allows the administrator to apply the changes to all linked future or to all linked past and future appointments. A linked appointment is an appointment that was made at the same time as the appointment begin viewed.
Viewing Existing Appointments
Clients can view any of their appointments by selecting the appointment from the Calendar Display, selecting it from the list of their appointments within Standard Display, or selecting it from their list of current appointments in the MY APPOINTMENTS option within the menu bar at the top of the page. Administrators can view any appointment at any time by selecting the appointment from the schedule display, from within the Master Listings Report, or from within the list of appointments in the Standard Display.
The "View Existing Appointment" form is divided into several sections as discussed below and in order from the top to the bottom of the form. Since the form offers additional functionality to administrators, options and sections only shown or available to administrators are labeled and highlighted as ADMIN ONLY.
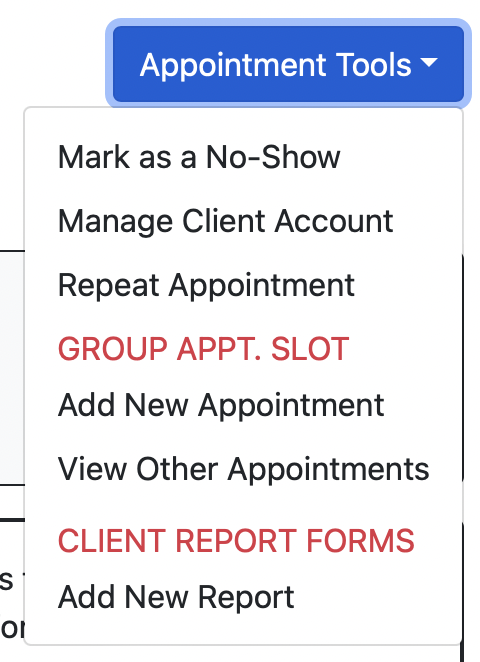 APPOINTMENT TOOLS: ADMIN ONLY: Selecting the "appointment tools" menu provides administrators with the ability to quickly mark an appointment as a no-show, manage the client's account, or enter and view post-session client report forms. If the staff or resource is set to use TENTATIVE APPOINTMENTS in Staff & Resource Management, and a client made their own appointment with this staff or resource, this menu also allows for the appointment to be confirmed. If an appointment slot is set to hold more than one appointment (as set via the GROUP APPOINTMENTS? setting in Staff and Resource Management), then the menu also provides options for adding new appointments to or for viewing other appointments within the group.
CLIENT NAME: ADMIN ONLY: Administrators are shown the name of the client at the top of the form. Selecting the name will open the client's full registration profile in a modal window. Administrators can opt to have additional information from a client's registration profile displayed directly on the form by using the DISPLAY ON APPOINTMENT? settings in Form Management: Registrations. If applicable, this section also displays labels for specialized appointment types (such as walk-in or placeholder appointments) or for a client's first visit.
APPOINTMENT INFORMATION: The next section of the form shows the appointment date and time, the staff or resource's name, and when the appointment was created and modified (if applicable).
MEET ONLINE? If the appointment is an online or eTutoring appointment, then the form will display a section that shows the appointment type, instructions, and, for online appointments, a link that opens the Online Consultation Module's session for that appointment. The language used in this area can be configured via the "Language Options" section of Global System Settings.
APPOINTMENT FORM QUESTIONS: The next section of the form displays the answers to completed appointment form questions (as set in Form Setup: Appointments). This section also displays any files that are already attached to the appointment with the file's title, the time and date that it was uploaded, and the name of the individual who uploaded or attached the file. Administrators see an additional option allowing them to email a given file to the client. Full administrators see another option that allows them to delete an attached file.
ATTACH FILE BUTTON: If ENABLE FILE ATTACHMENTS is set to YES in Schedule Management, (and if client's have the ability to edit the appointment in question), then clients and administrators will be able to select "attach file" to add a file to the appointment. If ALLOW UPLOADS AT ANY TIME is set to YES in Global System Settings, then clients will be able to add files to their appointments at any time; otherwise, they will be restricted to only adding files to appointments that they can currently modify.
EDIT AND CANCEL BUTTONS: While administrators can edit and cancel any appointment at any time, clients cannot edit or cancel appointments that occurred in the past or that are with administrative-only resources or on administrative-only schedules (as set in Staff and Resource Management and Schedule Management). A client's ability to edit can be further restricted by using the RESTRICT APPT. CHANGES? setting in Schedule Management. If a client doesn't have the ability to edit or cancel a given appointment, then they won't see the edit or cancel buttons. If the appointment is part of a chain of repeating appointments, then administrators will see options for canceling future or past and future appointments that were made at the same time as part of the same chain of repeating appointments. Administrators can also choose whether to "Send Cancelation-related Emails," meaning both the appointment email stating that the appointment was canceled, and, if applicable, waiting list notifications.
Sections in this Chapter
SECTION 1: Appointment Form Overview
SECTION 2: Specialized Appointment Types
SECTION 3: Client Report Forms