Once logged in, individuals are initially taken to the Calendar Display and always have the option to choose the Standard Display or appointment search. Like the Calendar Display, the Standard Display allows for appointments to be made and managed, and provides access to all other control panels, functions, and tools within the program.
The Non-Administrative Standard Display
When a client logs into WCONLINE, they are almost always looking for a quick way to check for and make an appointment at a time that works for them, or a quick view of their own appointments. The Standard Display offers both, and allows WCONLINE to do the work of finding appointments. Especially for clients, WCONLINE is designed to be extremely intuitive and easy-to-use. The Standard Display allows clients to quickly find, make, and manage appointments through a quick, intuitive, and text-only interface.
Clients who are using the Standard Display have the option to view the Calendar Display (via a link at the bottom of the Standard Display or by setting their preference in their profile), and can return to the Standard Display at any time using the "Appointment Search" option at the top of the Calendar Display. Regardless of which interface used, clients typically need very little instruction in order to begin making and working with their appointments.
On the Standard Display, a client sees two panels. The first provides a way to quickly find the appointment that they need based on specific criteria, where a client can select any specific options they would like or keep "Any Available" for more possible results. The second provides an overview of appointments that the client has (with appointments labeled and color-coded if they are online or eTutoring appointments), as well as a way to manage those appointments. Above the "Find an Appointment" options, a client would find messages regarding schedule limits, such as the number of appointments allowed per day, if applicable.
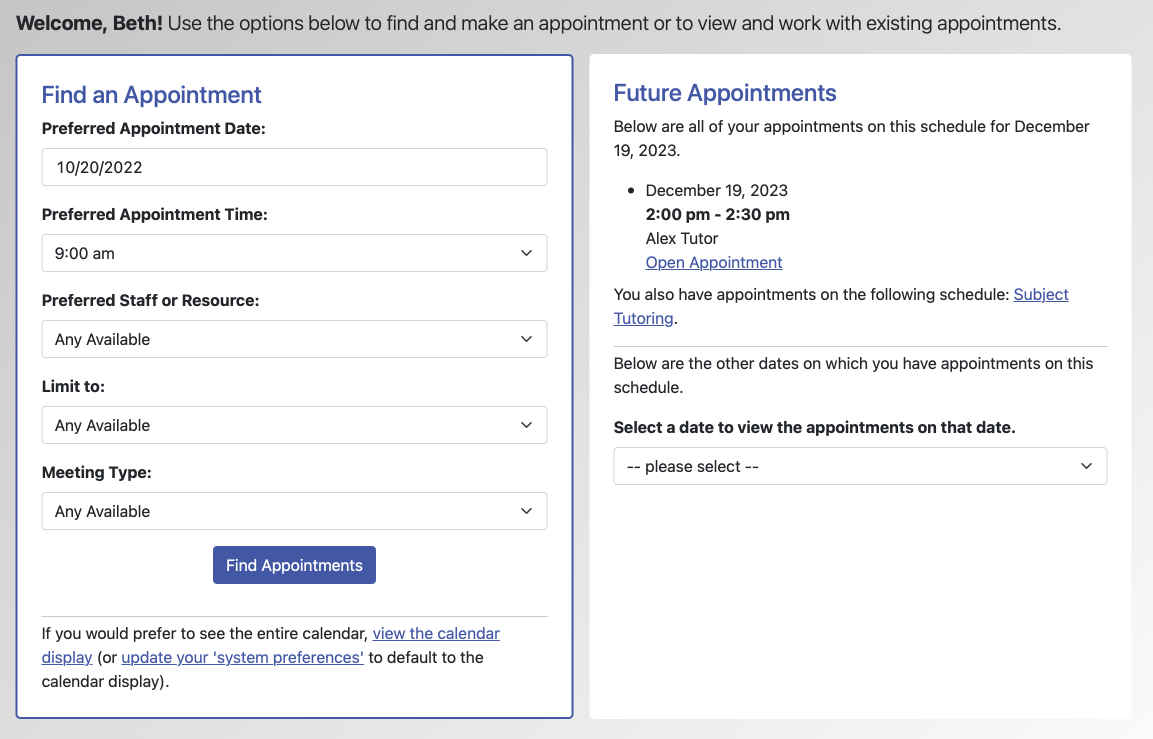
 In order to make an appointment, a client simply fills out the "find an appointment" form, selecting a preferred appointment date, time, and/or staff or resource. (If the schedule is set for SLOT SCHEDULING ONLY in Schedule Management, then the times option is not presented.) If SELECT BY FOCUS is set to YES or YES, Required in Schedule Management, then client can also select from a list of focuses. Similarly, if staff or resources are set for MODALITIES other than just face-to-face in Staff and Resource Management, then clients can also select from the available meeting modalities. Once the client selects "find appointments, the system will return a list of appointments that are exact matches or close matches to the request. Matches list the time, staff or resource, a SHORT BIO, if entered in Staff and Resource Management, and any relevant notes about the match. If there are no matches and the client would have to try too many different dates, a message explains why and suggests that the client try again or use the calendar display, where they can view a week at a time. (For example, if there are no openings at all for a week, the client will see a message instead of only being prompted to try again.)
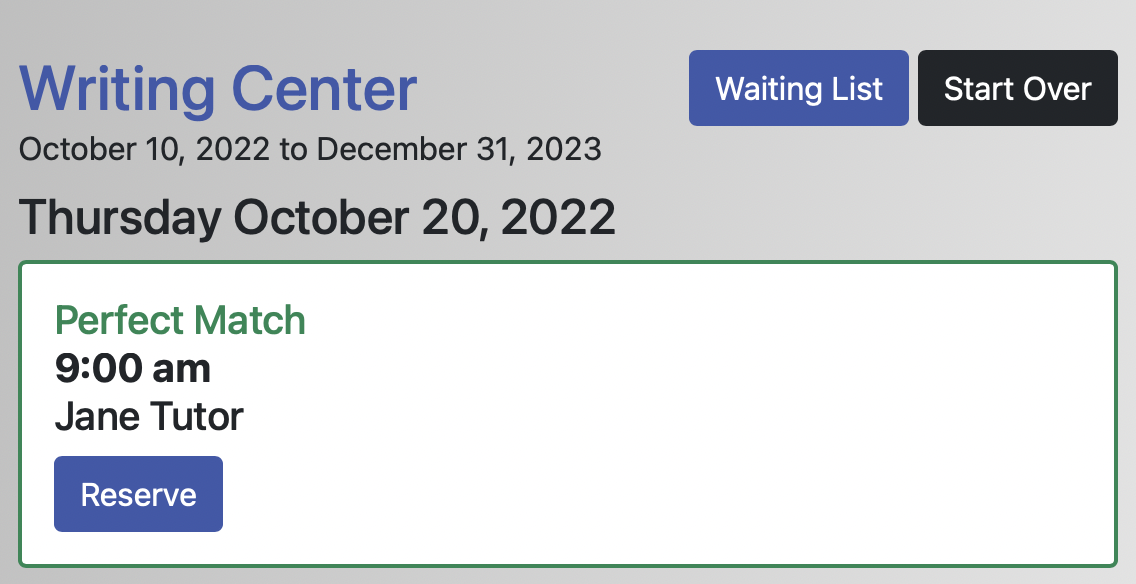
To make an appointment, the client simply selects "reserve" below the appointment that they want and then fills out the appointment form. Once complete, they'll be returned to the Standard Display's main screen and the new appointment will appear in the list of appointments. In order to access an existing appointment, the client selects the appointment from that list or selects the appointment from the My Appointments listing in the top menu. If a client has an online meeting, then the client will access that meeting by opening the appointment and following the "start or join online meeting" link. Unlike administrators, clients cannot see any information about appointments for other clients and do not see any information when hovering over an appointment on the schedule.
Staff members are typically basic administrators and, if they are, can see the appointments that clients have made with them. If they use the Standard Display, as long as they are logging in using an email address that matches the one listed under their listing as a staff or resource, they find a list of "their" appointments--here meaning appointments that clients have made with them--immediately after logging in. They have several other ways to find appointments, including using the Master Listings Report, or, as long as they are logged in using an email address that matches the one listed under their listing as a staff or resource, see appointments labeled "staff," indicating that they are the staff member for that appointment, in their My Appointments list.
Clients and administrators also have appropriate options to expand the list of appointments, including, for clients, displaying a list of their own appointments on another schedule, and, for staff, finding appointments on all schedules and on other days.
In addition, the Standard Display provides several tools that the client can use to access other program features:
WELCOME MENU: The Welcome menu is located in the top left of the schedule display--directly below the header or logo image. Selecting the welcome menu will allow the client to access the Profile & Communication Options tool and the About tool (which displays the CENTER OR SYSTEM DESCRIPTION as set in Global System Settings.
SCHEDULE SELECTION: Within the top menu bar is a drop-down list of all schedules with an AVAILABILITY of AVAILABLE TO EVERYONE in Schedule Management. If more than one schedule is available, clients can select a different schedule from the drop-down in order to be taken to that schedule.
A few other features within WCONLINE can impact the client's options in the Standard Display:
- If USE THE WAITING LIST is set to YES in Schedule Management, then clients will see a "Waiting List" prompt as a button near the top left after searching for an appointment. This allows the client to join the waiting list for that date.
- If the time clock is enabled and available to non-administrators in Module Setup: Time Clock, then clients can clock in and out by selecting a green or red "CLOCK IN" or "CLOCK OUT" prompt in the top menu.
- If administrators have added schedule-specific announcements in Announcement Management, then those announcements appear at the top of the display--directly below the navigation bar.
- If USE 'CONTACT CENTER' TOOL is set to YES in Global System Settings, then clients will see an option to "contact center" within the top menu. When clicked, clients will be presented with a form that enables them to easily send an email to the center.
- If LANDING PAGE ONLY is set to YES in Schedule Management, even with no staff or resources on the schedule, no "This schedule doesn't have any available staff or resources..." message will be displayed. And, if you have an announcement on the schedule, WCONLINE will always display your announcement, even on a mobile device.
The Administrative Standard Display
 In addition to having access to all schedules with an AVAILABILITY other than HIDDEN/ARCHIVED (as set in Schedule Management), administrators have access to every appointment on a given schedule. By selecting an appointment, an administrator can view or manage an appointment or add or view client report forms entered for that appointment. Full administrators have access to all administrative control panels in the Welcome menu, while basic administrators have access to a limited number of control panels (as set in Global System Settings). Administrators are also shown colors to represent online, eTutoring, placeholder, walk-in, and checked-in appointments (as also set in Global System Settings).
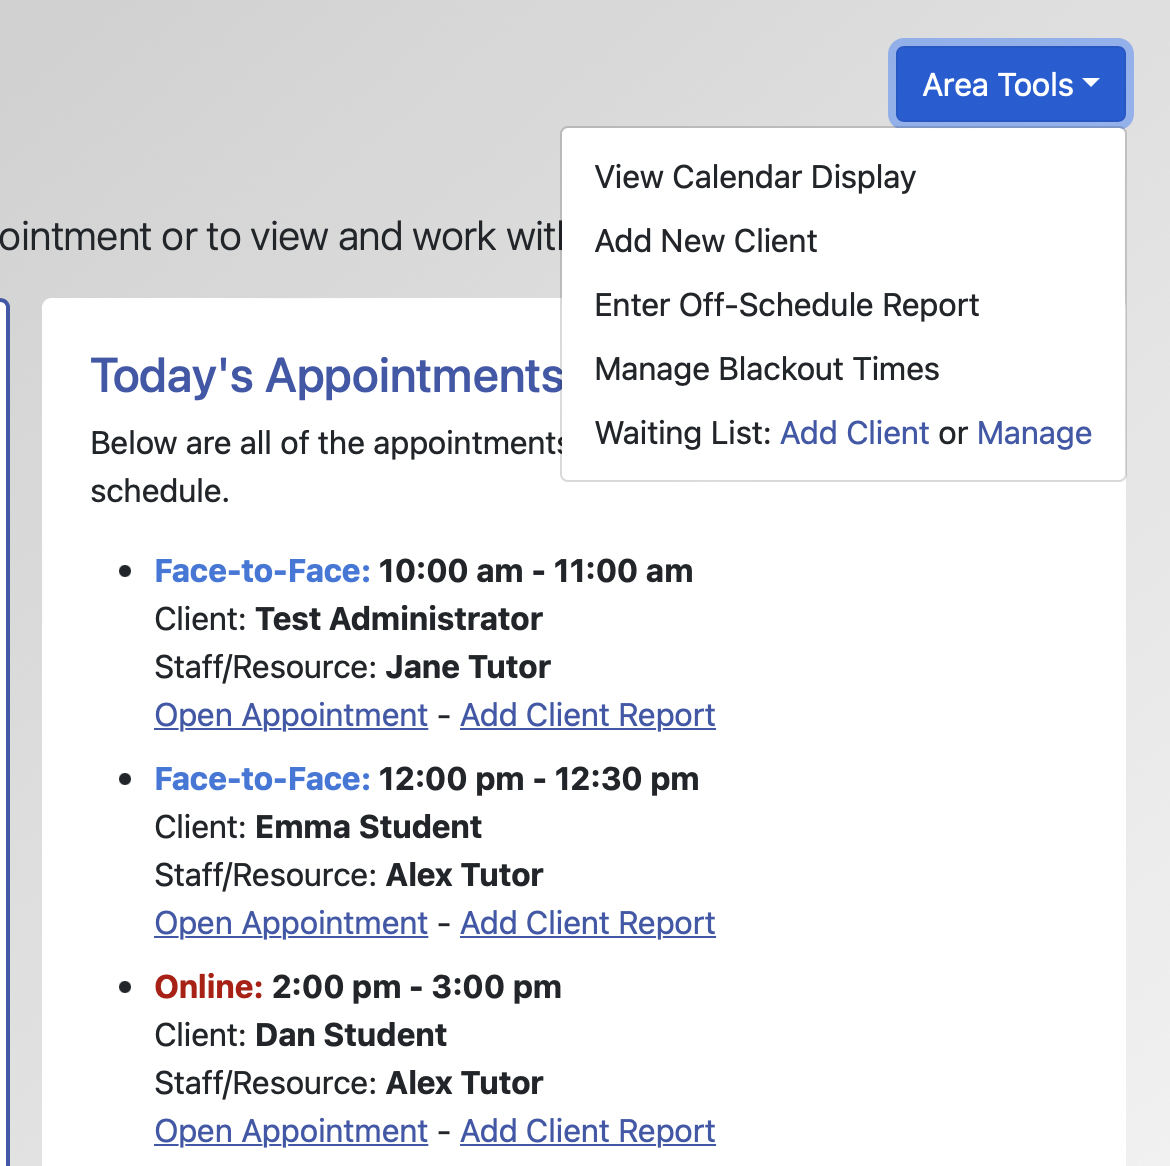
From the standard display, administrators also have administrative access to the tools clients also have access to, such as the waiting list, administrative-only announcements, and time clock. In addition, the standard display provides several tools that administrators can use directly from the display's "Area Tools" menu:
VIEW CALENDAR DISPLAY: Selecting this option takes the administrator to the Calendar Display.
ADD CLIENT TOOL: By selecting this option, an administrator can add a new client to the system by filling out the registration form for a new client.
ENTER OFF-SCHEDULE REPORT: If a staff member meets with a client outside of the hours displayed on the schedule, then the staff member can select this option to add an off-schedule client report form to record what happened during that meeting.
MANAGE BLACKOUT TIMES: By selecting this option, an administrator can access the Blackout Times Management control panel with the tool preset to the schedule and dates being viewed.
WAITING LIST: ADD CLIENT OR MANAGE: If USE THE WAITING LIST is set to YES in Schedule Management, then this option lets an administrator add a client to the waiting list or manage the clients already on the list.
LIST OF ORPHAN APPOINTMENTS: If you have enabled the display of orphan appointments using the Client Report Form Options, basic administrators who are logged in using an email address that matches their listing as a staff or resource will see, at the top of the standard display, a list of their own past appointments that are missing client report forms. If you've relabeled "Orphan" in the "Language Options" section of Global System Settings, then the title of this list of appointments will appear in your chosen term.
BASIC ADMINISTRATORS' LIST OF APPOINTMENTS: Basic administrators who are logged in with an email address that matches a listing in Staff & Resource Management find a list of appointments that are with them and a quick link to "Add Client Report," so they do not have to view appointments on the Calendar Display or run the Master Listings Report to add client report forms or find a list of appointments.
A Note on Accessibility
While all of WCONLINE is accessible and compliant with accessibility programs such as screen readers, the Standard Display, offered to clients and basic administrators by default and as the most efficient method of making and managing appointments, is truly text-only--making it often a better option for use with such devices and programs. Additionally, while the Calendar Display can be easily used on mobile devices, the Standard Display lends itself to use on smaller devices (such as mobile phones).
We also constantly update all aspects of WCONLINE—including the Standard Display—based on accessibility audits and changes in accessibility-related programming recommendations and technologies. We also maintain a Voluntary Product Accessibility Template for WCONLINE that can be downloaded at any time from http://26llc.com/doc_vpat.pdf.
A Note for Full Administrators
Rarely, a center sets staff and resources so that the appointment lengths clients are required to use are not possible to choose within the schedule's increments. For example, if a staff or resource requires 10-minute to 20-minute appointments, and the schedule has one-hour increments, a student would not be able to make an appointment. If this is the case, WCONLINE displays information for full administrators only, describing where to adjust appointment lengths. The Standard Display would not offer the staff or resource to students, or to basic administrators if not allowed to override appointment lengths, until appointment lengths are adjusted.
Sections in this Chapter
SECTION 1: The Calendar Display
SECTION 2: The Standard Display
SECTION 3: Card Reader Support