Once logged in, individuals are initially taken to the Calendar Display. Like the Standard Display, the Calendar Display allows for appointments to be made and managed, and provides access to all other control panels, functions, and tools within the program.
The Non-Administrative Calendar Display
Especially for clients, WCONLINE is designed to be extremely intuitive and easy-to-use. Clients are initially taken to the Standard Display, which allows clients to quickly find and make appointments. Clients and administrators can navigate between the calendar and standard displays by making a selection at the top of the schedule (or as part of the search results on the standard display). Regardless of which interface used, clients typically need very little instruction in order to begin making and working with their appointments.
On the Calendar Display, a client, by default, only sees four colors colors on the schedule--dark blue for blackouts or unavailable time, lighter blue for other appointments, yellow for the client's own appointments, and white for open and available times. (Note that these colors can be changed in the "Appointment, Unavailable Time, and System Colors" section of Global System Settings, and colors can be further customized using Form Setup: Appointments.) Times for past days are automatically grayed out to visually indicate that the days have passed and to prevent clients from making appointments for past times.
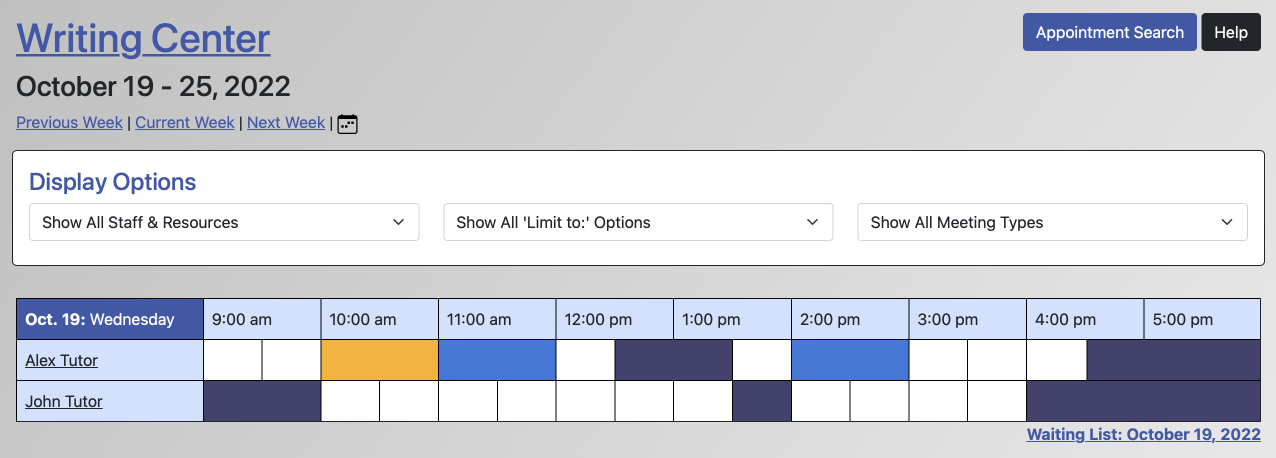
The schedule is designed to be like most calendars with the date positioned in the upper left, the names of available staff and resources down the first column, and with the times displayed across the first row. (If the schedule is set for SLOT SCHEDULING ONLY in Schedule Management, then the times will be replaced with slot numbers.) The display of staff and resources is typically in alphabetical order (although that can be randomized via the DISPLAY STAFF/RESOURCES... setting in Schedule Management). Additionally, the types of meetings available with each staff member, the availability of group appointments, a short bio, and other limits (based on settings in Staff and Resource Management) is displayed when hovering over a staff or resource's name.
In order to make an appointment, a client simply selects a white slot representing an open time and then fills out and saves the appointment form. Once saved, the appointment will appear in yellow on the schedule display. Similarly, in order to access an existing appointment, the client selects the appointment on the schedule or selects the appointment from the My Appointments listing in the top menu. If a client has an online meeting, then the client will access that meeting by opening the appointment and following the "start or join online meeting" link. Unlike administrators, clients cannot see any information about appointments for other clients and do not see any information when hovering over an appointment on the schedule.
Note that staff members are typically basic administrators and therefore have several ways to find appointments that clients have made with them. They can look over the schedule to see filled blocks of time by their name, use the Master Listings Report, or, as long as they are logged in using an email address that matches the one listed under their listing as a staff or resource, see appointments labeled "staff," indicating that they are the staff member for that appointment, in their "My Appointments list.
In addition, the schedule view provides several tools that the client can use to navigate the schedule or access other program features:
WELCOME MENU: The Welcome menu is located in the top left of the schedule display--directly below the header or logo image. Selecting the welcome menu will allow the client to access the Profile & Communication Options tool and the About tool (which displays the CENTER OR SYSTEM DESCRIPTION as set in Global System Settings.
DATE RANGE: Directly below the schedule's name are the dates that the current schedule view is showing. While defaulting to one week with the current day on top, this range can be impacted by both the DISPLAY A DAY OR A WEEK and LIMIT DAYS SHOWN settings in Schedule Management.
SCHEDULE SELECTION: Within the top menu bar is a drop-down list of all schedules with an AVAILABILITY of AVAILABLE TO EVERYONE in Schedule Management. If more than one schedule is available, clients can select a different schedule from the drop-down in order to be taken to that schedule.
SCHEDULE NAVIGATION TOOLS: Beneath the date range are options for navigating the schedule. By selecting "previous," "current," or "next," a client can move forward or backwards within the schedule (up until the schedule's starting and ending dates as set in Schedule Management). And, by selecting the calendar icon, a client can navigate to a specific date by selecting the date from an on-screen calendar.
APPOINTMENT SEARCH: To the right of the schedule's name, clients will find an "appointment search" button that, when selected, takes them to the Standard Display.
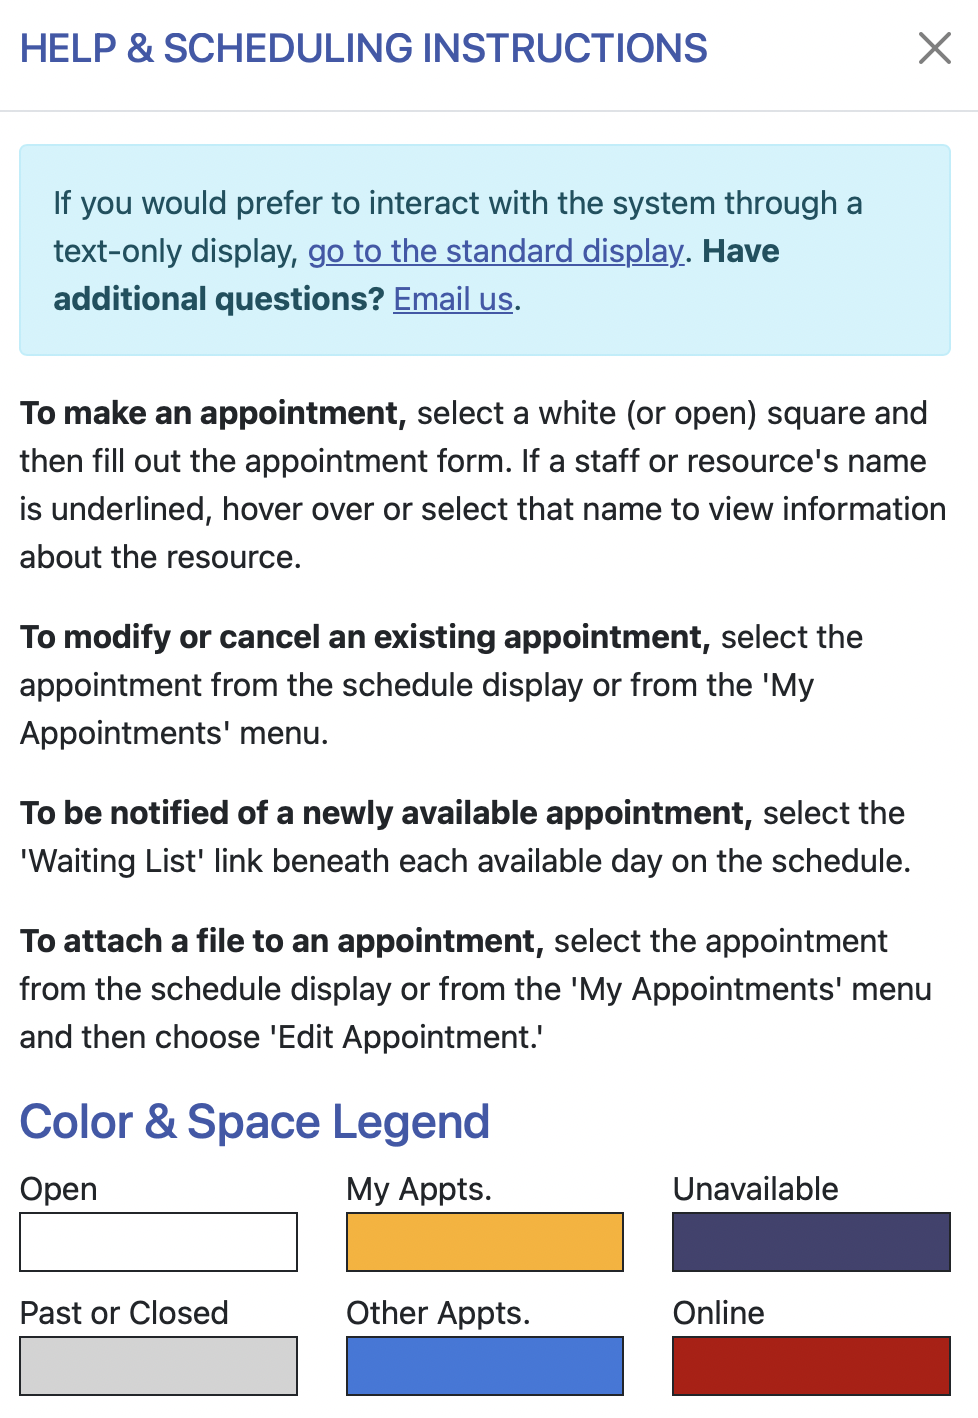 HELP: To the right of the "appointment search" button is the help instructional legend. By selecting the prompt, clients will see brief instructions for working with appointments, understanding the colors displayed on the schedule, and, depending on the features activated within WCONLINE, interacting with other available features (as discussed below).
DISPLAY OPTIONS: Directly above the calendar grid are choices that enable a client to narrow the schedule by staff or resource, focus, and/or modality. The focus prompt only appears if SELECT BY FOCUS is set to YES or YES, Required in Schedule Management. Similarly, the modality prompt only appears if one or more staff or resources is set for MODALITIES other than just face-to-face in Staff and Resource Management.
Several other features within WCONLINE can impact the client's view of the schedule:
- If INSTITUTION'S TIME ZONE is set in Global System Settings, then times on the current day that have already passed locally will be grayed out. Unlike administrators, clients cannot click on slots that appear in gray on the schedule. (Other settings in Staff and Resource Management that make a resource unavailable to clients, such as the AVAILABILITY setting, would also cause the resource's time slots to appear in gray to the student.)
- If USE THE WAITING LIST is set to YES in Schedule Management, then clients will see a "Waiting List" prompt beneath each current or future date on the schedule. This allows the client to join the waiting list for that date.
- If the time clock is enabled and available to non-administrators in Module Setup: Time Clock, then clients can clock in and out by selecting a green or red "CLOCK IN" or "CLOCK OUT" prompt in the top menu.
- If administrators have added schedule-specific announcements in Announcement Management, then those announcements appear at the top of the schedule display--directly above the first displayed date on the schedule.
- If USE 'CONTACT CENTER' TOOL is set to YES in Global System Settings, then clients will see an option to "contact center" within the top menu. When clicked, clients will be presented with a form that enables them to easily send an email to the center.
- If LANDING PAGE ONLY is set to YES in Schedule Management, even with no staff or resources on the schedule, no "This schedule doesn't have any available staff or resources..." message will be displayed. And, if you have an announcement on the schedule, WCONLINE will always display your announcement, even on a mobile device.
The Administrative Schedule Display
In addition to having access to all schedules with an AVAILABILITY other than HIDDEN/ARCHIVED (as set in Schedule Management), administrators have access to every appointment on a given schedule. By hovering over an appointment, administrators are shown information about the appointment in the slot and, by selecting an appointment, an administrator can view or manage an appointment or add or view client report forms entered for that appointment. Full administrators have access to all administrative control panels in the Welcome menu, while basic administrators have access to a limited number of control panels (as set in Global System Settings). Administrators are also shown colors to represent online, eTutoring, placeholder, walk-in, and checked-in appointments (as also set in Global System Settings).
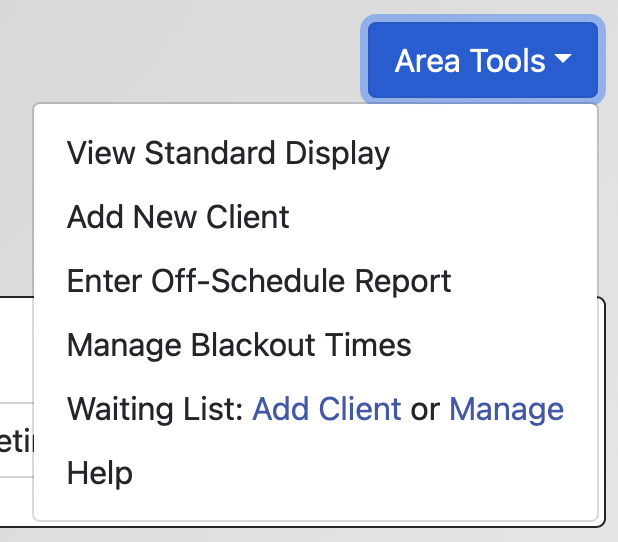 From the schedule view, administrators also have administrative access to the tools clients also have access to, such as the waiting list, administrative-only announcements, and time clock. In addition, the schedule view provides several tools that administrators can use directly from the display's "Area Tools" menu:
VIEW STANDARD DISPLAY: Selecting this option takes the administrator to the Standard Display.
ADD CLIENT TOOL: By selecting this option, an administrator can add a new client to the system by filling out the registration form for a new client.
ENTER OFF-SCHEDULE REPORT: If a staff member meets with a client outside of the hours displayed on the schedule, then the staff member can select this option to add an off-schedule client report form to record what happened during that meeting.
MANAGE BLACKOUT TIMES: By selecting this option, an administrator can access the Blackout Times Management control panel with the tool preset to the schedule and dates being viewed.
WAITING LIST: ADD CLIENT OR MANAGE: If USE THE WAITING LIST is set to YES in Schedule Management, then this option lets an administrator add a client to the waiting list or manage the clients already on the list.
PENCIL ICON: Full administrators (and, optionally, basic administrators if given access using the PENCIL ICON ACCESS setting in the "Access Control" section of Global System Settings) can select the pencil icon that appears next to a staff or resource's name on the schedule in order to change the name of that staff or resource for the selected day on the schedule. This function is typically used, for example, to quickly make note of a tutor who is temporarily covering a sick colleague's shift and has no effect on your data or statistics. For permanent changes to the schedule, use Blackout Times Management.
LIST OF ORPHAN APPOINTMENTS: If you have enabled the display of orphan appointments using the Client Report Form Options, basic administrators who are logged in using an email address that matches their listing as a staff or resource will see, at the top of the calendar display, a list of their own past appointments that are missing client report forms. If you've relabeled "Orphan" in the "Language Options" section of Global System Settings, then the title of this list of appointments will appear in your chosen term.
A Note for Full Administrators
Rarely, a center sets staff and resources so that the appointment lengths clients are required to use are not possible to choose within the schedule's increments. For example, if a staff or resource requires 10-minute to 20-minute appointments, and the schedule has one-hour increments, a student would not be able to make an appointment. If this is the case, WCONLINE displays information for full administrators only, describing where to adjust appointment lengths. The Calendar Display grays out those staff and resources for clients, and for basic administrators if not allowed to override appointment lengths, until appointment lengths are adjusted.
Sections in this Chapter
SECTION 1: The Calendar Display
SECTION 2: The Standard Display
SECTION 3: Card Reader Support