In Staff and Resource Management (which you'll find under the "Schedule & Staff Management" in the Welcome menu), selecting ADD NEW STAFF OR RESOURCE from the "Area Tools" menu will take you to the "Add a New Staff or Resource" form where you can add a new staff or resource on to a currently-available schedule. Similarly, selecting EDIT STAFF OR RESOURCE from the "Options" menu to the right of a resource's name in the overview will take you to the "Edit" form where you can edit the settings associated with an existing staff or resource. Both forms are identical with the exception that the "edit" form shows the existing settings for the staff or resource.
The resulting form is broken up into three sections--Introductory Settings, Staff & Resource Options, and Email-Specific Options. Hover over the question mark icons within the control panel for more information about each configuration option.
Introductory Settings
These are the settings that appear at the top of the form when editing or adding a staff or resource. They control the name, availability, appointment length, and other general settings of each resource.
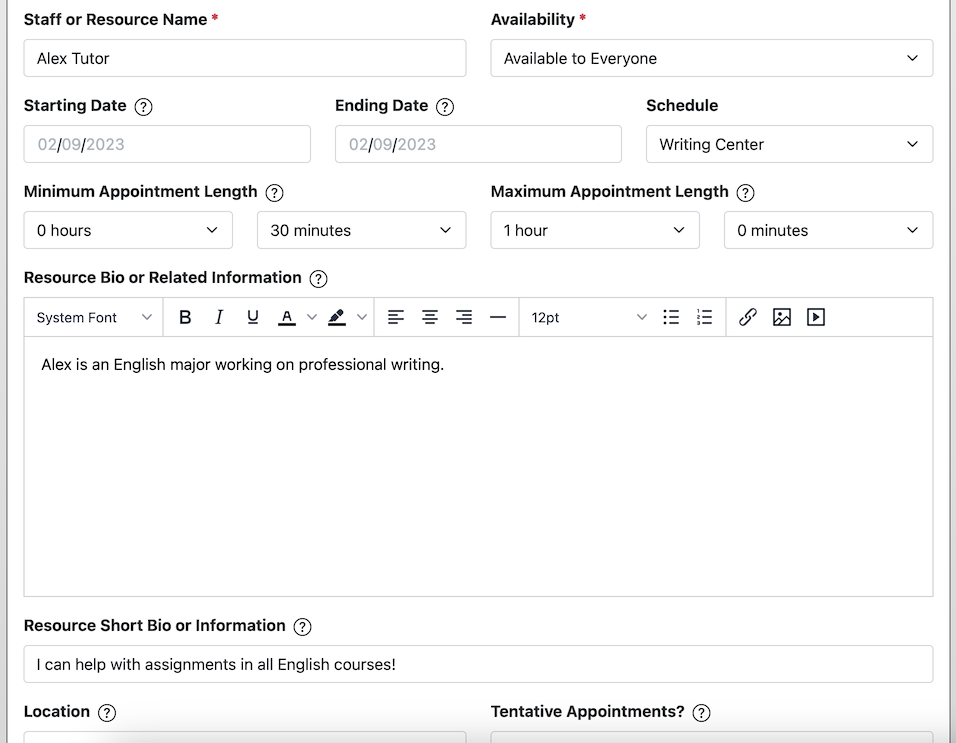
STAFF OR RESOURCE NAME: This is the name of the staff or resource as displayed on the schedule, appointment form, and within the various reports. You can name a staff or resource in whatever way makes the most sense for you. Some centers list staff first names only, while others list full names or only a portion of the first and last name. The name can also be something like "Lab Seat 1," "Room 312," or "On-Call or Drop-In Staff." If you feel that clients would benefit from seeing some piece of information before opening the appointment form, you could include that in the name (such as "Betsy Tutor (Room 100)") to have that displayed within the name display on the schedule. This field is required.
AVAILABILITY: By default, a staff or resource is AVAILABLE TO EVERYONE, which means that anyone can make an appointment with the resource. If this option is set to AVAILABLE TO ADMINISTRATORS ONLY, then only administrators will be able to make an appointment with the resource. Note that the HIDE ADMIN STAFF FROM CLIENTS setting in Global System Settings and a client's permissions as set in Client and Record Management impact a non-administrator's ability to see and/or make appointments with resources.
STARTING DATE and ENDING DATE: These dates are only needed if a resource is starting or ending mid-schedule (such as if a staff member resigns or is hired mid-semester). If entered, a resource will not be displayed before or after these dates. If left blank, a resource will always be available between the schedule's STARTING DATE and ENDING DATE (as set in Schedule Management).
SCHEDULE: This determines on which schedule the staff or resource will appear. We strongly recommend against moving resources from one schedule to another, as doing so will also move all of the appointments from the old to the new schedule. If setting up for a new scheduling period, consider our recommendations before moving a resource.
MINIMUM APPOINTMENT LENGTH: This sets the shortest appointment that a client will have to make in order to save their appointment. If you want to require that all appointments be the same length, set the minimum and maximum to the same value. While the ability to override appointment length settings is typically for only full administrators, basic administrators can be given that access using the MIN/MAX APPOINTMENT LENGTHS setting at the bottom of Global System Settings.
MAXIMUM APPOINTMENT LENGTH: This sets the longest appointment that a client will have to make in order to save their appointment. If you want to require that all appointments be the same length, set the minimum and maximum to the same value. While the ability to override appointment length settings is typically for only full administrators, basic administrators can be given that access using the MIN/MAX APPOINTMENT LENGTHS setting at the bottom of Global System Settings.
RESOURCE BIO OR RELATED INFORMATION: The formatted text that you enter here appears at the top of the appointment form for all appointments with this staff or resource. This is typically used to provide information about the staff or resource, to reiterate center policies, or to provide links to resource-specific resources. The formatting tools allow you to make your text bold, italic, or in a variety of colors, positions, and formats. You can also use the image icon to add an image to this information (such as a staff member's headshot).
RESOURCE SHORT BIO OR RELATED INFORMATION: The text that you enter here appears below the staff or resource's name in the Standard Display's appointment results and when a client hovers over the resource's name on the Calendar Display. This field is limited to 250 characters.
LOCATION: If entered, WCONLINE will display a "location" label at the top of the appointment form with this information. This is useful if staff or resources work in different spaces, but most likely unnecessary if all staff and resources work out of the same central space. If this staff or resource is available at a specific web address or URL, enter only that URL here (such as 'http://zoom.us/p/edu/tutor1_sharedroom'). The URL will then become clickable on the appointment form automatically.
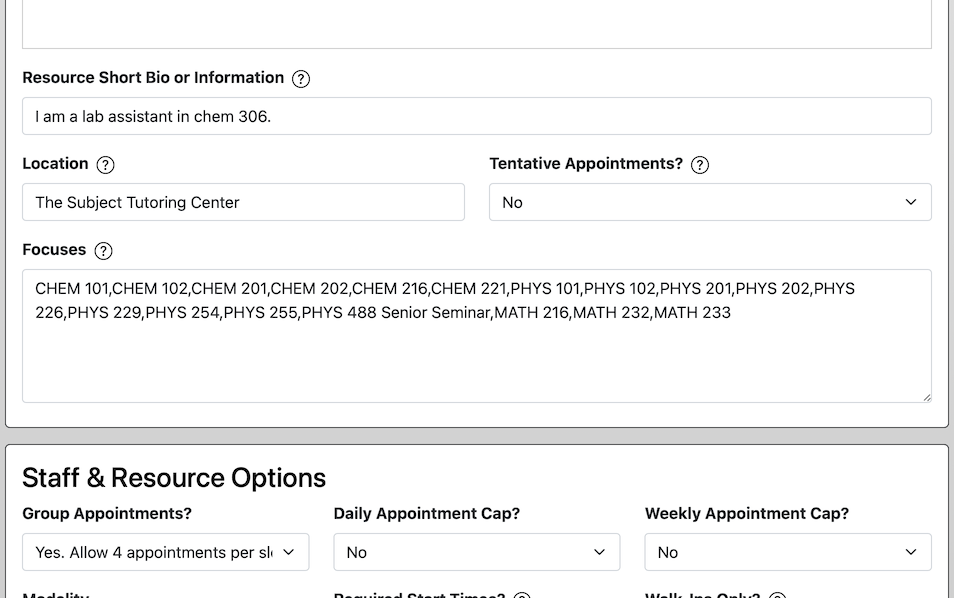
FOCUSES: If enabled (via the SELECT BY FOCUS? option in Schedule Management), WCONLINE displays a focus drop-down menu at the top of the schedule. This allows clients to select a focus and see only resources who share that focus. For example, if three of your resources list a focus of "English 101" in this field, only those three resources will appear if "English 101" is selected from the drop-down at the top of the schedule.
This field lets you define the focuses for which this staff or resource is available. Focuses should be entered as a comma separated list and can contain only letters, numbers, spaces, and hyphens. Finally, note that you can change the focus selection prompt as displayed on the schedule using "Language Options" available within the "Area Tools" of Global System Settings.
TENTATIVE APPOINTMENTS? By default, as soon as a client successfully saves an appointment, the appointment is definite: it is on your schedule, the client receives an appointment confirmation email, and the appointment counts as an appoinment throughout your data. If your center requires that students make tentative appointments, so that appointments are confirmed with clients only once they are confirmed by staff, choose YES.
With YES selected for a given staff or resource, when a client makes their own appointment, the success message states that the appointment is tentative, the appointment is labeled as "tentative" for administrators, and the client is not yet sent an appointment email. If the staff or resource is set to receive appointment emails, the email is sent to the staff or resource. And, the appointment is counted as a placeholder until it is confirmed.
An administrator can open the appointment and select "confirm appointment" from the "Appointment Tools" menu to instantly change the appointment from tentative to a confirmed appointment, send the appointment "modified" email to the client, and have the appointment counted as a regular or non-placeholder appointment. Note that appointments made by administrators are automatically considered "confirmed."
Sections in this Chapter
SECTION 1: Staff and Resource Overview
SECTION 2: Add or Edit: Introductory Settings
SECTION 3: Add or Edit: Staff & Resource Options
SECTION 4: Add or Edit: Email-Specific Options
SECTION 5: Duplicate Staff or Resources
SECTION 6: Administrative Access Management
SECTION 7: FAQ (Administrative Access, Notifications, and More)