In Schedule Management (which you'll find under the "Schedule & Staff Management" section of the Welcome menu), selecting ADD A NEW SCHEDULE from the "Area Tools" menu will take you to the "Add a New Schedule" form where you can add a new schedule. Similarly, selecting EDIT SCHEDULE from the options menu to the right of a schedule's name in the overview will take you to the "Edit" form where you can edit the settings associated with an existing schedule. Both forms are identical with the exception that the "edit" form shows the existing settings for the schedule.
The resulting form is broken up into five sections--Introductory Settings, Schedule Options, Client Scheduling Limits, Schedule-Related Emails, and A/B Repeating Schedule Setup. Hover over the question mark icons within the control panel for more information about each configuration option. Note, too, that some of the settings apply to how the schedule is viewed on the Calendar Display versus on the Standard Display.
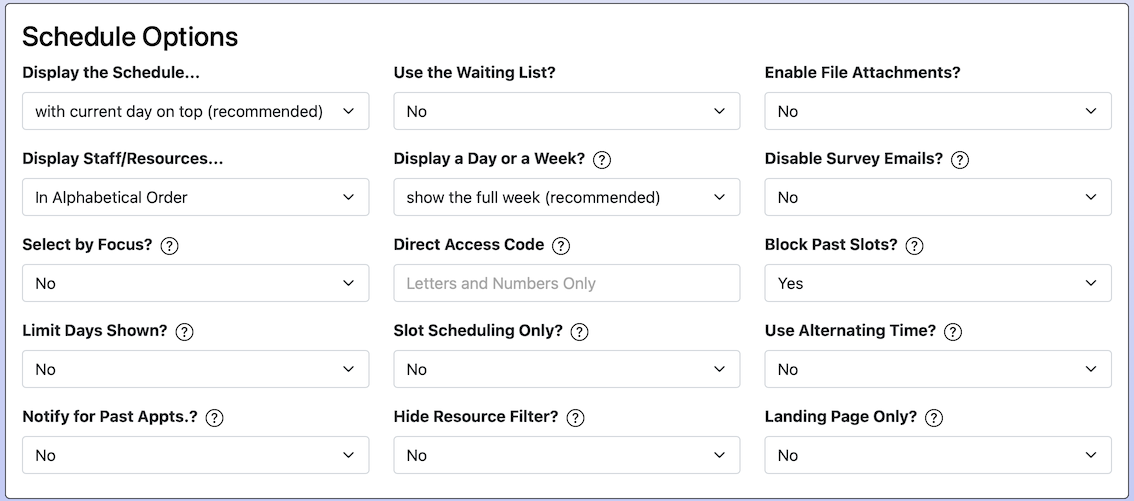
Schedule Options
These are the settings that appear in the second area when editing or adding a schedule. They control schedule-wide tools (such as the waiting list and file attachments) and the appearance of and access to the schedule.
DISPLAY THE SCHEDULE...: This setting determines how WCONLINE displays the schedule. We strongly recommend setting this to WITH CURRENT DAY ON TOP. That setting makes WCONLINE much easier for clients to use as the current day (or today) is always at the top of the schedule. If you would rather that the schedule display with Monday on top, set this to WITH MONDAY ON TOP. Keep in mind that, if set that way, clients will have to scroll through several past and unavailable days before finding availabile openings.
USE THE WAITING LIST: If you set this option to YES, WCONLINE will add a link below each day on the Calendar Display and an option in the Standard Display's Appointment Search that allows a client to join the waiting list for that day. If a client wants to be notified when an appointment is canceled, they can select that link and fill out the resulting form to join the waiting list. Optionally, clients can elect to be notified of openings only with a specific staff or resource, between specific times, or, if SELECT BY FOCUS is enabled below, by focus. Administrators can use the "Area Tools" at the top of the Calendar or Standard Display (or can use the Master Listings Report) to manage the waiting list.
When an appointment is canceled (and assuming that the appointment time has not passed), WCONLINE will email all clients who are on that day's waiting list. If a client wants to reserve the time slot, they can log in and, as long as someone else hasn't already reserved the slot, can make the appointment. If you've set USE MOBILE TEXT MESSAGING to YES in Global System Settings and if a client has opted in to receiving text messages, then their waiting list notification will go out via text instead of email. The content of the email and text waiting list message is set in the Schedule-Related Emails section of Schedule Management. Note that if an administrator cancels an appointment, they can choose not to send out cancelation-related emails, and the waiting list notification is one of those emails.
ENABLE FILE ATTACHMENTS: If you want clients to be able to attach files to their appointments, set this option to YES. If set to one of the YES, REQUIRED options, then clients will be unable to schedule an appointment unless they attach a file when making the appointment. Clients can upload files by filling out the "file attachments" section on the appointment form either when initially making an appointment or when editing one of their existing appointments. Once enabled, you can set a variety of file upload-specific settings in Global System Settings (such as the types of files accepted by your center and whether or not file attachments can be added at any time).
DISPLAY STAFF/RESOURCES: By default, WCONLINE displays the list of staff and resources in alphabetical order on the schedule. Occasionally, this can lead to clients making more appointments with the staff or resource that appears first alphabetically than with other staff or resources on the schedule. Setting this option to IN RANDOM ORDER will result in staff and resources being displayed in random order (and in an order that changes every time the schedule is refreshed or viewed). This prevents clients from choosing the same staff or resource simply because the staff or resource appears first alphabetically. If you would prefer that clients see the list in random order but that administrators see the list in alphabetical order, set this to ADMINS: ALPHABETICALLY; CLIENTS: RANDOMLY.
DISPLAY A DAY OR A WEEK: By default, WCONLINE's Calendar Display displays a week (or seven days) on each "page" of the schedule, and you can easily move forward and backward in seven day increments using the "PREVIOUS" and "NEXT" links at the top of the schedule. For extremely large schedules (typically with 100 or more staff and resources working every day), displaying the schedule one day at a time can make viewing the schedule and finding an appointment easier. To accomplish this, set this option to SHOW ONLY ONE DAY AT A TIME. If you choose both WITH MONDAY ON TOP under DISPLAY THE SCHEDULE... and SHOW ONLY ONE DAY AT A TIME here, WCONLINE will ignore WITH MONDAY ON TOP, because that setting would apply to only a whole-week view.
DISABLE SURVEY EMAILS? If enabled in Module Setup: Surveys, WCONLINE will automatically send survey invitations to clients who have had an appointment. If this option is set to YES, then WCONLINE will not send survey invitations for appointments made on this schedule. This is useful if you have a schedule that is used for other purposes than student conferences or consultations.
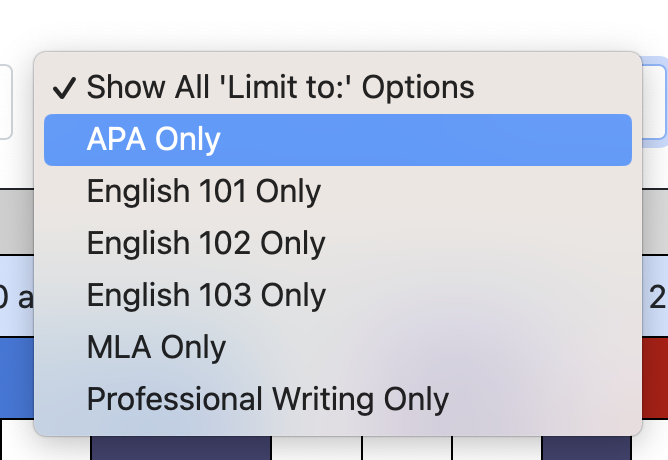 SELECT BY FOCUS: By default, clients see all staff and resources who are available on your schedule. If you would like, you can set WCONLINE to allow clients to narrow the schedule view by selecting a focus. Once enabled, clients will select from a list of focuses (or classes, or specialities) that you define that will appear at the top of the schedule. Once they select a focus, they'll see only those staff or resources who are available for that selected focus.
Enabling the focus tool requires two steps. One is to set this option to YES or REQUIRED. Either selection will cause WCONLINE to offer a list of focuses that can be used to limit or find appointments. If set to REQUIRED, non-administrators will be forced to select a focus in order to make an appointment, and those joining a group appointment will be required to select the same focus as the first member of the group. You'll also need to define the list of focuses for each of your staff and resources via the FOCUSES option in Staff and Resource Management. Finally, note that you can change the focus selection prompt as displayed on the schedule using "Language Options" available within the "Area Tools" of Global System Settings.
DIRECT ACCESS CODE: By default, clients are presented with a list of schedules on the login page and select from the appropriate schedule when they log in. If you use a single WCONLINE site for multiple centers and if you want to direct clients from your website to a specific schedule, then you can enter a "short code" here for this schedule. Once entered, create your links to this schedule as https://[WCOURL]/index.php?scode=XXXX' (with 'XXXX' replaced with the short code entered here and with [WCOURL] replaced with your full WCONLINE URL (such as demo.mywconline.com)).
If a valid short code is used in the URL, WCONLINE will only provide clients with a single schedule choice on the login page. The short code can also be used with Single Sign On to direct students to a specific schedule by adding '&scode=XXXX' to the end of the backdoor.php string. Note that short codes can contain letters and numbers only and cannot contain spaces. The schedule also has to be available to everyone. If multiple available schedules have the same short code, those schedules will all be displayed to the client on the login page.
BLOCK PAST SLOTS: If you set the INSTITUTION'S TIME ZONE in Global System Settings, WCONLINE will automatically gray out time blocks on the Calendar Display as the starting time passes locally. Regardless of this setting, the Standard Display will only return non-past times if the time zone is set. Across both displays, this prevents clients from making appointments for a time that has already passed. Since administrators can make appointments at any time, this does not impact administrators. If you would prefer that non-administrators be able to make appointments at any time (rather than for just times that haven't passed), then set this option to NO.
LIMIT DAYS SHOWN: By default, clients can see your entire schedule--from the schedule's starting day through the schedule's ending day. If you would prefer that clients only be able to see a specific number of days in the future, then set this setting to the number of days that clients should be able to see. For example, if you set this to YES. CLIENTS CAN ONLY BOOK 7 DAYS AHEAD, then clients will only be able to see today and the next six days on the schedule. Administrators will continue to be able to see the entire schedule.
SLOT SCHEDULING ONLY: If this schedule is used ONLY for asynchronous eTutoring appointments (where a student typically reserves a slot, uploads a paper, and receives written feedback) or for non-time-based scheduling (such as periods or slots), then set this option to YES. In all other cases, set this option to NO.
When set to YES, WCONLINE will replace the times displayed on the schedule with slot numbers (i.e. 'Slot 1,' Slot 2', etc.). This will let clients sign up for a slot instead of a specific time. To set the specific number of slots available, set your scheduling increments to '1 hour' and your available times to the maximum number of slots you want in a given week. For example, to have eight slots available per day, set your available times to 9am to 5pm. Then, add staff or resources in Staff and Resource Management and the number of slots that they're individually available for each day using Starting Availability Management. Finally, note that you can change the word 'slot' as displayed on the schedule to anything (such as 'period') using "Language Options" available via the "Area Tools" menu within Global System Settings.

USE ALTERNATING TIME? In almost every case (and unless you set up a schedule that looks similar to the picture below), this option should be set to NO. Typically, when creating a schedule, you'll use STARTING TIME, ENDING TIME, and SCHEDULE INCREMENTS in Schedule Management and MINIMUM and MAXIMUM APPOINTMENT LENGTH in Staff and Resource Management to define the increments displayed on your schedule and the minimum and maximum length appointments that clients can make when making an appointment. For example, if you have one hour appointments, you would most likely set your schedule increments to "one hour" and the appointment lengths both to "one hour." Or, if you have thirty minute and sixty minute appointments, you would most likely set your schedule increments to "thirty minutes," the "minimum" appointment length to "thirty minutes" and the "maximum" appointment length to "one hour."
If your schedule requires a smaller increment (such as "15 minutes") and if your staff require longer appointments (such as forty-five minute appointments), then you could use this option to ensure that the starting and ending times as displayed on the appointment form match the exact forty-five minute openings that a staff or resource is available, without any need to adjust times and regardless of where an individual clicks in an open span of time (such as clicking at 2:15pm to make a 1:45pm-2:30pm appointment). You could also use this option if you wanted to schedule 15 minute breaks, for example, between defined appointments.
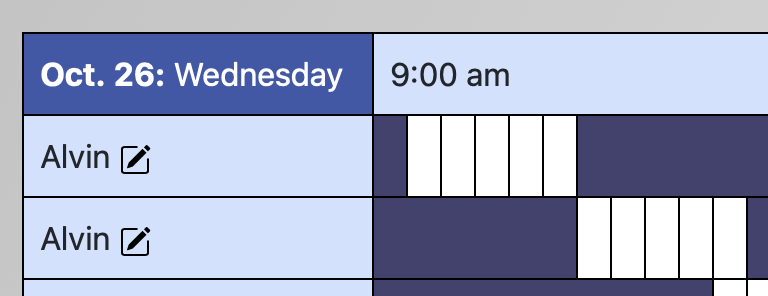 To use this option, first set your increments above. Most likely, you will be using smaller time increments, such as five to fifteen minutes, and planning to offer longer appointments, such as 25- or 45-minute appointments. Then, set this option to YES. Next, add staff or resources in Staff and Resources Management, choosing appointment lengths that allow your planned appointment length. If you want to define specific appointment slots within a larger period when a staff member is available, then you'll need to add the staff or resource twice (as in the second day displayed in the above screenshot). Finally, create the alternating time blocks or schedule the breaks between appointments when adding staff schedules in Starting Availability Management. Once done, clients can click anywhere in the specific appointment block to open an appointment form with the starting and ending times preset to match the predefined openings that you've created.
As with any type of schedule using any options, clients can initially see each increment on the Standard Display and on the Calendar Display. If a client uses the Standard Display to check for openings, they will be offered only your desired starting times. For example, if your first opening is 8:05am-8:30am, and a client uses 8:00 am under "Find an Appointment," the first appointment they are offered will be 8:05am.
NOTIFY FOR PAST APPTS.?: By default, the appointment email does not go out for appointments created in the past. For example, if an administrator adds an appointment for a client this morning (with the INSTITUTION'S TIME ZONE set in Starting Availability Management) or yesterday, the client and staff automatically do not receive the email, without a need to uncheck the NOTIFY CLIENT checkbox on the appointment form, which means you can add appointments after-the-fact or add appointments shortly after their starting time without sending out emails to clients who do not need new appointment information. If you would like to send those appointment emails--such as to notify clients that they have been added to a meeting that just started--choose YES here.
HIDE RESOURCE FILTER: By default, before clicking to search or make an appointment, clients can choose a staff or resource, so, if they know the name of the tutor or other type of staff or resource they would like to meet with, they can quickly find availability with that staff or resource. This speeds up appointment-making when clients would otherwise read through names to find a familiar tutor, for example. When a client uses the Standard Display to search for appointments with a specific staff or resource, they are offered close matches with others. If you would like to remove the option to prioritize or filter by a specific staff or resource--as might be the case if you name resources by number or letter (e.g. desk 1, desk 2, etc.) and there is no difference between them--choose YES.
LANDING PAGE ONLY: Most schedules are added to offer staff or resources and their availability. However, some centers use a schedule as a landing page--meaning an informational page that displays an announcement or only a schedule title, with no staff and resources. With this option set to YES, even with no staff or resources on the schedule, no "This schedule doesn't have any available staff or resources..." message will be displayed on the standard display or the calendar display. And, if you have an announcement on the schedule, WCONLINE will always display your announcement, even on a mobile device.
Sections in this Chapter
SECTION 1: Schedule Management Overview
SECTION 2: Add or Edit: Introductory Settings
SECTION 3: Add or Edit: Schedule Options
SECTION 4: Add or Edit: Client Scheduling Limits
SECTION 5: Add or Edit: Schedule-Related Emails
SECTION 6: Add or Edit: A/B Repeating Schedule Setup
SECTION 7: Manage Holidays and Closures
SECTION 8: Mass Modality Update
SECTION 9: FAQ (Email Delivery, Blank Schedules, Setup, and More)