 Once you open Schedule Management (which you'll find under the "Schedule & Staff Management" section of the Welcome menu), you'll see an overview of all schedules on your system. Within WCONLINE, the calendar on which staff and resources appear (and the "thing" that clients view to see your availability and to make appointments) is your schedule. Typically, a center administrator will work through the options in this control panel when creating a new schedule for a new scheduling period. As with all control panels, be sure to hover over the question mark icons within the control panel in order to find suggestions and more information about each configuration option.
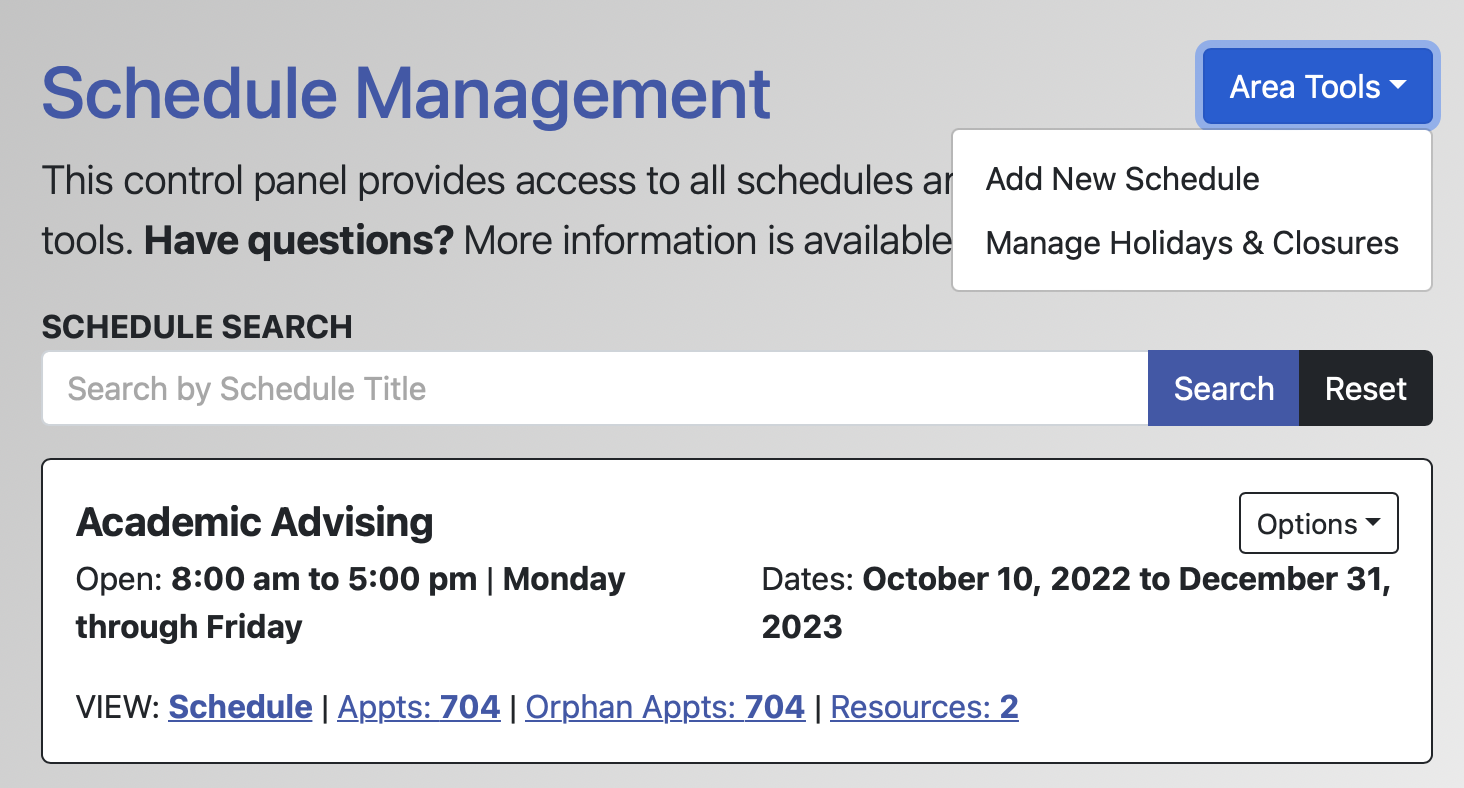
At the top of the overview is the "Area Tools" menu, which allows you to access other areas of Schedule Management:
- ADD A NEW SCHEDULE: This tool lets you create a new schedule.
- MANAGE HOLIDAYS & CLOSURES: This tool lets you set the days when your center (and schedule) is closed for holidays or expected and unexpected closures.
Also near the top of the overview is a SCHEDULE SEARCH. If you enter part of a schedule's title (as set via the SCHEDULE TITLE field when creating or editing the schedule) and select the "search" button, WCONLINE will show just the schedules whose title contains the specified search string. You can enter just a partial name, such as "Fall" to see all schedules with a title that includes "Fall" (such as "Fall 2019," "Fall 2020," and "Fall 2023"). Selecting the "reset" button will return to the standard, default overview display.
The rest of the overview is made up of individual listings for each schedule. Schedules are displayed in alphabetical order; however, schedules that have an AVAILABILITY of "Hidden/Archived" appear at the end of the list (and are shown with a red border). The display shows the schedule's name in a larger, bold font followed by schedule-specific information:

OPEN: This shows the schedule's starting and ending times as well as the days on which the schedule is open. If SLOT SCHEDULING ONLY is set to "Yes" within the schedule's options, then this will show the number of daily slots available instead of the schedule's starting and ending times.
VIEW: This shows the number of appointments, client report forms, resources, and orphan appointments (or appointments for which a client report form hasn't been entered) across the entire schedule. If you have relabeled "Orphan" in the "Language Options" section of Global System Settings, then the link will use your chosen term. Selecting one of the labels (such as "Appts: 704" within the above image) will take you to the corresponding control panel or report with the selected item displayed. If a schedule doesn't have any appointments, client report forms, or orphan appointments, then the associated VIEW option will not be displayed. Selecting the "schedule" link (that appears as the first option) will take you to the schedule display for the selected schedule.
DATES: If the schedule's STARTING DATE and/or ENDING DATE have been defined within the schedule's options, then this will show the schedule's starting and/or ending date.
OPTION MENU
To the right of the schedule's name is the "Options" menu for the schedule. That menu provides access to tools specific to that schedule:
EDIT SCHEDULE: Selecting this link will take you to the "Edit" page where you can make changes to the schedule's existing settings.
![]() MAKE DEFAULT SCHEDULE: The default schedule, designated by a blue title, blue border, and a checkmark icon, is the first schedule displayed at the top of lists of schedules. To make a new schedule the default schedule, select 'Make Default Schedule' from the menu.
MAKE DEFAULT SCHEDULE: The default schedule, designated by a blue title, blue border, and a checkmark icon, is the first schedule displayed at the top of lists of schedules. To make a new schedule the default schedule, select 'Make Default Schedule' from the menu.
You do have to have a default schedule and the default schedule cannot be deleted or have its AVAILABILITY set to "Hidden/Archived." If you're setting up a new schedule, you'll typically make that new schedule the default once you're ready for clients to begin using that schedule. If you want all of your schedules to appear in alphabetical order (rather than having the default schedule appear first), simply make the schedule that appears first alphabetically the default schedule.
DUPLICATE SCHEDULE: Typically used when creating a new schedule for a new scheduling period, this tool lets you duplicate an old schedule (so that your new schedule can use the same settings as your old schedule without you having to set up those settings manually).
Once you select "Duplicate Schedule," WCONLINE will prompt you to name your new schedule and confirm the duplication. Once confirmed, WCONLINE will create and title your new schedule while using the settings that you set in your old schedule. When duplicating a schedule, only the schedule and its associated settings are duplicated. No appointments, client report forms, or other data are included in the process.
HIDE/ARCHIVE SCHEDULE: A hidden/archived schedule is saved (so you can still run reports on its appointments) but is not displayed in your selection of schedules, and it is sorted to the end of the list here. If you edit a schedule, you will see the option to HIDE/ARCHIVE SCHEDULE under AVAILABILITY; this option is a quick link to hide/archive without clicking to edit and save.
DELETE SCHEDULE: Selecting this link, which is only available to full administrators, will cause the system to ask you to confirm that you wish to delete the specified schedule. Be sure to read the confirmation screen carefully. If you confirm, then the schedule, its resources, and all appointment data attached to the schedule will be permanently deleted.
DISPLAY OPTIONS
At the bottom of the schedule overview, you'll also find two options that define how the overview itself is displayed:
PER PAGE: By default, the system shows five schedules per page. If you would like to see ten or twenty-five schedules per page, select the applicable number and the display will automatically update.
PAGE: If you have more schedules than what can be displayed on a single page, selecting a number after this option will show you additional schedules.
Sections in this Chapter
SECTION 1: Schedule Management Overview
SECTION 2: Add or Edit: Introductory Settings
SECTION 3: Add or Edit: Schedule Options
SECTION 4: Add or Edit: Client Scheduling Limits
SECTION 5: Add or Edit: Schedule-Related Emails
SECTION 6: Add or Edit: A/B Repeating Schedule Setup
SECTION 7: Manage Holidays and Closures
SECTION 8: Mass Modality Update
SECTION 9: FAQ (Email Delivery, Blank Schedules, Setup, and More)