In Schedule Management (which you'll find under the "Schedule & Staff Management" section of the Welcome menu), selecting ADD A NEW SCHEDULE from the "Area Tools" menu will take you to the "Add a New Schedule" form where you can add a new schedule. Similarly, selecting EDIT SCHEDULE from the options menu to the right of a schedule's name in the overview will take you to the "Edit" form where you can edit the settings associated with an existing schedule. Both forms are identical with the exception that the "edit" form shows the existing settings for the schedule.
The resulting form is broken up into five sections--Introductory Settings, Schedule Options, Client Scheduling Limits, Schedule-Related Emails, and A/B Repeating Schedule Setup. Hover over the question mark icons within the control panel for more information about each configuration option.
Schedule-Related Emails
These are the settings that appear in the fourth area when editing or adding a schedule. They define the emails and text messages that the system sends when a client makes, modifies, or cancels an appointment, when a client is reminded of their appointment, and when an appointment becomes available. While the emails are sent for separate purposes, they are all composed and setup in a similar fashion, as below. To work with a specific email, select the title of that email from within this section.
EMAIL BODY: For all of the emails in this area, you can use the what-you-see-is-what-you-get editor to format your message (or you can compose the message in a word processor and then copy it into the editor, which will retain most formatting). The editor also allows you to include images in the outgoing messages. In order to help prevent messages from being caught by spam filters, we recommend including text that describes the purpose of the message (rather than only sending an image, for example).
EMAIL SUBJECT: This is the email subject as displayed in the outgoing email's "subject" field. Note that emails are turned on and off by the presence or absence of a subject. If you set the subject of a given email to be blank, then WCONLINE will not send that email (and will display "DISABLED: Enter a subject below in order to enable this email." in red at the top of the email configuration).
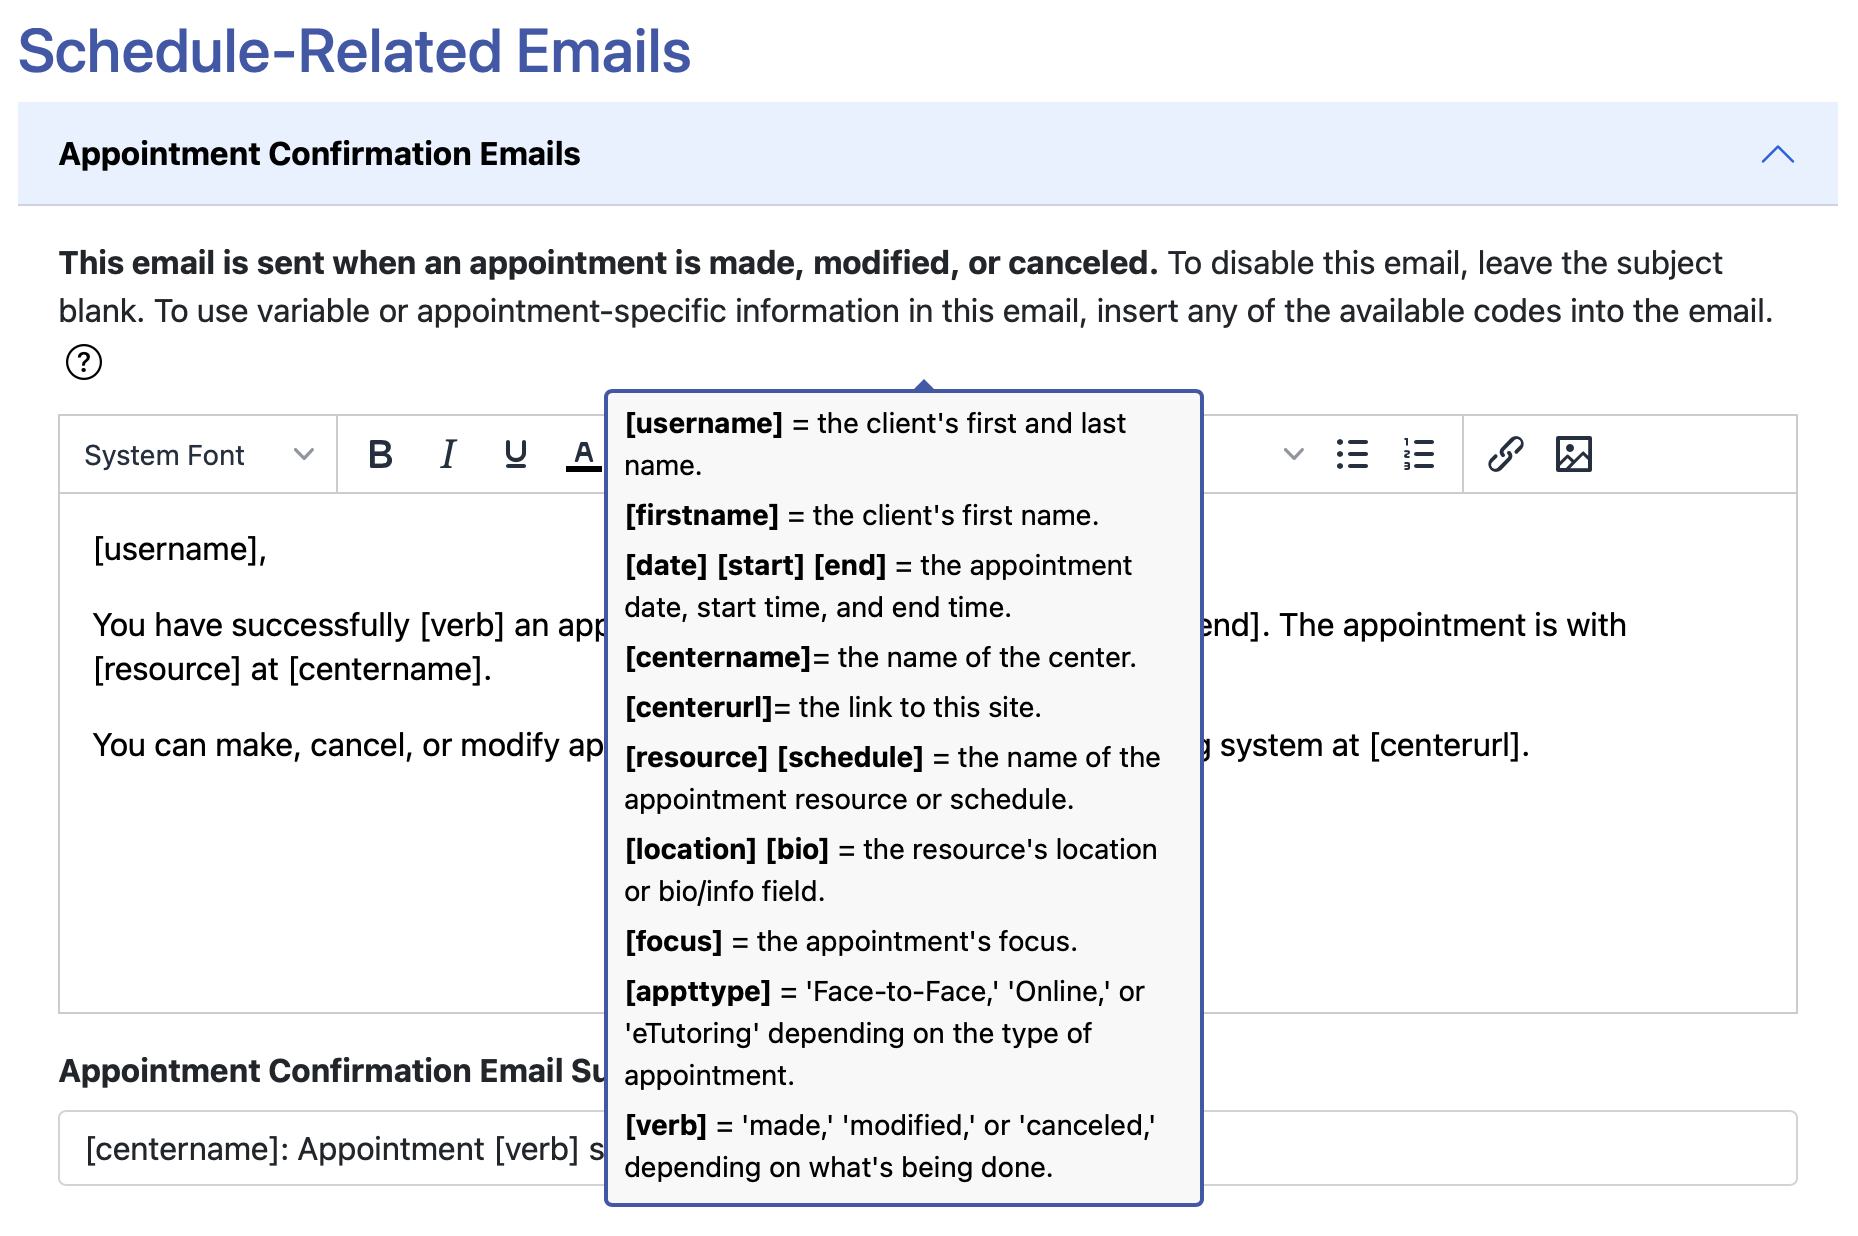
AVAILABLE CODES: As you compose the messages, make note of these as listed when hovering over the question mark icon at the top of the email that you're composing (and note that there are different codes available within different emails). These codes can be inserted into the MESSAGE BODY, MESSAGE SUBJECT, and, for messages with text options, in the TEXT MESSAGE so that variable information, such as the client's name, can be used in the email messages. To use a code, simply enter it exactly as listed below. The system will automatically replace the code with the corresponding variable information when the email is sent.
For example, assume that you have an "appointment confirmation email" with the following in the message body for your "Learning Resource Center:"
[username], you have successfully [verb] an appointment on [date] between [start] and [end]. The appointment is with [resource] in [location] at the [centername].
And assume that Jason Smith makes a 3:00-3:30pm appointment with Beth Tutor (who meets in Science 321) on April 21. Jason will receive an email that reads:
Jason Smith, you have successfully made an appointment on Friday, April 21, 2024 between 3:00pm and 3:30pm. The appointment is with Beth Tutor in Science 321 at the Learning Resource Center.
All emails configured through the Schedule-Related Emails section of Schedule Management will include information about unsubscribing from future messages:
To opt out, log in to https://[YOUR SITE'S WCONLINE URL] and then select 'Profile & Communication Options' from the welcome menu.
The replacement data for your AVAILABLE CODES are all taken from various places within your WCONLINE system:
- USERNAME, FIRSTNAME: These are taken from the client's entries on your registration form.
- DATE, START, END, FOCUS, APPTTYPE: These are taken from the client's entries on your appointment form.
- CENTERNAME: This is taken from CENTER/SYSTEM TITLE in Global System Settings.
- RESOURCE, LOCATION, BIO: These are taken from STAFF OR RESOURCE NAME, RESOURCE BIO OR RELATED INFORMATION, and LOCATION in Staff and Resource Management.
- SCHEDULE: This is taken from SCHEDULE TITLE in Schedule Management.
TEXT MESSAGE NOTICE: If you have set USE MOBILE TEXT MESSAGING? to YES in Global System Settings, then clients can opt-in to receiving text messages in lieu of emails for appointment reminder messages and for announcements of appointment availability via the waiting list. These fields allow you to define the message that is sent via text for those two instances.
Specific Email Types and Purposes
To work with each email, click anywhere in the rectangle that contains the email's name to expand the view of that email.
APPOINTMENT CONFIRMATION EMAILS: This email is sent to a client when their appointment is made, modified, or canceled. The [verb] code within the email allows WCONLINE to send the same email for all three actions by simply replacing the [verb] with the word "made," "modified," or "canceled" depending on the action being performed. The appointment "made" and "modified" emails are always sent for upcoming appointments and can be set to go out for past appointments using NOTIFY FOR PAST APPTS.?, also in Schedule Management.
DISTINCT CANCELATION EMAILS: Some centers prefer to send different information to a client when an appointment is canceled (rather than sending the same email with a different action verb that is sent when an appointment is made or modified). If an email is configured here, that email will be sent when a client's appointment is canceled.
REMINDER EMAIL: This email (or, optionally, text) is sent one or two days (as defined by the TIMING setting) before the client's appointment. Additionally, by adjusting the REMINDERS & SCRIPTS STARTING TIME in Global System Settings, you can define the time that the reminders are sent each day.
WAITING LIST EMAIL: If you set USE THE WAITING LIST? to YES in Schedule Management, then clients will have the option to join the waiting list and be emailed or texted when an appointment is canceled for a specific date on your schedule. This section allows you to define the email and text that is sent.
Sections in this Chapter
SECTION 1: Schedule Management Overview
SECTION 2: Add or Edit: Introductory Settings
SECTION 3: Add or Edit: Schedule Options
SECTION 4: Add or Edit: Client Scheduling Limits
SECTION 5: Add or Edit: Schedule-Related Emails
SECTION 6: Add or Edit: A/B Repeating Schedule Setup
SECTION 7: Manage Holidays and Closures
SECTION 8: Mass Modality Update
SECTION 9: FAQ (Email Delivery, Blank Schedules, Setup, and More)