In Schedule Management (which you'll find under the "Schedule & Staff Management" section of the Welcome menu), selecting ADD A NEW SCHEDULE from the "Area Tools" menu will take you to the "Add a New Schedule" form where you can add a new schedule. Similarly, selecting EDIT SCHEDULE from the options menu to the right of a schedule's name in the overview will take you to the "Edit" form where you can edit the settings associated with an existing schedule. Both forms are identical with the exception that the "edit" form shows the existing settings for the schedule.
The resulting form is broken up into five sections--Introductory Settings, Schedule Options, Client Scheduling Limits, Schedule-Related Emails, and A/B Repeating Schedule Setup. Hover over the question mark icons within the control panel for more information about each configuration option.
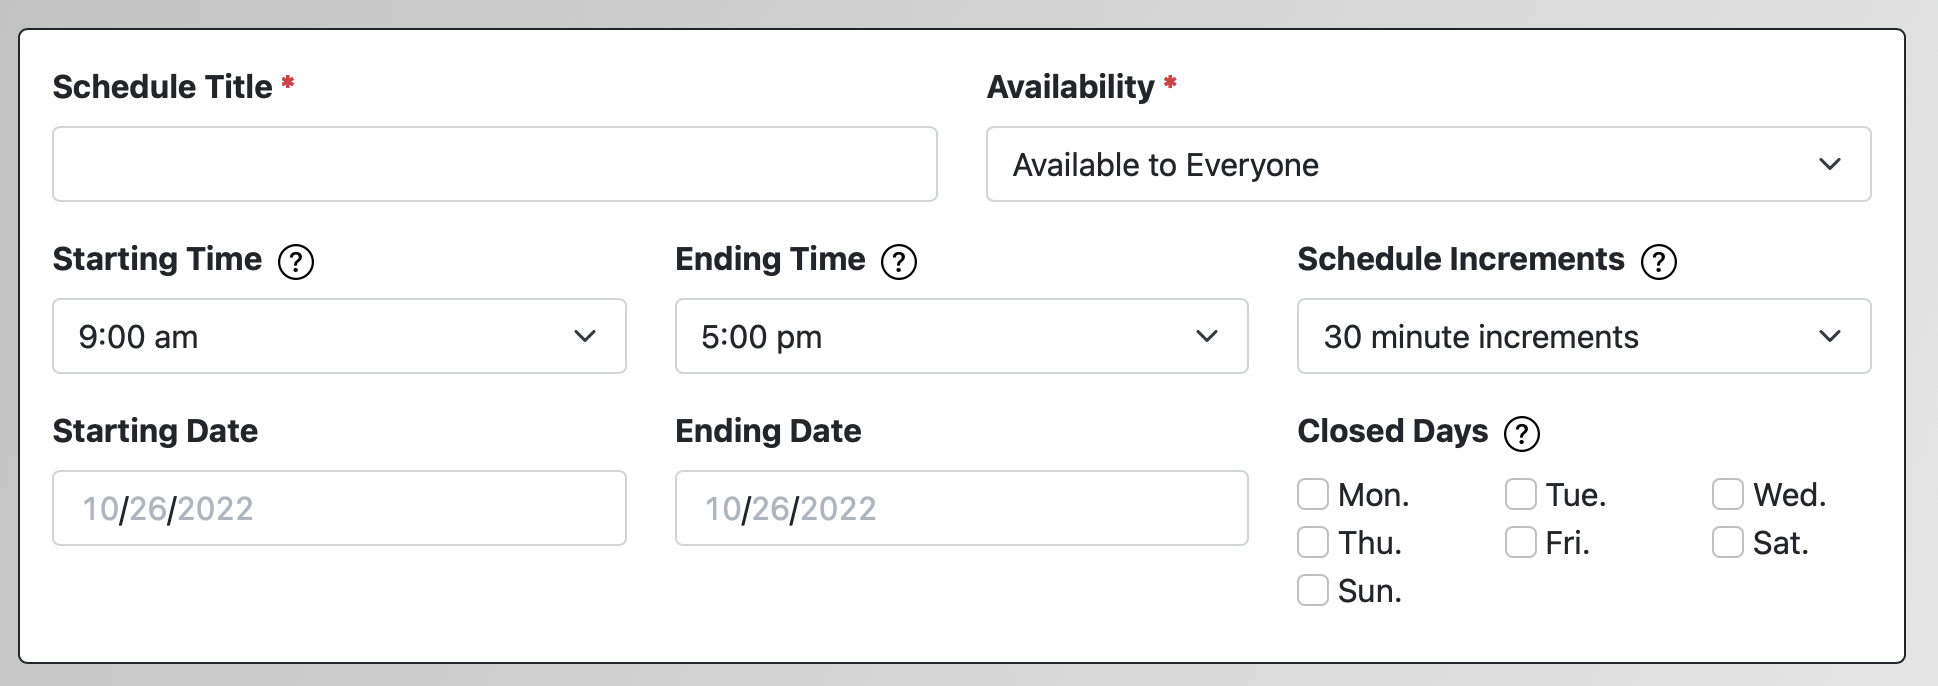
Introductory Settings
These are the settings that appear at the top of the form when editing or adding a schedule. They control the name, display dates and days, availability, and times and increments of the schedule.
 QR CODE: When editing an existing schedule, a QR code appears at the top right. When clients using mobile devices use the QR code, shared on printed materials or on your website, they are directed to the login page of the mobile version with this schedule as the only option. Similar to the DIRECT ACCESS CODE, described in the next section, this allows you to send clients to a specific schedule. Clients can still choose from among other available schedules once they are logged in. Hover over the QR code for more details.
SCHEDULE TITLE: This is the name of the schedule as displayed on the schedule, appointment form, and within the various reports. You can name a schedule in whatever way makes the most sense for you. Some centers list simply the term (such as "Fall 2024" or "Intersession II 2023." If a WCONLINE subscription is shared among multiple centers, then this field typically contains the name of the center and term, such as "Advising Center - Quarter 1 2024." This field is required.
AVAILABILITY: By default, a schedule is AVAILABLE TO EVERYONE, which means that anyone logged in to WCONLINE can view the schedule. If this option is set to AVAILABLE TO ADMINISTRATORS ONLY, then only administrators will be able to view or access this schedule. Finally, if this option is set to HIDDEN / ARCHIVED, then the schedule and all of its associated data and resources will be hidden throughout WCONLINE. Archiving your old schedules is typically the last step in setting up in creating a new schedule for your new scheduling period. Note that your default schedule (as set in the schedule overview page) has to be set as AVAILABLE TO EVERYONE.
STARTING TIME and ENDING TIME: This option defines the time span of a given day on your schedule. When selecting your available times, set the starting time to the earliest time that your center opens and set the ending time to the latest that your center closes in a given week. Once you add staff or resources to your schedule and set the hours for those staff or resources, the system will automatically display the correct open hours for each day.
SCHEDULE INCREMENTS: Schedule increments define the scheduling periods and appointment starting and ending times available on your schedule. If you offer one hour appointments that begin and end on the hour, set your increments to one hour. If you offer thirty minute appointments and one hour appointments, set your increments to thirty minutes so that both appointment lengths can be accommodated. If you choose 20 minute increments, you must set your schedule to start and end on a full hour (:00). If you choose 45 minute increments, you must select starting and ending times that are a multiple of 45 minutes apart, in addition to setting your schedule to start and end on a full hour (9:00am and 6:00pm, for example).
Be careful when selecting your schedule increments as it is difficult to change the increments for an existing schedule with existing blackouts and appointments. You cannot change your schedule increments or starting and ending times if doing so would make existing blackouts or appointments no longer fit on your schedule. For example, if you have any blackouts or appointments that end at :30 (in both the past and future), you will not be able to change your schedule increments to "one hour" as the appointments that end at :30 would not be able to be displayed properly under the new increment span.
STARTING DATE and ENDING DATE: If set, these dates define the date on which the schedule begins and the date on which the schedule ends. The schedule will not show any availability or dates before the starting date or after the ending date. Typically, these are set to the scheduling period's dates covered by the schedule, such as to the dates of a specific semester, quarter, or term.
CLOSED DAYS: This option lets you define the days that your center (or, more precisely, that this schedule) is not open. Closed days will not appear on your schedule or be counted in any report. If your center is not open on the weekends, for example, check "Sat." and "Sun." WCONLINE will then remove those days from the schedule.
Sections in this Chapter
SECTION 1: Schedule Management Overview
SECTION 2: Add or Edit: Introductory Settings
SECTION 3: Add or Edit: Schedule Options
SECTION 4: Add or Edit: Client Scheduling Limits
SECTION 5: Add or Edit: Schedule-Related Emails
SECTION 6: Add or Edit: A/B Repeating Schedule Setup
SECTION 7: Manage Holidays and Closures
SECTION 8: Mass Modality Update
SECTION 9: FAQ (Email Delivery, Blank Schedules, Setup, and More)