Drop-In or Walk-In appointments are those appointments which are made at the last minute--without a scheduled appointment on the schedule. Some centers have a few walk-ins per year, while others operate solely as a walk-in only center. Some offer walk-ins for just face-to-face appointments at the physical center, while others allow walk-in appointments for online synchronous and asynchronous meetings. Like many features in WCONLINE, the program offers several different ways of handling walk-ins depending on the needs and existing procedures of the center. The end goal, though, is always to record the data associated with the meetings.
Walk-In Appointments
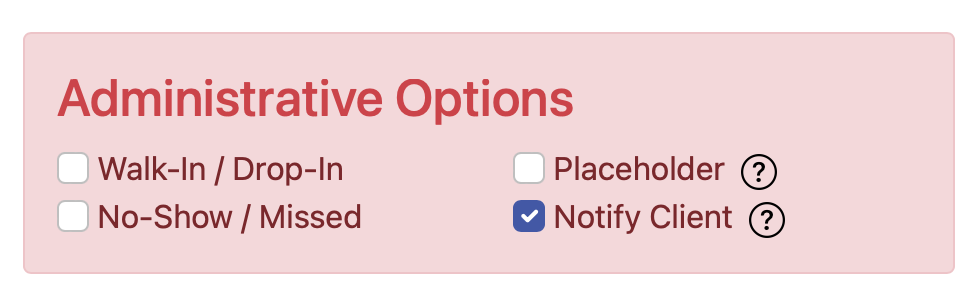 If there is an existing opening on the schedule (or if a client was marked as a no-show, revealing a newly available opening on the schedule), then the easiest way to handle a walk-in is to simply make an appointment for the client and then designate the appointment as a walk-in by checking the WALK-IN / DROP-IN checkbox that appears at the bottom of the appointment form. Checking that box ensures that the appointment is recorded as a walk-in on the System Statistics Report, on the appointment form itself, and in the various exports available through the System Data Export tool. Additionally, if you set a walk-in color in the "System Color Settings" section of Global System Settings, then the appointment will appear in that color on the schedule.
If a client arrives or is ready to meet online as a walk-in and is not registered yet, any full or basic administrator can create an account for the client by selecting "Add New Client" from the "Area Tools" at the top of the Calendar Display, Standard Display, and Client and Record Management.
Walk-In Only Staff or Resource
If you have staff or resources that are only available for walk-in appointments (in that they do not take appointments that are scheduled in advance), then you'll most likely want to take advantage of the WALK-INS ONLY setting in Staff and Resource Management. As described when hovering over the blue question mark next to that option and in the manual entry on the option, that option grays out or makes available all of a staff or resource's available time... except for the current block of time. Each available slot for that staff or resource on your schedule opens fifteen minutes before its start and remains open until it fills or the time passes. This allows clients to make appointments as they arrive or when they're ready to start their meeting.
Administrative-Only Walk-In Appointments
If you would like clients to see available times but never make their own appointments (such as might be the case for a walk-in only center), you would first need to set your staff or resource's AVAILABILITY to AVAILABLE TO ADMINISTRATORS ONLY in Staff and Resource Management. Then, in Global System Settings, make sure that the HIDE ADMIN STAFF FROM CLIENTS setting is set to NO. This setup allows clients to see available time on the schedule, but does not allow clients to make their own appointments for those slots. When a client arrives at the center, the staff member meeting with the client would make the appointment and designate it as a walk-in.
Online Appointment Walk-Ins
There are a couple of ways that you can handle walk-in or drop-in appointments for online sessions. The first is to set up your online staff or resources as Walk-In Only Staff or Resources (as described above). Clients would then simply make an appointment and then join the staff member in the online consultation module's room. The staff member would most likely want to set up email or text notifications for when an appointment is made, which is done easily in the email section of the staff member's entry in Staff and Resource Management.
A second option would be to add an announcement asking clients to contact the center if they see an opening on the schedule and want to meet with a staff member at the last minute. Announcements can be added via the Announcement Management tool, and, in Global System Settings, you can ENABLE 'CONTACT CENTER' TOOL. Clients would then use that tool to send an email to your center. Staff monitoring the center email account would respond to an incoming request and make an appointment on the schedule for the client. Then, staff and client would meet via that new appointment.
Waiting Room
The WCONLINE Time Clock offers the ability to set up a waiting room by changing the TIME CLOCK MODE to WAITING ROOM MODE. Once set up, clients can select the "clock-in" icon in the navigation menu to enter the waiting room. Clients waiting are displayed to administrators at the top of the schedule. This lets administrators take clients out of the waiting room should an opening occur. Administrators can contact the client directly or make an appointment for the client on the schedule.

Dedicated, Specific Walk-In Only Hours
If a staff member has some hours for appointments made in advance and some for walk-ins only, you can add two copies of the staff member's entry in Staff & Resource Management. The first copy would be identical to the second except in NAME and AVAILABILITY. While the first copy would be available for appointment scheduling, the second copy can be limited to walk-ins only (as above) or can be set to be "available to administrators only" (also as described above) and can be named something like, "Jane Smith - Walk-Ins Only." Once you've created two entries, you can add the distinct hours for each in Starting Availability Management.
Sections in this Chapter
SECTION 1: Creating a First or New Schedule
SECTION 2: Addressing Emails Not Being Received (or Emails Sent to Spam)
SECTION 3: Adding Images to Announcements, Bios, and Mass Emails
SECTION 4: Multiple Centers Sharing a Subscription
SECTION 5: Adding New Administrators
SECTION 6: Accessing and Changing Your WCONLINE URL
SECTION 7: Drop-Ins and Walk-Ins
SECTION 8: Different "Finals Week" Schedules
SECTION 9: Individual Not Recognized as an Administrator
SECTION 10: Using Group Appointments with Focuses
SECTION 11: Students Select a Different Course and Focus