In Global System Settings (which you'll find under the "System Configuration" section of the Welcome menu), you can define a variety of system-wide settings and controls. The first section in Global System Settings provides Introductory Settings that control site access and the name, email address, description, and logo of the site. As with all control panels, be sure to hover over the question mark icons within the control panel for more information about each configuration option.
Introductory Settings
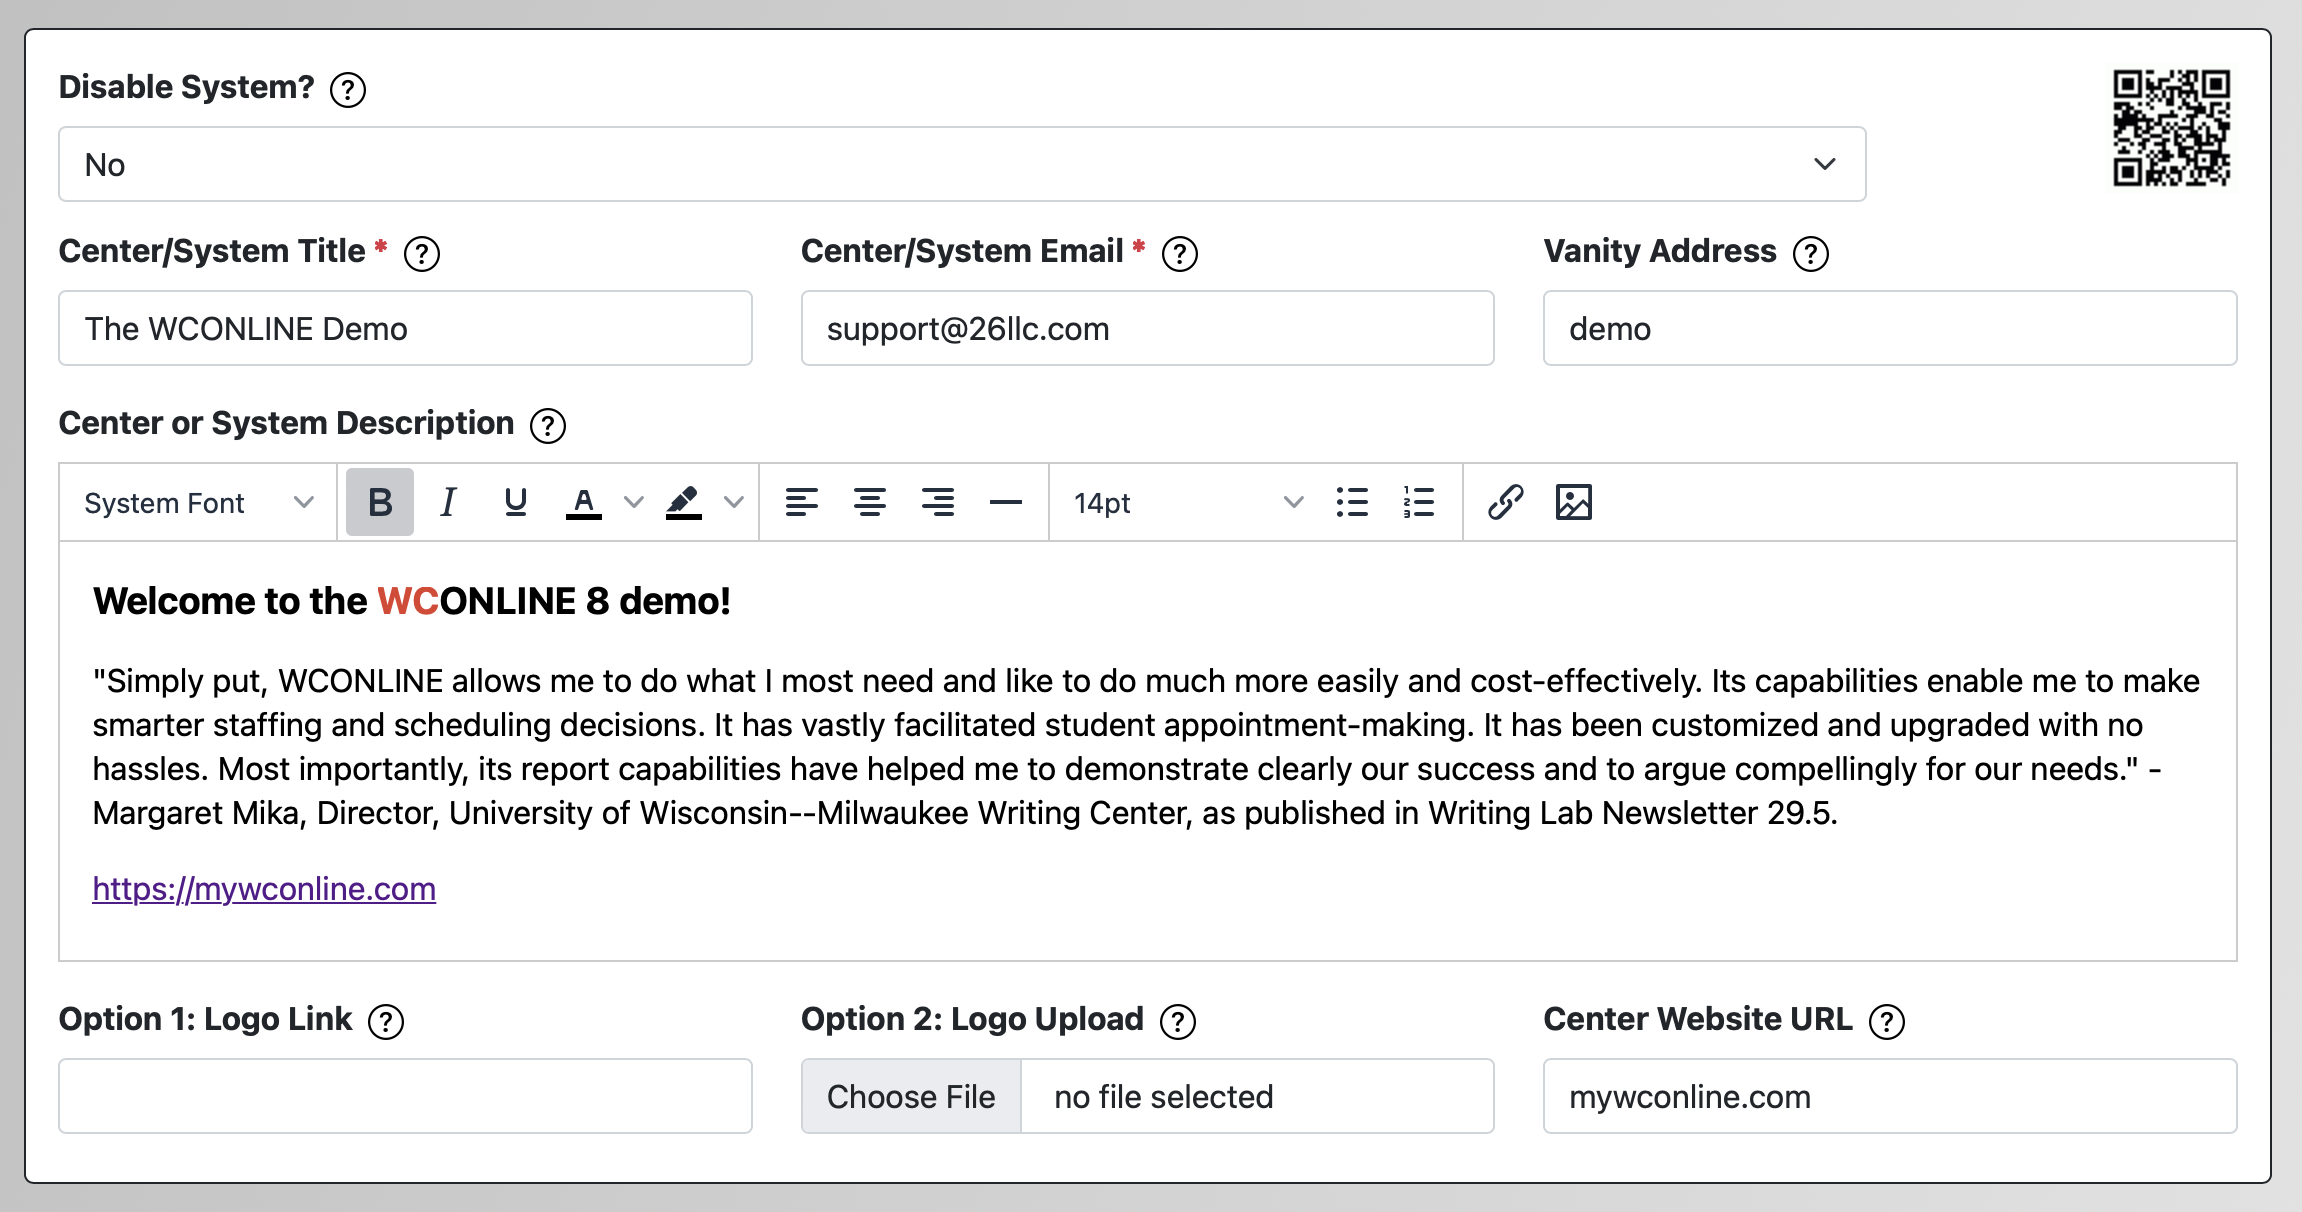
DISABLE SYSTEM: By default, anyone who has registered for an account on your WCONLINE site can log in to the program (unless the account itself has been deactivated because of a no-show or cancelation policy violation or manually in Client and Record Management). If this option is set to YES. ONLY ALLOW ADMINISTRATORS TO LOG IN TO THIS SITE., then the system will only allow full and basic administrators to log in. Other users will see a message on the login page and an appropriate error if they attempt to log in. This feature is typically used if the administrator needs to set up the system without having clients attempting to also make appointments.
![]() QR CODE: At the top right of this section is a QR code that, once shared with clients using mobile devices, directs individuals to your WCONLINE site. Hover over the QR code for more details.
QR CODE: At the top right of this section is a QR code that, once shared with clients using mobile devices, directs individuals to your WCONLINE site. Hover over the QR code for more details.
CENTER/SYSTEM TITLE: The name entered here is used throughout WCONLINE including on the log-in page, as the web browser's "title," as a replacement for the [centername] code in the configuration of outgoing emails, and as the sender's name in system-generated emails. Typically, this is set to either the name of the center using WCONLINE or, in the case where WCONLINE is shared by multiple centers, to the name of the institution itself.
CENTER/SYSTEM EMAIL: The email address entered here is used as the sender email address and the reply-to email address for all system-generated email. It's also displayed to clients at the bottom of the login page, in several error or informational messages, and in the "about" information available within the "Welcome" menu. Typically, this is set to a center's generic email address, to the director's email address, or to an email address that is or that can be shared by all of the centers using the same WCONLINE site.
VANITY ADDRESS: By default, your WCONLINE site is accessed through the full URL that was assigned to you. For example, our demo is accessed via the URL "demo.mywconline.com." Site URLs are usually comprised of the institutional domain and end in either "mywconline.com" or "mywconline.net."
This setting gives you the ability to use a different, shorter address to access your WCONLINE site. If set, a vanity address allows for individuals to type in 'mywco.com/XXXX' to reach your WCONLINE account (where 'XXXX' is whatever you enter in the VANITY ADDRESS field). Typically, this is set to a center's nickname, shortened name, or program name and is used by a center in advertising--to make getting to WCONLINE more site-specific. For example, if your center was called "The Learning Clubhouse," you could set your VANITY ADDRESS to "clubhouse" and access your site by going to mywco.com/clubhouse instead of to your full WCONLINE URL. You are welcome to use any VANITY ADDRESS as long as that address isn't already taken, isn't offensive, and doesn't infringe on someone's (or another institution's) copyright.
CENTER OR SYSTEM DESCRIPTION: The formatted text that you enter here appears within the "about" modal located within the "Welcome" menu or along the top menu bar throughout the site. This is typically used to provide a general description of your center and links to important websites. The formatting tools allow you to make your text bold, italic, or in a variety of colors, positions, and formats. You can also use the image icon to add an image to your description.
If you would like to make part of the description--such as a link or statement--available to administrators only, surround that statement with brackets. For example, if you want your staff to have access to a specific policy or link, you could add that link to your description as "[administrative only material here]." WCONLINE would only display the text within the brackets if the viewer was a logged in administrator.
Introductory Settings: Logo Options
WCONLINE displays a logo at the top of your site. That logo is typically set to the institution's logo or to a center's header graphic. The options in this section allow you to change the logo and to define where a client will go if they click on that logo.
OPTION 1: LOGO LINK: If your logo or header image is available online and can be accessed via a web address that ends in .jpg, .png, or .gif, then you can change the logo simply by entering the full web address of your logo in this field. For example, if your logo was accessed at www.yourinstitution.edu/center/logo.png, then you would enter that full address in this field. To return to the logo that we installed when we first set up your new site, simply delete the link listed for this option.
OPTION #2: LOGO UPLOAD: If you have an image file on your computer and want to use that image as your logo, then you can use the "choose file" option here to upload that logo into WCONLINE. When uploading a logo, be sure to use an image file that is less than 1mb in size (so that it loads quickly), and that is saved at 72dpi as either a .jpg, .gif, or .png file.
CENTER WEBSITE URL: If you would like for clients to be taken to your center's website (or to any website) when they click on the logo or on your institution's name that that appears at the top of almost every page in WCONLINE, enter the target link here. Links should be entered without the http:// or https:// and will look something like 'www.yourinstitution.com/center/index.html' (without the quotation marks) when entered correctly.
Note that logo changes may not appear to you or to others immediately. While the change is made immediately within WCONLINE, images are often cached by web browsers, internet providers, and even local internet routers and modems. As a result, if you change your logo (and especially if you make multiple changes in a short period of time), you might see your old logo constantly or occasionally until all the caches clear. This process can take up to two days, but is usually completed in a couple of hours. Since the caches are all housed outside of WCONLINE, we can't impact this process.
Also note that individuals access WCONLINE from a variety of different (and differently sized) devices. Consider how your logo will appear on the larger screens of laptops and desktops as well as the smaller screens of mobile phones and tablets when changing your logo. Logos that are no wider than 500px and no higher than 200px typically look the best when displayed in WCONLINE.
Sections in this Chapter
SECTION 1: Introductory Settings
SECTION 2: General Settings
SECTION 3: File Upload-Specific Settings
SECTION 4: Registration-Specific Settings
SECTION 5: Cross-Schedule Limits
SECTION 6: System Color Settings
SECTION 7: Social Media
SECTION 8: No-Show Policy and Enforcement
SECTION 9: Cancelation Policy and Enforcement
SECTION 10: Access Control
SECTION 11: API Configuration
SECTION 12: Authentication Options
SECTION 13: Language Options
SECTION 14: Zoom Integration
SECTION 15: Zoom Integration (Beta)