In Global System Settings (which you'll find under the "System Configuration" section of the Welcome menu), you can define a variety of system-wide settings and controls. The second section in Global System Settings, titled "General Settings" and available by clicking "GENERAL" in the "JUMP TO" links, provides options for a wide variety of system features. As with all control panels, be sure to hover over the question mark icons for more information about each configuration option.

General Settings
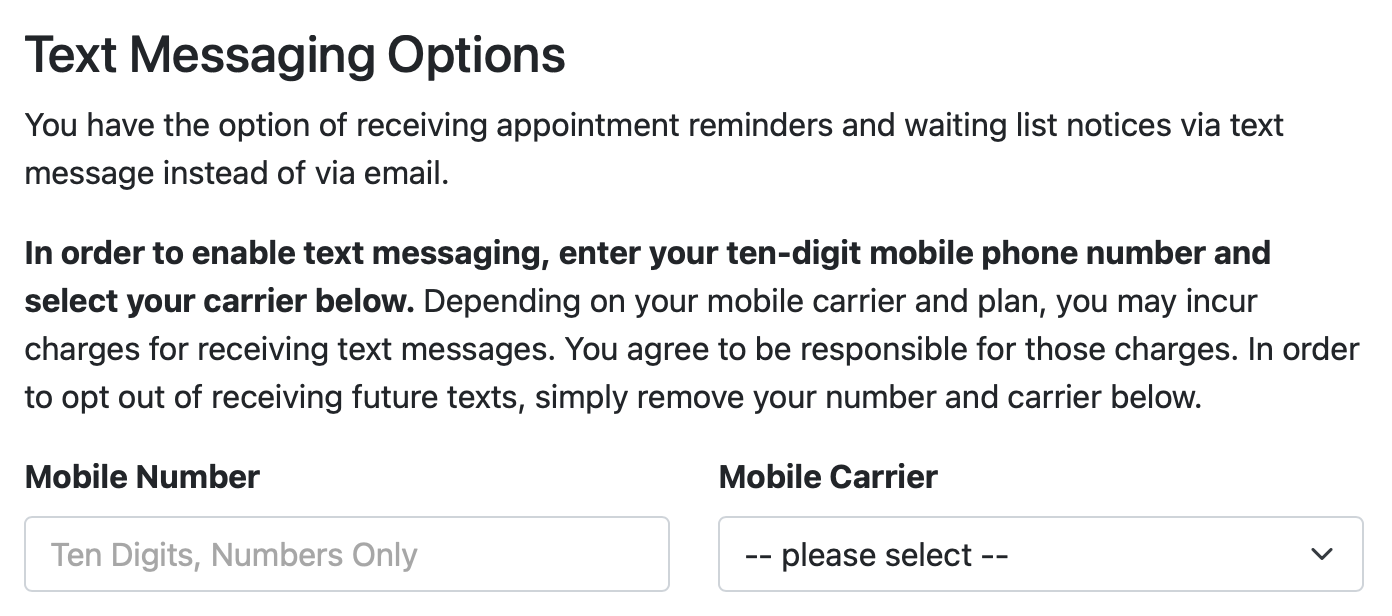 USE MOBILE TEXT MESSAGING: If enabled, WCONLINE will add a "TEXT MESSAGING OPTIONS" section to your registration form. When registering or when updating their profile via "Profile & Communication Options" in the Welcome menu, clients can choose to add their mobile number and mobile carrier in order to opt-in to the text messaging system.
Once a client has opted in, they will receive waiting list and appointment reminder messages (as defined in Schedule Management) via text message. Additionally, staff who opt in to text messaging via the options at the bottom of their registration profile will receive copies of appointment confirmation messages as text messages if SEND APPOINTMENT MESSAGES is set to YES in Staff and Resource Management. Additionally, if an administrator opts in to text messaging, they can also opt-in to two-factor authentication by selecting the appropriate option at the bottom of "Profile & Communication Options." With two-factor authentication enabled, administrators are sent a one-time password via text that they must enter before being able to fully log in.
If you have text messaging enabled and choose to disable it (by setting this option to NO), then WCONLINE will remove all mobile information from your system. Also note that WCONLINE will not display a client's mobile number to anyone except for the client. This means that, if you want to collect a student's phone number, you'll need to add that to your registration form via Form Setup: Registration Form. Administrartors can search for and remove specific mobile numbers via Client and Records Management, and clients can do the same without logging in via the option at the bottom of the login form.
REQUIRE SCHEDULE SELECTION: By default, the login page pre-selects the default schedule (as set in Schedule Management), allowing an individual to log in simply by entering a valid username and password. If you have multiple schedules and if you would like those logging in to be forced to select a schedule before being able to successfully log in (as a way to ensure that they are consciously choosing the most appropriate schedule), then set this option to YES.
USE A/V IN ONLINE MEETINGS: In Staff & Resource Management, you have the option to make your staff available for online consultations through the included Online Consultation Module. By default, that module allows for synchronous collaboration on an uploaded document and communication via a real-time, text-based chat platform. If you set this option to YES then those participating in an online session will be prompted to use their computer's (or mobile device's) camera and microphone during the session.
INSTITUTION'S TIME ZONE: To enable options in WCONLINE that use your local time, select your time zone here. The list of locations is a standardized list, similar to, or exactly the same as, the lists of time zones that appear in computers' settings and preferences, photo date/time options, etc. For example, New York is a widely-used location to represent the entire Eastern time zone. You are telling WCONLINE a time zone, not an actual location. If enabled, WCONLINE will use your local time in a variety of ways, including for the 'recorded time' in the time clock and on appointment creation and cancelation displays, for the availability of iCal calendar email attachments, to allow time-based client scheduling limits, and to determine when the next day should start. Additionally, with your institution's time zone set, non-administrators will be unable to make appointments on the current day for a given start time if that time has already passed locally.
REMINDERS/SCRIPTS STARTING TIME: In Schedule Management, you can set WCONLINE to email or text clients with a reminder of their appointment. In Module Setup: Surveys, you can set WCONLINE to email all students who had an appointment on the given day with an invitation to complete the survey. And, in Module Setup: Time Clock, you can set WCONLINE to automatically clock out individuals who forgot to clock out. This setting determines when all of those automated actions take place.
MASTER LISTINGS DEFAULT RANGE: In addition to being accessed directly from the Welcome menu, the Master Listings Report can be accessed via links in Client and Record Management, Schedule Management, and Staff and Resource Management. When accessed through one of those control panels (and while the date range of the report can always be changed within the report itself), WCONLINE defaults to displaying the requested list of appointments, no-shows, cancelations, or client report forms to cover toward and the next seven days.
Depending on the workflow at your center, you might find a different default span to be helpful; therefore, this option allows you to specify a different default should a different range be more applicable to your work. Setting the option to 'Today MINUS One Year,' for example, will default the report's display to show all requested data from today backwards through one year ago.
HIDE ADMIN STAFF FROM CLIENTS: In Staff and Resource Management, staff or resources have an AVAILABILITY of ADMINISTRATORS ONLY. If a staff or resource is set to be available to administrators only, then that staff is still displayed on the schedule, but is unavailable for scheduling by anyone but full or basic administrators. If you set this option to YES then administrative-only staff will only be displayed to administrators. This means that, if a non-administrator logs in, that individual will not see those resources in addition to not having access to them.
AUTO-REFRESH ADMIN VIEW? WCONLINE automatically times out anyone who is logged in after approximately thirty to forty-five minutes of inactivity. If your administrators typically access the program from their own computers, then you might find it helpful to set this option to one of the YES options. If enabled, WCONLINE will automatically refresh the schedule display periodically for full or for basic and full administrators. This will allow administrators to remain logged in if they keep their browser on the calendar or standard display.
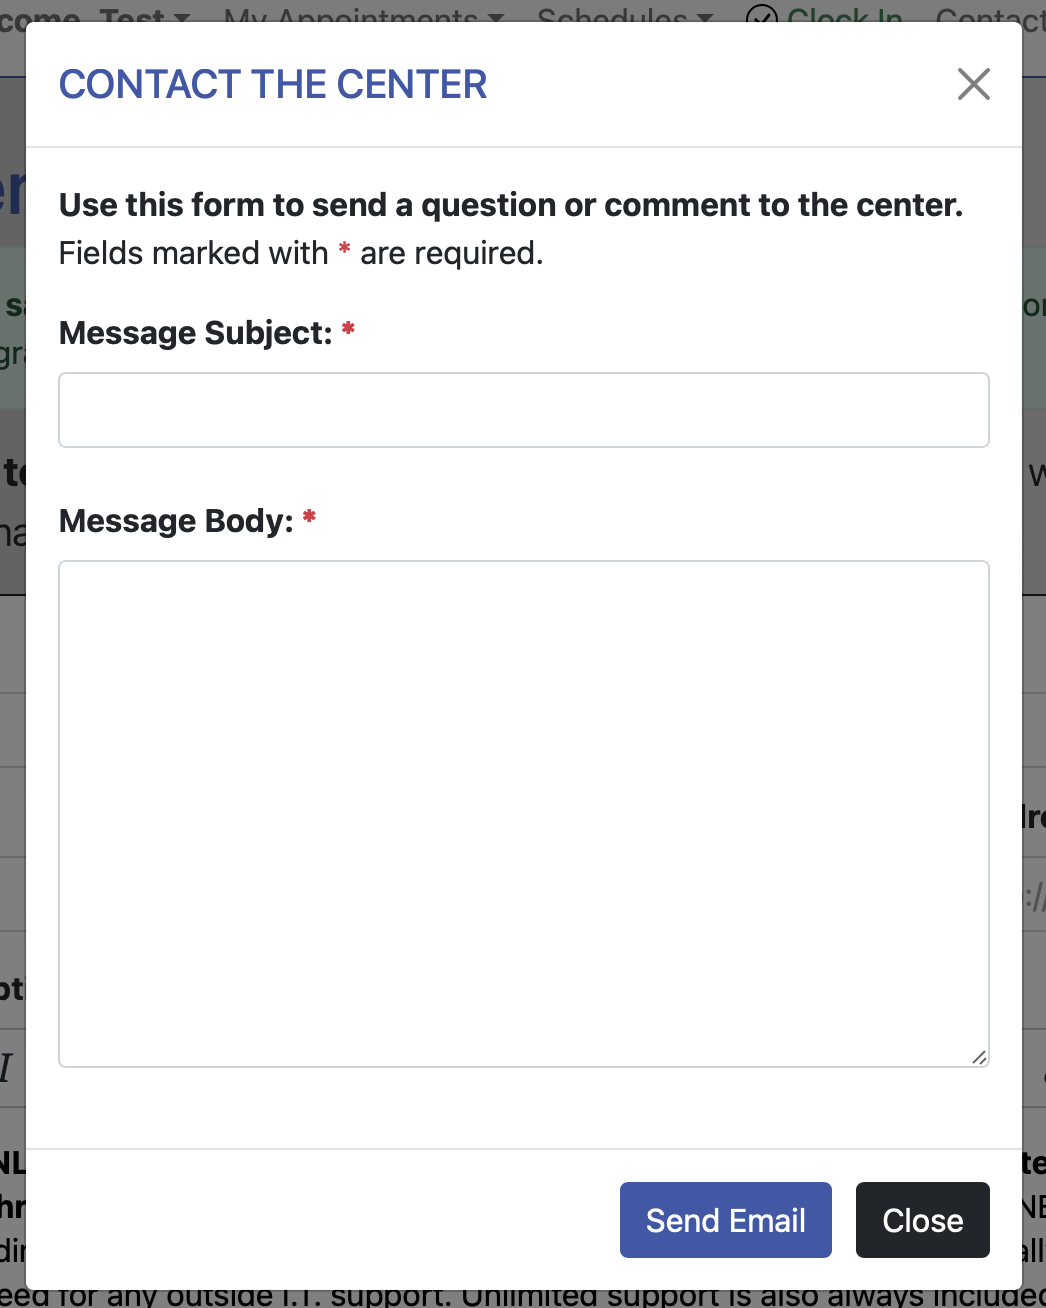 ENABLE 'CONTACT CENTER' TOOL: The "Contact Center" tool provides a quick form that clients can use to send an email to your center. If this option is set to YES, WCONLINE will add a contact option to the top navigation menu. When selected, clients will be able to send a quick question to the center by filling out a short form. That question is sent to the CENTER/SYSTEM EMAIL as defined near the top of Global System Settings.
HIDE "FACE-TO-FACE" LABELING: When staff and resources are set, in Staff and Resource Management, to allow face-to-face appointments only, WCONLINE hides the appointment type label by default. If you would like to display the "Face-to-Face" label, disable this option by choosing NO. The "Face-to-Face" label can be customized in LANGUAGE OPTIONS, also in Global System Settings.
HEADER TYPE: NAVIGATION FIRST refers to WCONLINE's default display, which, in all areas, prioritizes easy, efficient navigation on mobile devices and a view that allows students to instantly see appointment-making options and availability. With this selected, the center's logo is included in the "about" information that you and your staff and students can access from your welcome menu. LOGO FIRST allows you to display the center's logo at the top of every page (instead of in the "about" information) and arranges the page somewhat--but still conveniently--around the top header.
Card Reader Support
WCONLINE can be paired with a card reader to allow clients to log in to the system, check in for their appointment, or access the time clock by swiping or scanning their institutional ID card at specific computers in your center. The next two settings determine how WCONLINE knows what computers have card readers and how swipes or scans are read and handled. For much more extensive information about card readers, including information about the card reader offered through us, visit the "card reader" section of this manual.
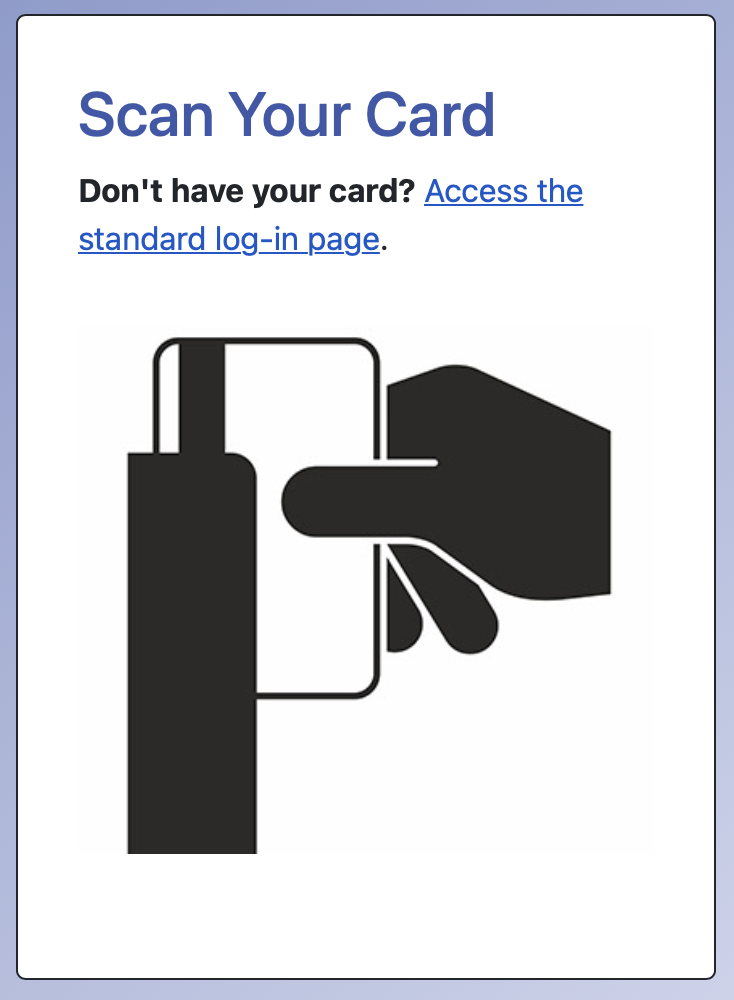 ENABLE CARD READER SUPPORT? To enable card reader support, you have to tell WCONLINE what computer or computers have a card reader attached. To do so, enter the static, public IP address of the computer which has the card reader. If you have multiple computers with card readers, enter the unique IP address for each, separated by a comma. If your computer doesn't have a unique, public IP address or has an IP address that changes, you may need to reach out to your IT department so that they can assign such an IP to you.
CARD READER PROTOCOL SELECTION: This setting determines how WCONLINE reads the information attached to your institutional ID cards. For almost all applications and card types, leave this setting set to "Encrypted Protocol." If, while testing the card reader, WCONLINE either isn't recognizing the cards that you swipe or is assigning different cards to the same person, try changing this setting to 'Default Protocol.' This change will allow WCONLINE to look for your card data in a separate track on your ID cards. If neither protocol works, try changing the system to the 'Secondary Protocol' which lets the reader look for data on older ID cards.
DO NOT change this setting unless the current setting is not working. Changing this setting will delete all stored card scans in your system which will require everyone to reattach their cards when they next use the reader.
Sections in this Chapter
SECTION 1: Introductory Settings
SECTION 2: General Settings
SECTION 3: File Upload-Specific Settings
SECTION 4: Registration-Specific Settings
SECTION 5: Cross-Schedule Limits
SECTION 6: System Color Settings
SECTION 7: Social Media
SECTION 8: No-Show Policy and Enforcement
SECTION 9: Cancelation Policy and Enforcement
SECTION 10: Access Control
SECTION 11: API Configuration
SECTION 12: Authentication Options
SECTION 13: Language Options
SECTION 14: Zoom Integration
SECTION 15: Zoom Integration (Beta)