In Global System Settings (which you'll find under the "System Configuration" section of the Welcome menu), you can define a variety of system-wide settings and controls. Within the "Area Tools" menu, you'll find links to a variety of tools that also enable global changes throughout your WCONLINE site. The first tool, "API Configuration," allows you to automatically export WCONLINE data for use on an institutional website or within an institutional data warehouse.
The API's ease-of-use and "custom" option would make combining WCONLINE data and institutional datas, outside of WCONLINE, nearly instant. (Note that, with students' unique institutional email addresses and the option to import data if you use SSO, you can ensure that you always have a key field that identifies each student.)
API Access
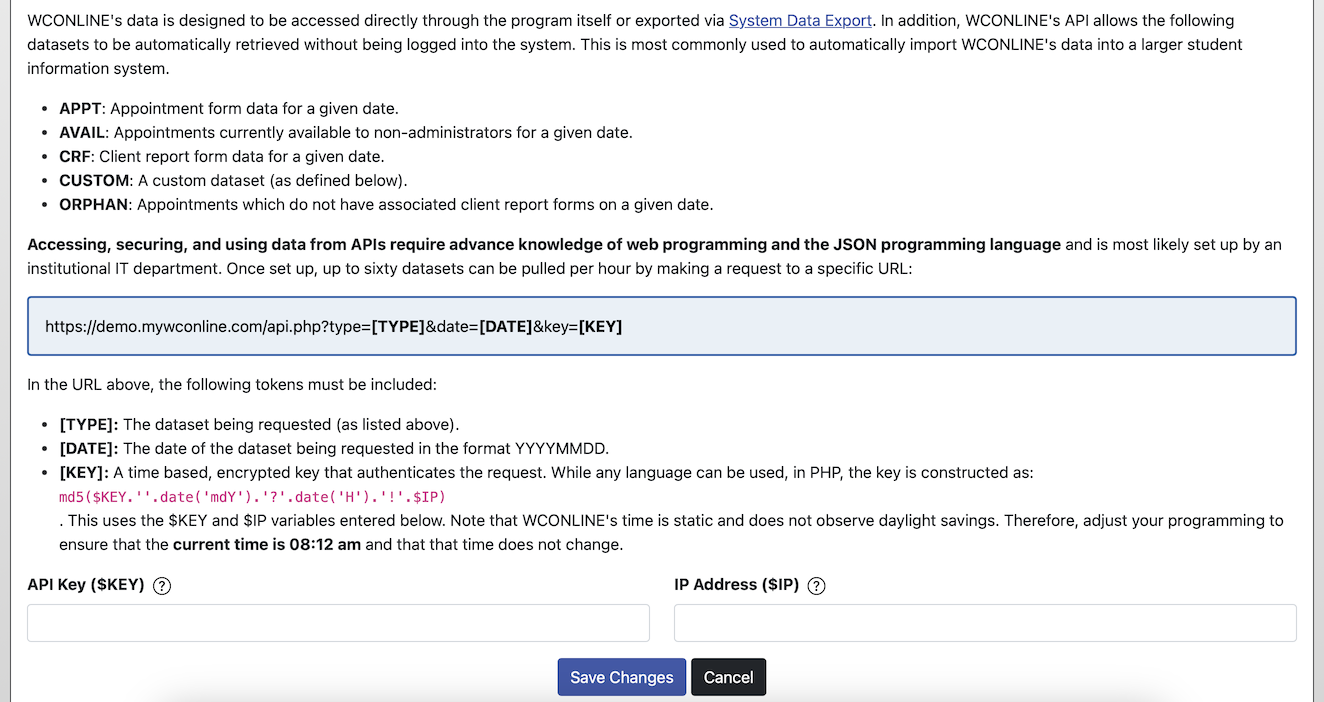
WCONLINE includes built-in reports and an export, all of which work quickly and report up-to-the moment data whenever used. WCONLINE's API allows you to request and receive system data in JSON format without being logged into the system. This is mostly useful to IT departments that wish to import WCONLINE data regularly into another system, such as into a learning management system or advising tool (where email address can be used as the key field to sync data between the systems). Your IT department can set up the API to make the following datasets available:
- APPT: This is a list of appointment data for a given date. The following fields are returned for this API call: Client First Name, Last Name, and Email Address; Schedule Title; Staff or Resource Name; Appointment Date, Start Time, and End Time; Walk-In; No-Show; Placeholder; Online; and, Focus (if focus is required).
- AVAIL: This is a list of appointments currently available (to non-administrators) for a given date. The following fields are returned for this API call: Schedule Title; Appointment Date and Start Time; and, Staff or Resource.
- CRF: This is a list of client report form data for a given date. The following fields are returned for this API call: Client First Name, Last Name, and Email Address; Schedule Title; Staff or Resource Name; Appointment Date, Start Time, End Time, and Length (as recorded on the client report form); and, Off-Schedule (for off-schedule reports).
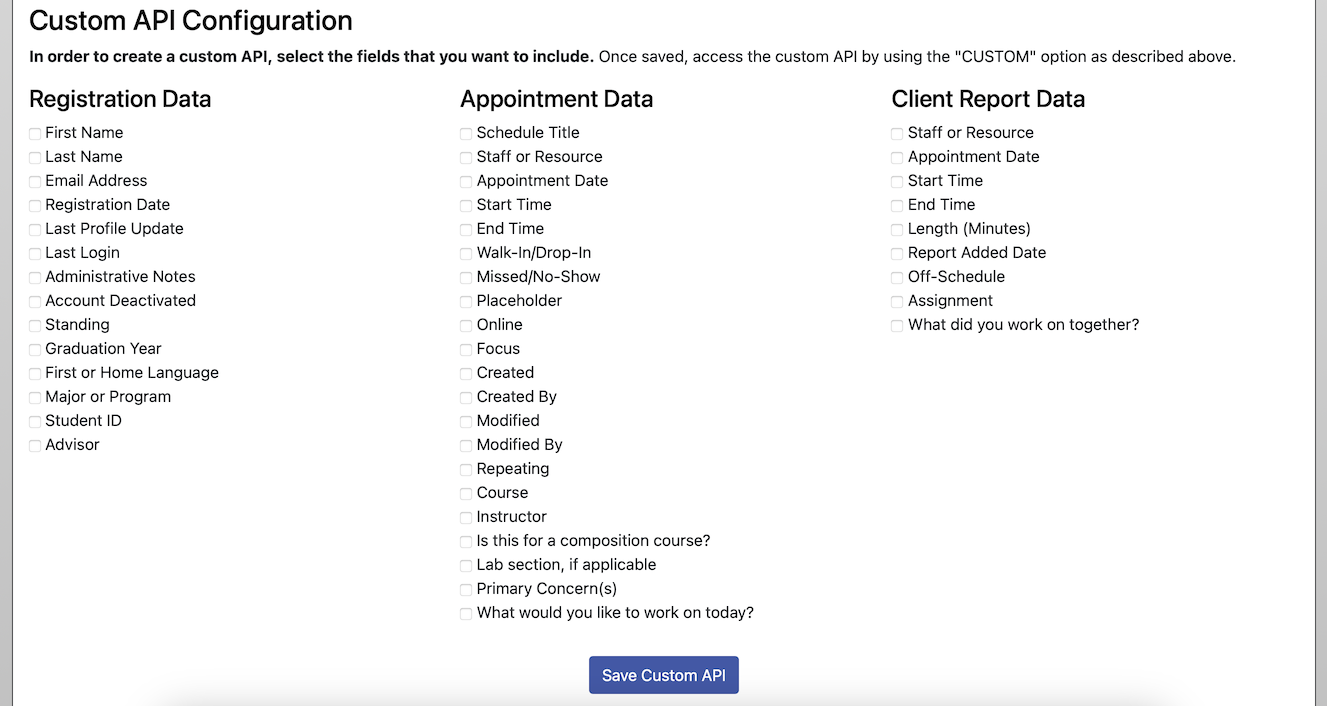
- CUSTOM: This is a list of data that you can define below the API setup and description. You can include any registration, appointment, and/or client report form fields.
- ORPHAN: This is a list of appointment data for a given date for appointments which do not have associated client report forms. The following fields are returned for this API call: Client First Name, Last Name, and Email Address; Schedule Title; Staff or Resource Name; Appointment Date, Start Time, and End Time; Walk-In; No-Show; Placeholder; Online; and, Focus (if focus is required).
As with all control panels, be sure to hover over the question mark icons next to each option for more information about each entry.
While the section contains extensive information, there are only two values to enter:
API KEY ($KEY): This is the case-sensitive, ten-or-more-character string that is shared by the institution and WCONLINE in order to independently construct the key (as above). We recommend using a long and random value (which should be treated and secured like a password).
IP ADDRESS ($IP): This is the public IP address of the computer which will be requesting data from WCONLINE's API. Requests that originate from a different IP (or that are not crafted properly) will be ignored.
Once configured, data is pulled by sending a request to this specific URL, so, after adding the API Key and IP Address and clicking "Save Changes," you will see detailed instructions that include both the exact key to use in place of "[KEY]" and the unencrypted string. For example, your instructions after saving could show, using a fabricated example, "Based on the settings below, the current [KEY] is 17y2rgr86b63a96g3fi776kp09st6419 which is constructed from the unencrypted string passwordpassword05182023?08!12.34.567.890."
You, or your IT department, would be able to construct the URL by replacing each code in brackets with the correct term, such as by replacing "[TYPE]" with "CUSTOM," "[KEY]" with "17y2rgr86b63a96g3fi776kp09st6419" using the example above, etc.
The tokens in the URL are defined in the API instructions and are:
- [TYPE]:The dataset being requested (as listed above).
- [DATE]: The date of the dataset being requested in the format YYYYMMDD.
- [KEY]:A time based, encrypted key that authenticates the request. While any language can be used, in PHP, the key is constructed as:
md5($KEY.''.date('mdY').'?'.date('H').'!'.$IP)
using $KEY and $IP the variables entered below. Note that WCONLINE's time is static and does not observe daylight savings. Therefore, adjust your programming to ensure that WCONLINE's current time as displayed in this control panel.
And, in the unencrypted string portion of the example above, "08" represents the time, with the hour being 8:00am at the time we constructed our demo API.
Below the API setup and instructions, you can define your custom API by choosing any (or all) checkboxes to include fields, including specific registration, appointment, and client report data fields.
Accessing, using, and displaying data from APIs require advanced knowledge of web programming and the JSON programming language. Most likely, this data will be pulled from WCONLINE and made available for use by an institutional IT department. Additionally, questions about pulling and using the data accessed through the API would need to be directed to the institution's IT department, as we do not have access to the tools and systems available to work with data pulled from WCONLINE. Note that you are responsible for the use and security of the data once it is accessed and pulled from WCONLINE. Also note that the API system will only allow sixty or less queries per hour. Subsequent queries (and errors) will be ignored and will result in the return of no data.
Sections in this Chapter
SECTION 1: Introductory Settings
SECTION 2: General Settings
SECTION 3: File Upload-Specific Settings
SECTION 4: Registration-Specific Settings
SECTION 5: Cross-Schedule Limits
SECTION 6: System Color Settings
SECTION 7: Social Media
SECTION 8: No-Show Policy and Enforcement
SECTION 9: Cancelation Policy and Enforcement
SECTION 10: Access Control
SECTION 11: API Configuration
SECTION 12: Authentication Options
SECTION 13: Language Options
SECTION 14: Zoom Integration
SECTION 15: Zoom Integration (Beta)