In Global System Settings (which you'll find under the "System Configuration" section of the Welcome menu), you can define a variety of system-wide settings and controls. The fourth section in Global System Settings, titled "Registration-Specific Settings" and available by clicking "REGISTRATION" in the "JUMP TO" links, defines a variety of global registration limits that impact clients when they fill out your registration form in order to create a new account on the system. Hover over the question mark icons within the control panel for more information about each configuration option.
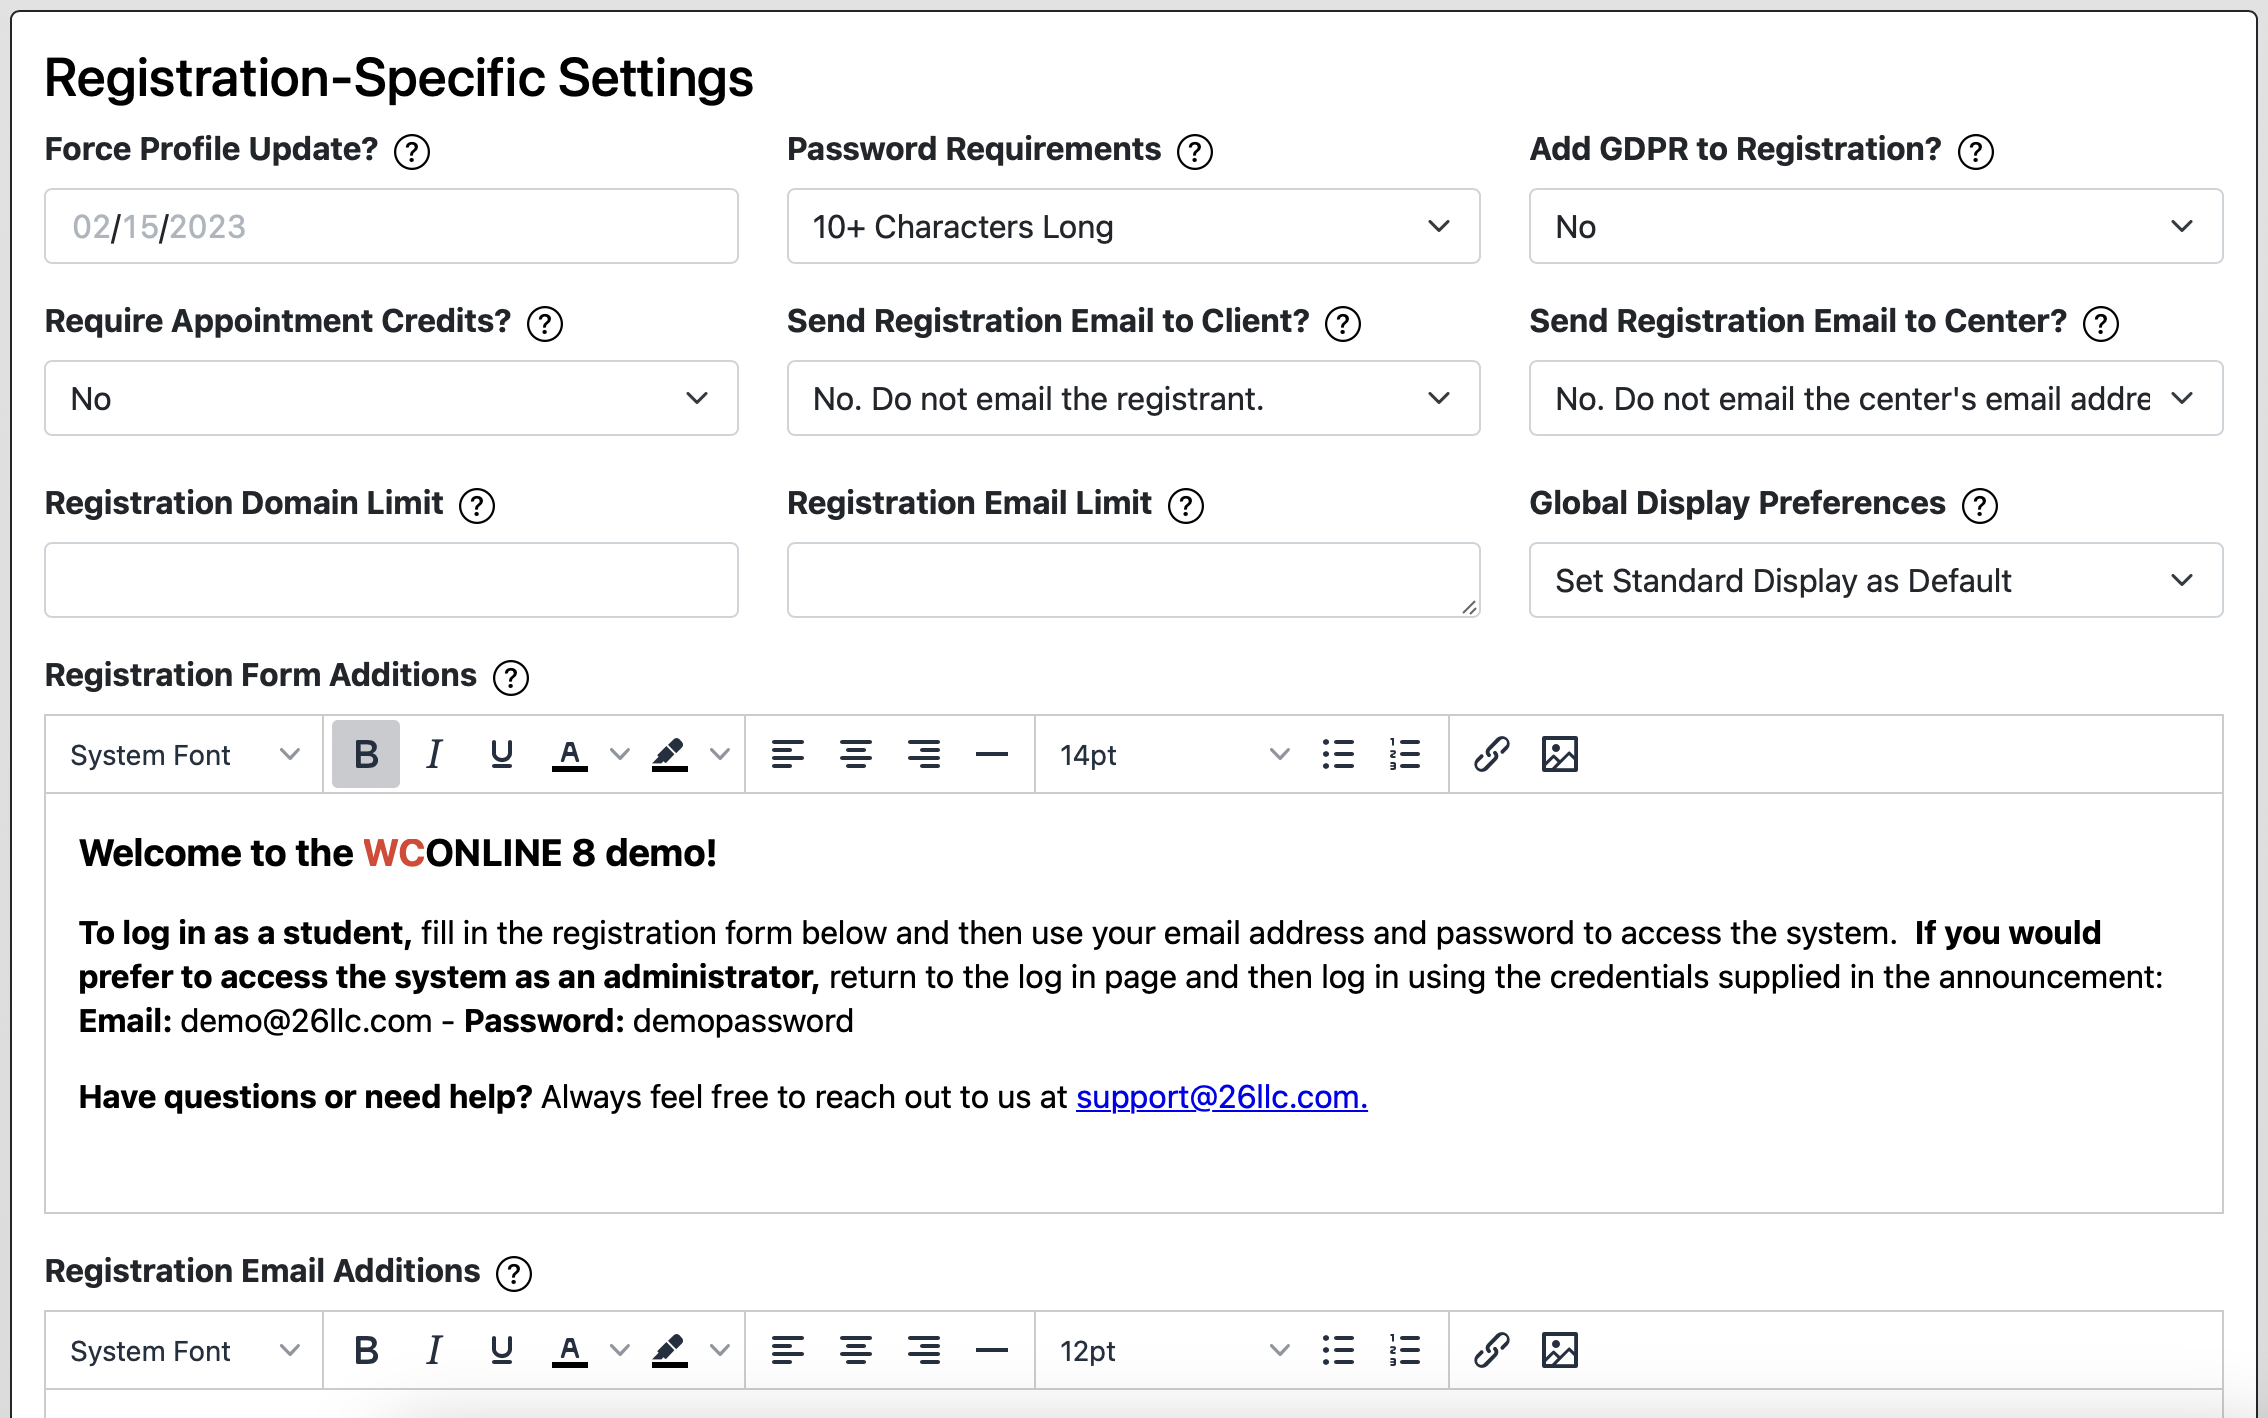
Registration-Specific Settings
FORCE PROFILE UPDATE? Clients enter their demographic information when they first fill out your registration form in order to create an account and access your WCONLINE system. Clients can also update their saved registration information at any time by using "Profile & Communication Options" in the "Welcome" menu.
If you would like to force clients to update their profile if they haven't done so since a specific date, enter that date here. For example, if you enter October 1, 2022, all individuals that haven't updated their profile since October 1st will be taken to the profile edit page when they log in. As per the message that is displayed to clients, clients must update their profile (or save the profile without making any changes) before they will be able to access any other area of the program.
PASSWORD REQUIREMENTS: By default, WCONLINE only requires that a password be ten or more characters long. This setting lets you force clients to use stronger passwords--such as passwords that contain symbols or symbols and uppercase letters. If changed, clients who have already registered may continue using their existing passwords even if they don't meet the new requirements.
ADD GDPR TO REGISTRATION: The European Union's General Data Protection Regulation (GDPR) defines how online systems must handle an individual's data. If your institution is impacted by GDPR, then setting this option to YES will add a GDPR statement to the registration process and require that clients acknowledge your GDPR commitment when they register or update their profiles.
If you enable this option, know that you will most likely need to take additional steps in order to be compliant with GDPR. WCONLINE doesn't set any cookies automatically except for the 'strictly necessary' session cookie (as defined by and immune from GDPR), and WCONLINE doesn't collect data automatically except as entered by a given individual. In order to be fully compliant with the European GDPR laws, however, you must also:
- Add a privacy policy to your center's website and link to it via the CENTER OR SYSTEM DESCRIPTION setting near the top of Global System Settings.
- Agree to delete a client's account fully if the client asks for such deletion.
- Agree to give a client an export of their data (via System Data Export) if the client requests such.
REQUIRE APPOINTMENT CREDITS: This setting is most useful to centers where clients pay for or are assigned specific numbers of sessions with the center, such as would be the case for most private tutoring centers. If set this option is set to YES then clients will be unable to make appointments unless they have at least one credit. A credit allows a client to make a single appointment.
Credits are set on a client-by-client basis in (and clients can be excluded from this restriction in) Client and Record Management's 'Account Options' control panel.
SEND REGISTRATION EMAIL TO CLIENT and/or CENTER: If enabled, the person registering for a new account on the system (and/or the CENTER/SYSTEM EMAIL as listed in Global System Settings) will receive a registration confirmation email after registering.
If the CLIENT option is set to YES. EMAIL THE REGISTRANT. then the client will receive an email that looks similar to the following after they successfully register:
Dear Jane,
Thank you for registering for an account at The WCONLINE Demo.
Your account has been created. Your access details are below:
URL: https://demo.mywconline.com
Email: jane@emailaccount.edu
Sincerely,
The WCONLINE Demo
Finally, if the first selection box is set to YES. EMAIL THE REGISTRANT & REQUIRE ACTIVATION. then the client will receive an email that looks similar to the following after they successfully register:
Dear Jane,
Thank you for registering for an account at The WCONLINE Demo.
In order to activate your new account, click the link below. Once you have activated your account, you will be able to log in immediately.
https://demo.mywconline.com/index.php?email=jane@emailaccount.edu&token=784khiewu21921jlkj12&action=ACTIVATE
Sincerely,
The WCONLINE Demo
In order to access WCONLINE, the client has to follow the link in that email (as they are told on the login page when trying to log in and immediately after completing the registration form). Administrators can also activate the client's account manually by following the displayed instructions in Client and Record Management.
REGISTRATION DOMAIN LIMIT: By default, clients can use any email address to register for an account on the system. If a domain is entered here, the system will only allow users to register using an email address with that domain. To enter multiple allowable domains, enter each separated by a comma. For example, if you enter "26llc.com,mail.26llc.com," then WCONLINE will only allow clients to register if they use an email address that ends in either @26llc.com or @mail.26lllc.com. The domain requirement is displayed on the registration form.
If you would like to require that clients use only their institutional email address, you can use this setting to do just that. First, enter your institutional domain here. Then, set SEND REGISTRATION EMAILS? (as described above) to YES. EMAIL THE REGISTRANT & REQUIRE ACTIVATION. Once set, clients will be required to enter an institutional email address when they register and will be required to prove that that email address is theirs (by clicking a link in an email sent to them) before they can access WCONLINE.
REGISTRATION EMAIL LIMIT: If email addresses are entered here, the system will only allow individuals to register using one of those email addresses. Email addresses must be entered without quotation marks or other punctuation (except for the @ symbol) and must be separated only by commas. Note that this limit is rarely used and only for situations where a center can serve only a small number of specific individuals.
SET GLOBAL DISPLAY PREFERENCES: By default, individuals first interact with WCONLINE through the Calendar Display. With the Standard Display designed to present information that the individual most readily needs--such as the ability to find an appointment or find a quick summary of existing appointments, and in a way best used by accessibility programs, setting the Standard Display as the default is an option.
Using the System Preferences area within Profile & Communication Options, individuals can update their personal preferences and set the system to default to the Calendar Display, which shows all appointments and available times in a large grid. (And, the Standard Display is designed to allow staff to quickly find appointments that clients have made with them and add client report forms in one click, so staff might switch to the standard display for convenience.)
Using this option, you can set the default display for everyone, including clients, on their initial registration or when they next log in.
REGISTRATION FORM ADDITIONS: Information entered here will be displayed at the top of the registration and profile-update forms.
REGISTRATION EMAIL ADDITIONS: If enabled via the SEND REGISTRATION EMAIL TO CLIENT setting above, WCONLINE will send a client an email when the client registers. The exact content of the registration email is based on other options within the program, such as whether or not you are using single-sign-on or whether or not you require account activation, but will look similar to the email shown above.
If you would like to add additional information to the registration emails, such as information about your center or its policies, include that information in this field. The information that you add will then be included directly above the "Sincerely" text in the above outgoing email.
Sections in this Chapter
SECTION 1: Introductory Settings
SECTION 2: General Settings
SECTION 3: File Upload-Specific Settings
SECTION 4: Registration-Specific Settings
SECTION 5: Cross-Schedule Limits
SECTION 6: System Color Settings
SECTION 7: Social Media
SECTION 8: No-Show Policy and Enforcement
SECTION 9: Cancelation Policy and Enforcement
SECTION 10: Access Control
SECTION 11: API Configuration
SECTION 12: Authentication Options
SECTION 13: Language Options
SECTION 14: Zoom Integration
SECTION 15: Zoom Integration (Beta)