In Global System Settings (which you'll find under the "System Configuration" section of the Welcome menu), you can define a variety of system-wide settings and controls. Within the "Area Tools" menu, you'll find links to a variety of tools that also enable global changes throughout your WCONLINE site. The second tool, "Authentication Options," allows you to set up single-sign-on so that individuals can sign in to WCONLINE using their institutional credentials. Hover over the question mark icons within the control panel for more information about each configuration option.
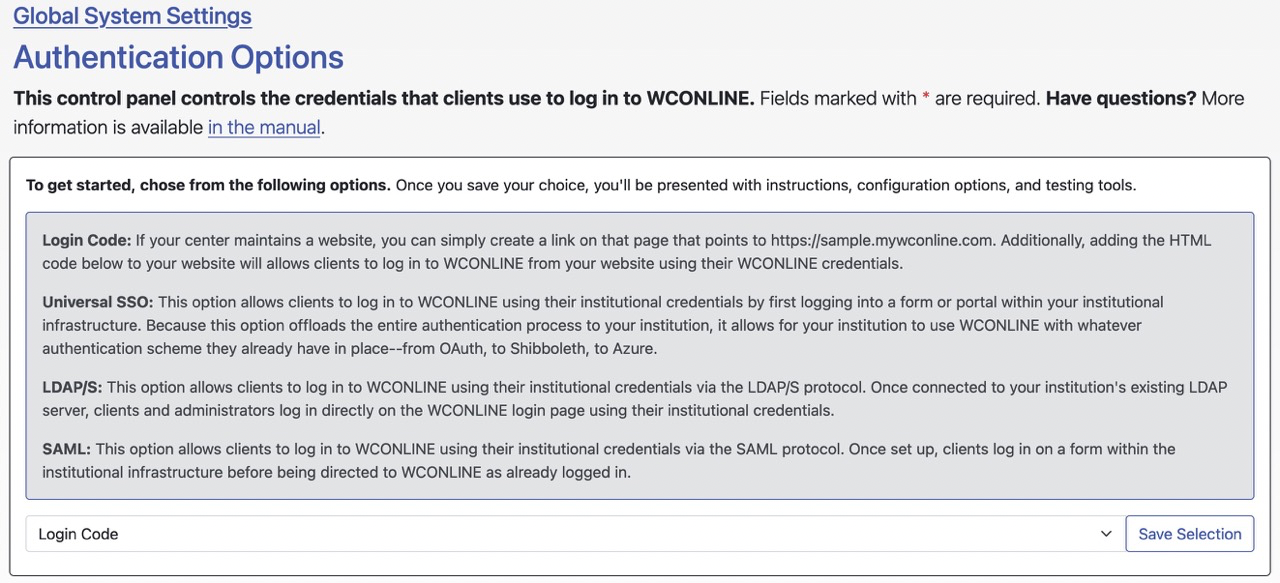
By default, everyone who uses your WCONLINE site first fills out your registration form in order to create an account on the system. After entering their email address and creating a password on that form, they log in to WCONLINE by entering that email address and password on each visit. While the bulk of our clients use WCONLINE by handling registrations in this way, WCONLINE does support two types of single-sign-on solutions:
- SAML: It is highly recommended that you use SAML. We are progressing towards deprecating support for our proprietary SSO, and eventually LDAP/S. SAML is the simplest configuration, and is the most stable of our available authentication protocols.
- SINGLE-SIGN-ON (SSO): Our proprietary SSO solution is designed to work with any authentication scheme that your institution already has in place—Shibboleth, SAML, ADFS, Google, Banner, Azure. How it accomplishes this is by offloading the authentication process entirely to the institution. Once the institution has authenticated the client (typically by having the client log in to a form or portal within the institution's website), the institution passes the client to WCONLINE already authenticated. Scroll to the "Single-Sign-On (SSO)" section of this manual page for extensive information on this option.
- LDAP/S: Alternatively, if your institution maintains an LDAP (or Active Directory) server, then you can configure WCONLINE to allow individuals to log in directly on the WCONLINE login page using their institutional usernames and passwords. Scroll to the "LDAP/S" section of this manual page for extensive information on this option.
The "Authentication Options" control panel also gives access to LOGIN CODE that you can use to allow clients to log in to WCONLINE (using their WCONLINE-specific email addresses and passwords) from your center's website. This code is simply HTML code that can be copied and pasted into the web code on your website to add the login form to your center's website.
Unlike nearly every other area of WCONLINE, you will most likely need IT support in order to configure any of the available options. The options require settings that are typically only available to institutional IT departments; however, WCONLINE is designed to allow your IT department to set up, test, and implement single-sign-on without any involvement from us (although we are still certainly happy to help). In order to get started, we recommend creating a full administrative account for your IT department and then pointing them to this manual page and to the "System Authentication" options in Global System Settings.
Keep in mind that Single Sign On offloads the authentication process to your institution. This means that if you or if clients are suddenly unable to log in to WCONLINE, you'll need to reach out to your IT department as we have no way to know why or to correct the issue that is preventing logins.
SAML
Before we dive in, we highly recommend you start by watching this brief video walkthrough that explains WCONLINE's SAML configuration process: SAML Configuration Walkthrough.
To configure SAML, you will first need full administrative rights to WCONLINE. If you don’t yet have administrative rights, ask your WCONLINE administrator to allocate you full administrative privileges in WCONLINE and email you an invitation to register. You can also be granted temporary administrative privileges by our support team with the permission of an existing administrator. Just email support@26LLC.com with a WCONLINE administrator CC’d. Once the existing administrator approves via email, our support staff will create your full administrator profile.
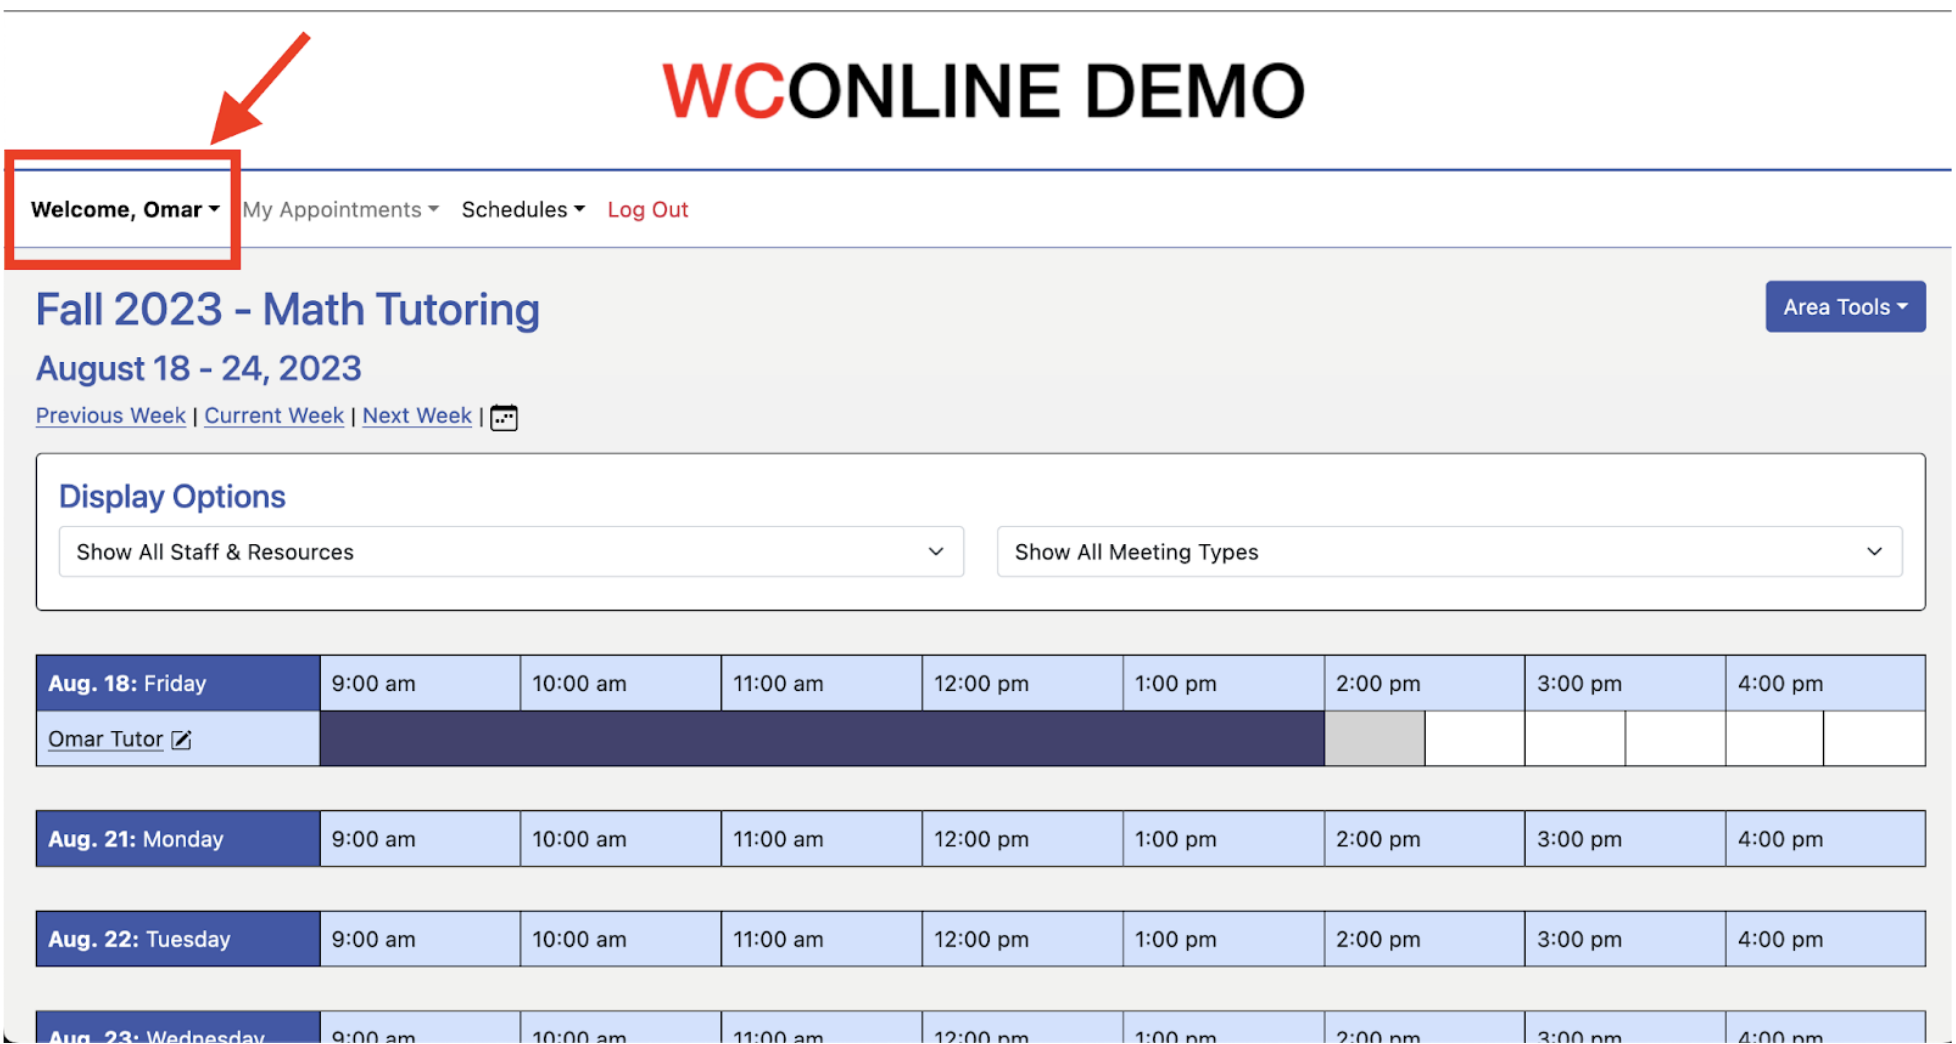
Once you have full administrative rights, log into WCONLINE and navigate to the drop-down welcome menu on the upper left hand corner of your site.
Once in the welcome menu, click “Global System Settings.”
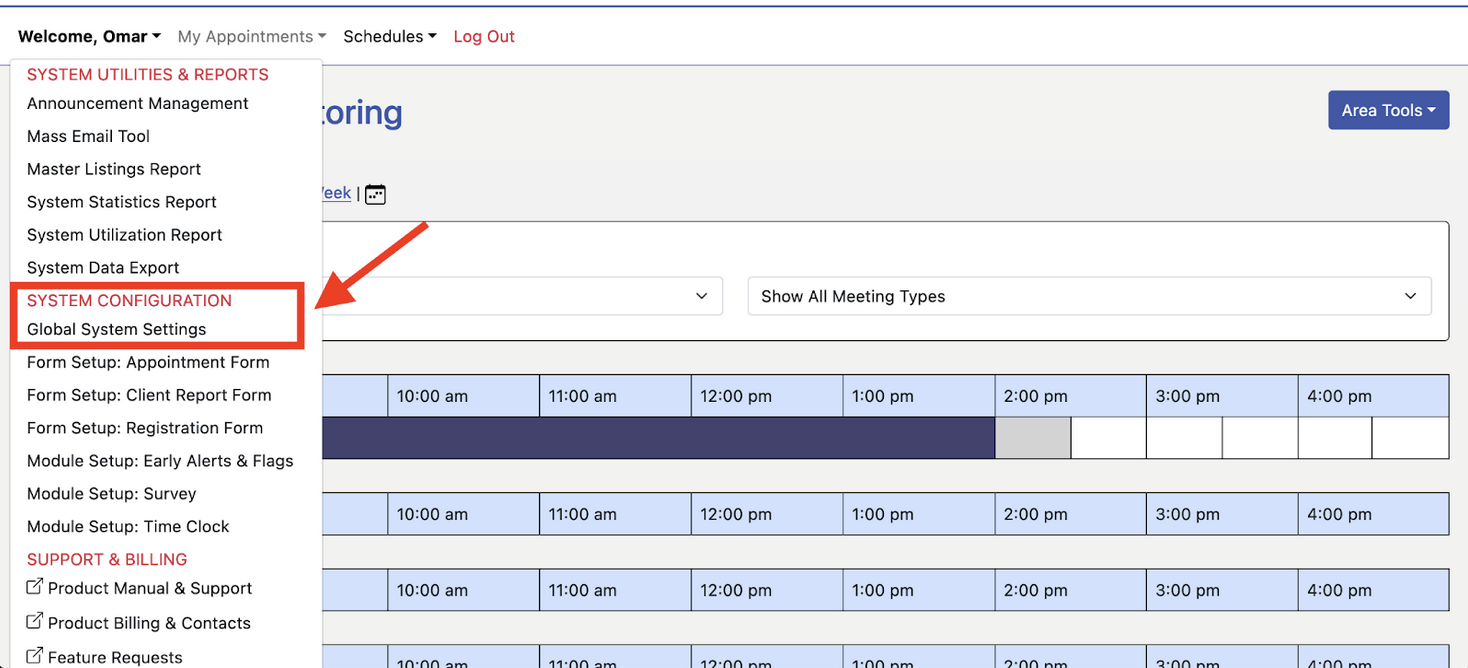
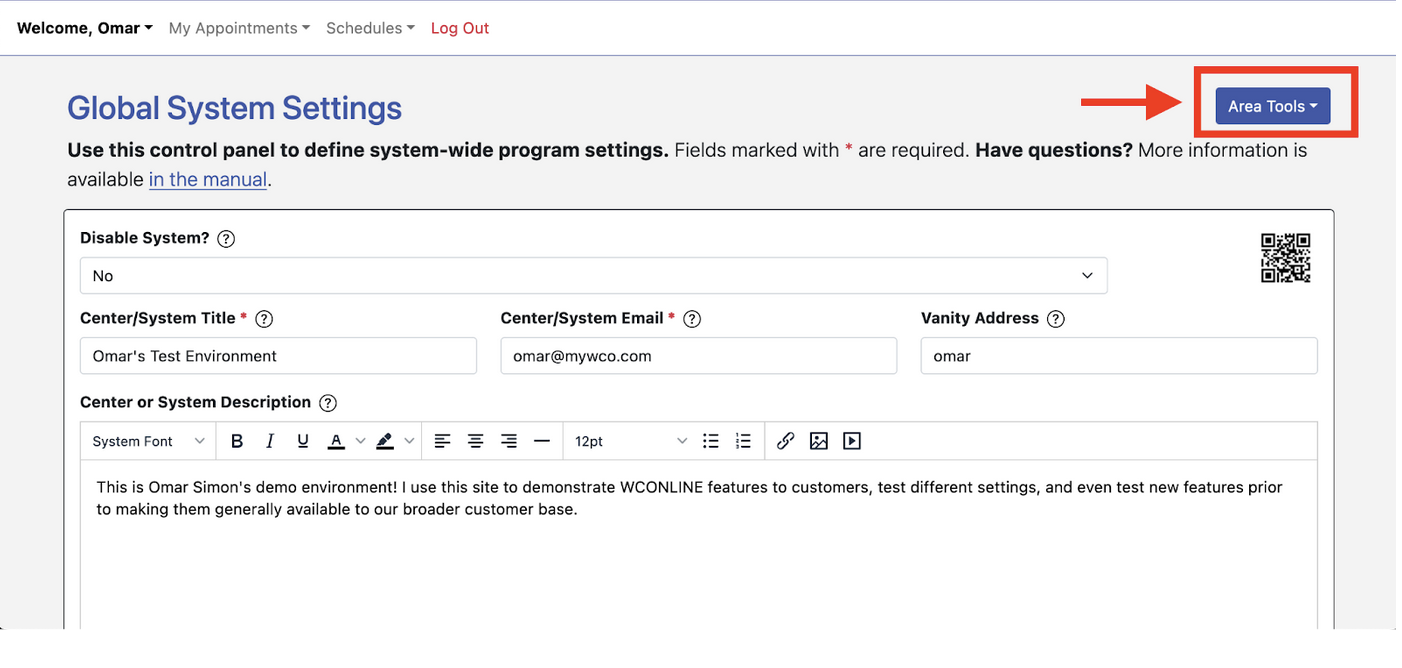
Once within global system settings, navigate to “area tools” in the upper right hand corner, and click “Authentication Options” from the drop-down menu.
Once within Authentication Options, scroll to the drop down menu titled “Login Code” and select “SAML” from the list, then save your selection. If the form is currently set to Login Code, we can fully configure and test SAML from this page without any disruption to site access or authentication.
It’s important to note that if you are currently using “Universal SSO” or “LDAP,” switching the drop down form to SAML will disable your current SSO implementation. If you do not currently have SSO configured, then there will be no disruption to site access or authentication.
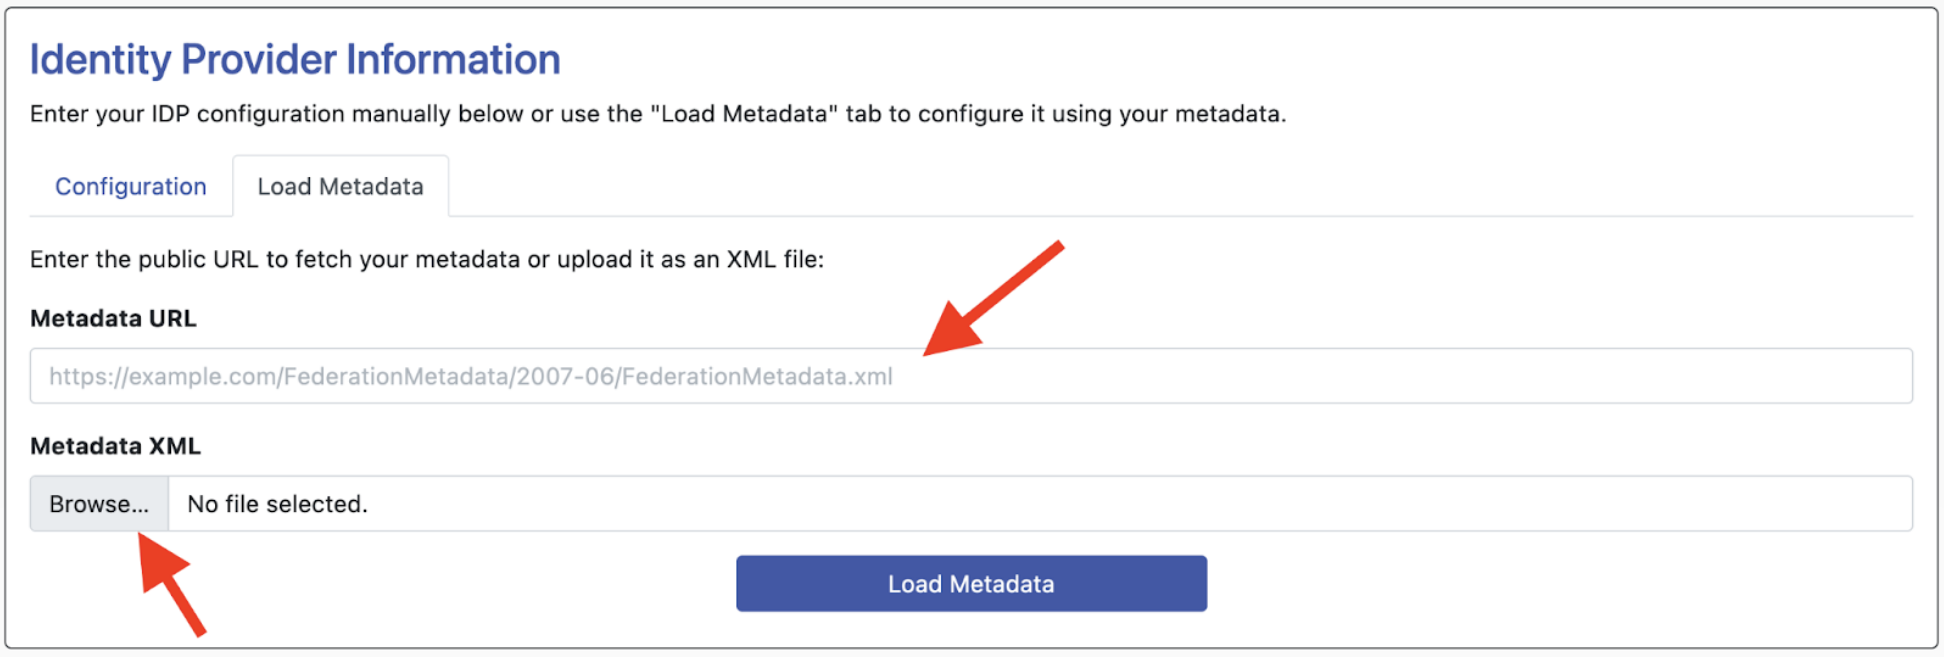
Once you’ve saved SAML, scroll down to the section titled “Identity Provider Information,” and click “Load Metadata.”
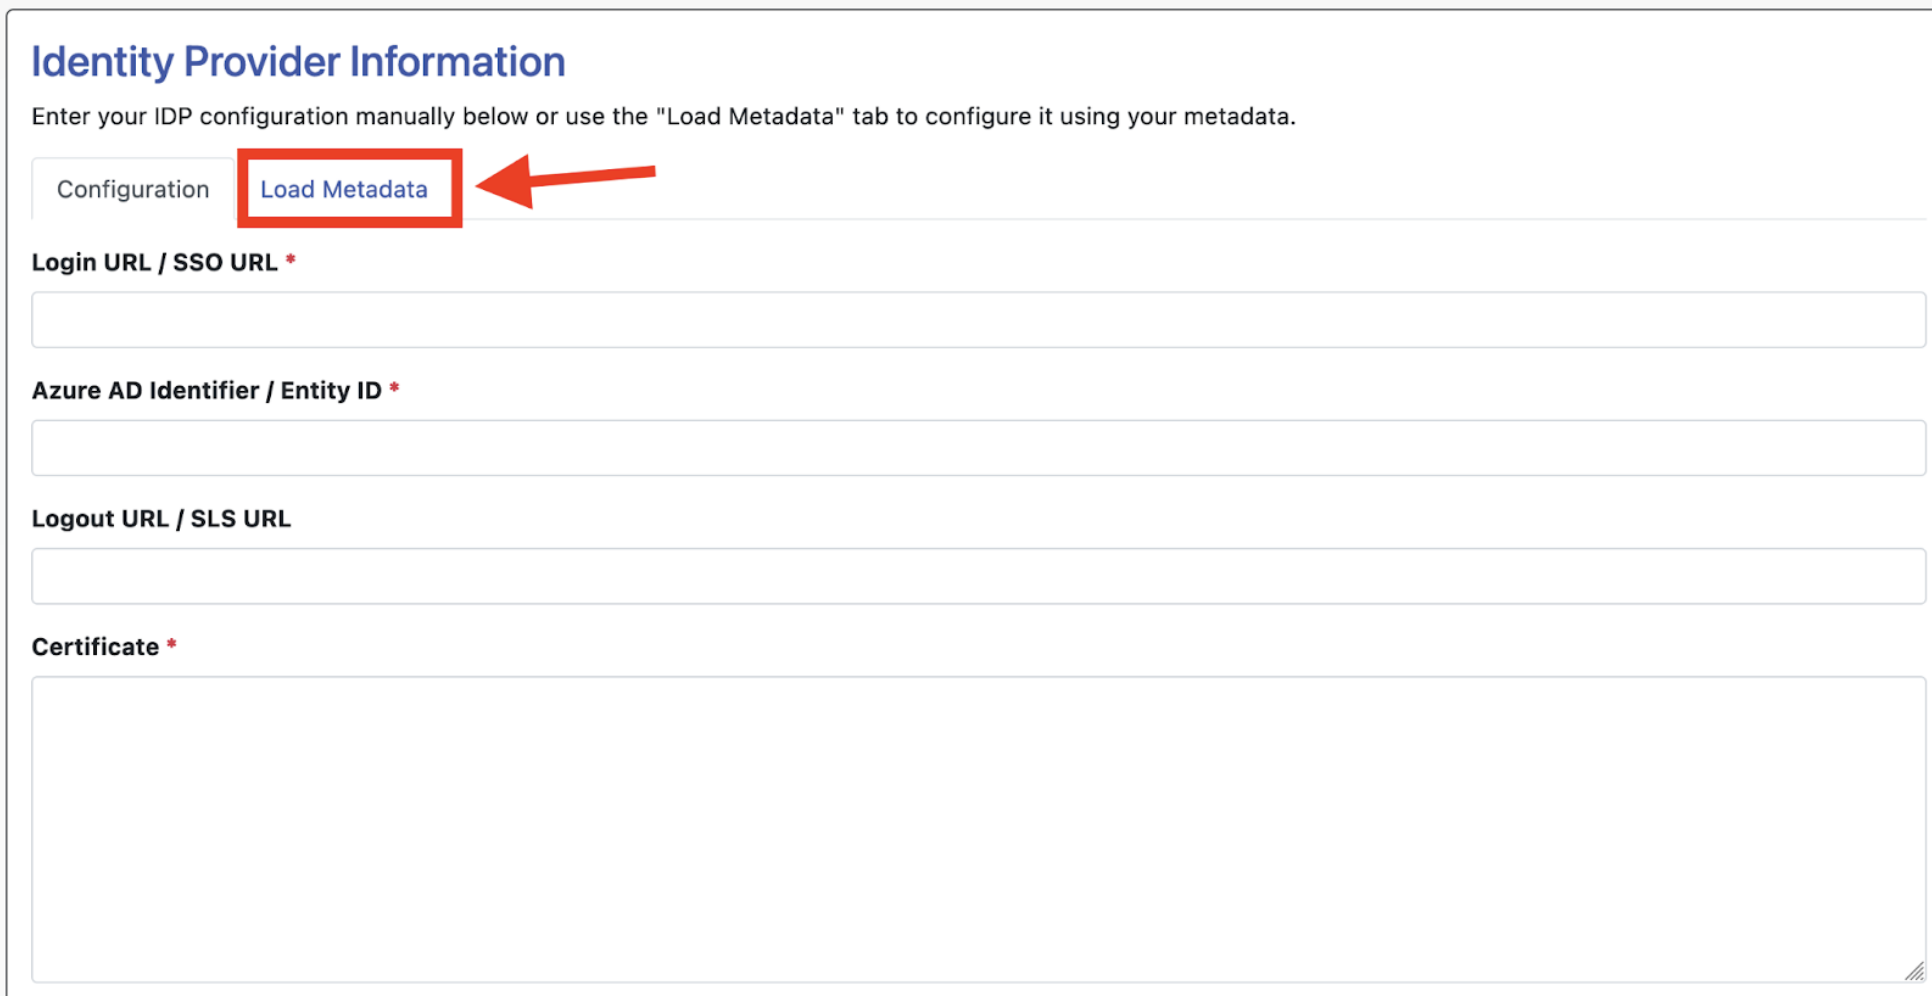
From here, you’ll have two ways to import your IDP metadata. You can simply paste the metadata URL into the URL field and click “Load Metadata.”
Alternatively, you can upload the your metadata XML file and click load metadata.
You only need to use one of these methods.
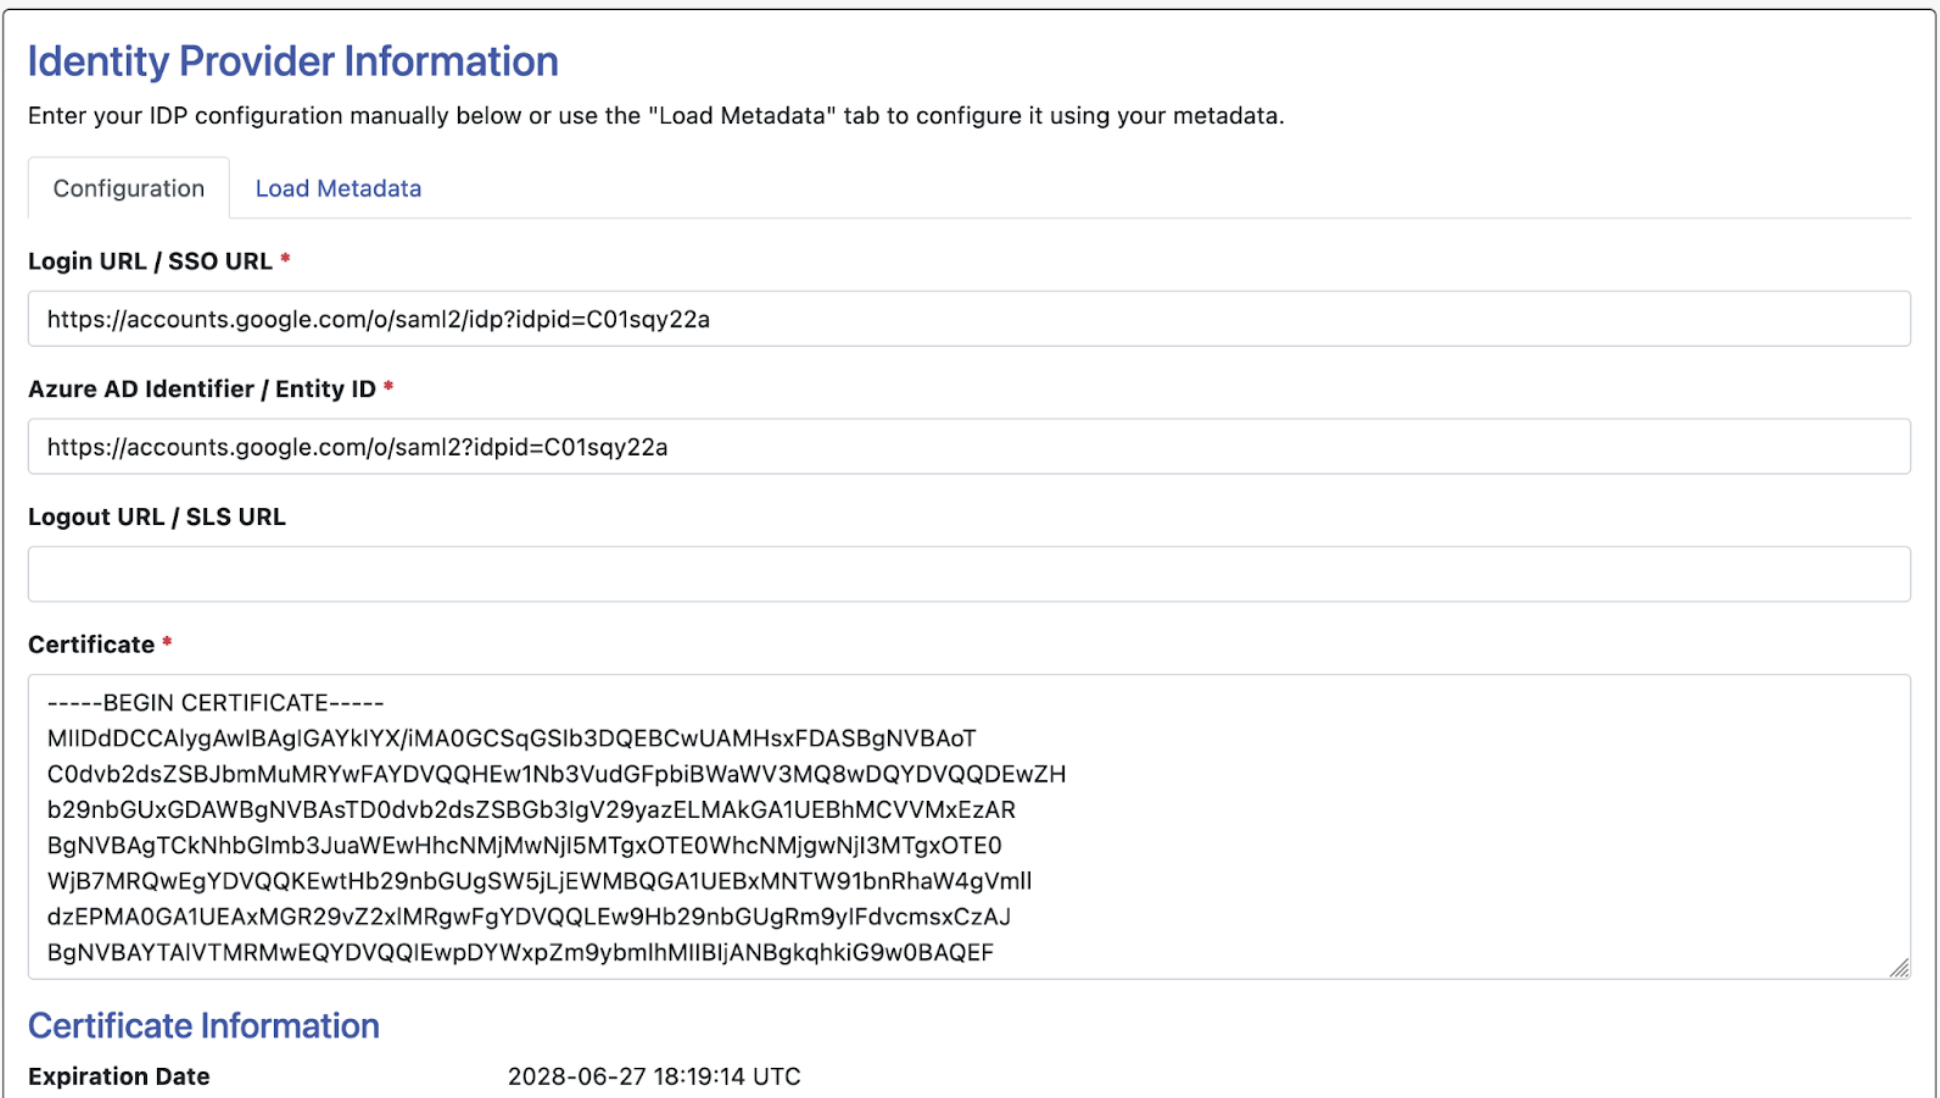
Once you click “Load Metadata,” you’ll be returned to the configuration tab and will find your Login URL / SSO URL, Entity ID, and X.509 Certificate imported. Check the certificate expiration date and ensure it’s not already passed. As long as the certificate is current, then this process is complete.
NOTE: When the certificate is 90 days from expiration, your WCONLINE app administrators will be notified via email. When the certificate is within 60 days of expiration, app administrators will be prompted via banner notification to contact IT. When they click the banner notification, they will be presented with an explanation of what’s happening, and an email they can copy and paste, and send to campus IT. This email will include all the relevant information for IT regarding certificate expiration, and a link to our SSO documentation.
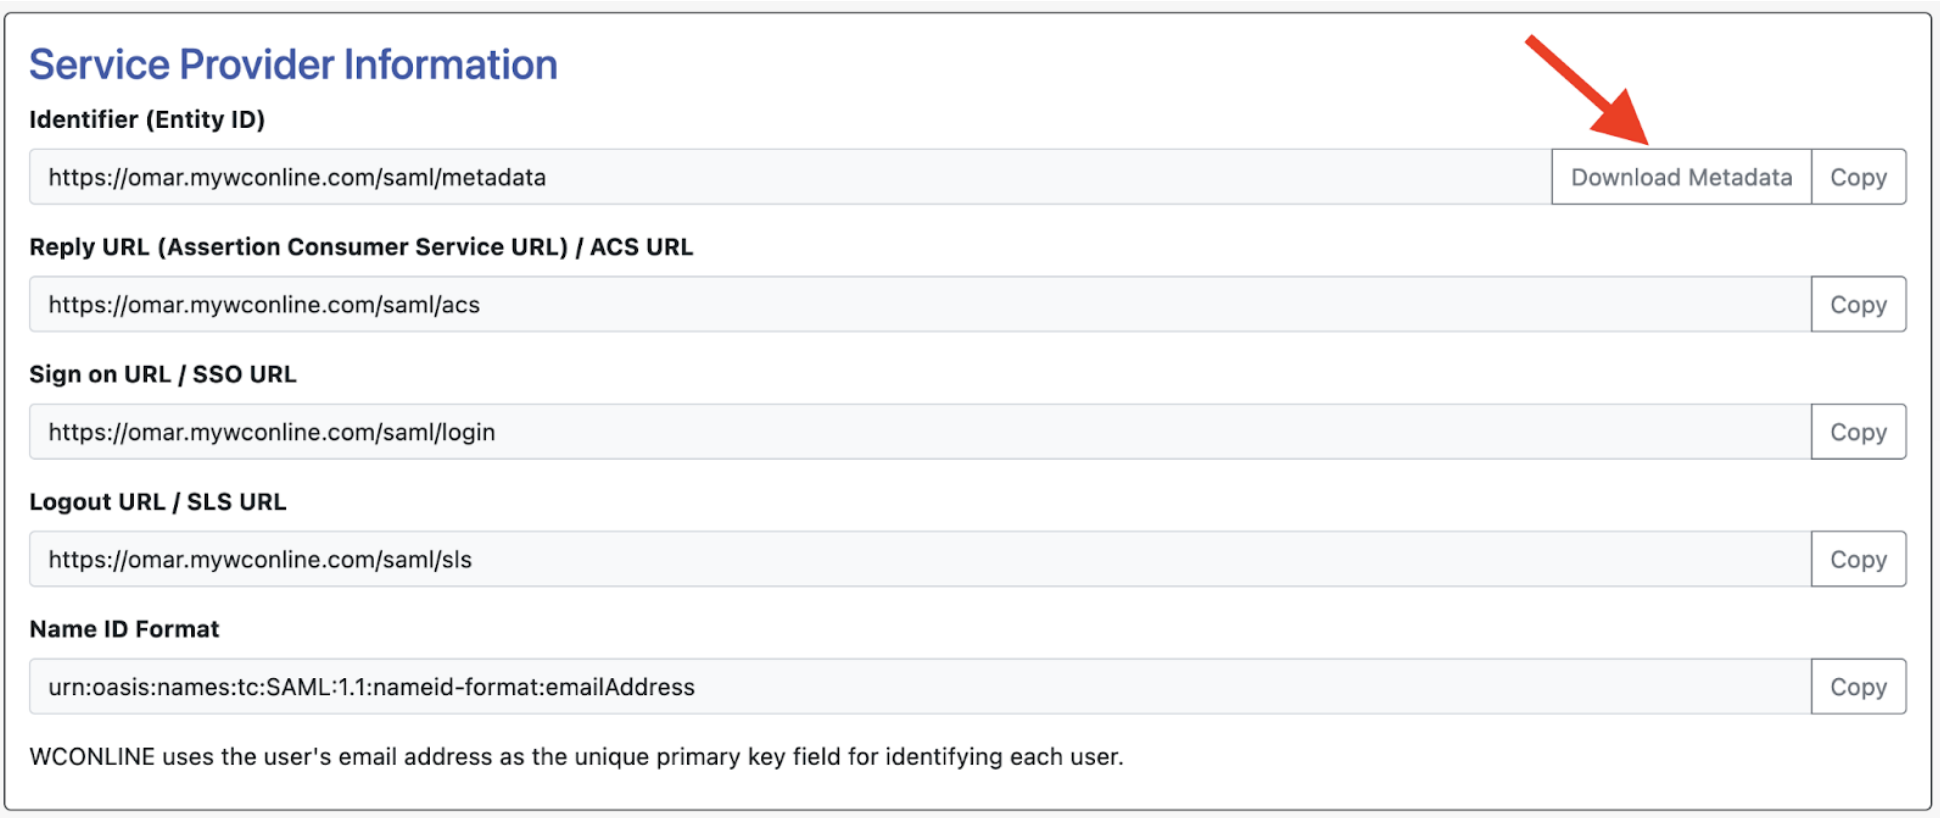
Now that we’ve imported the necessary information from your identity provider, we can import the service provider (SP) metadata over to your IDP.
Scroll up to the section titled “Service Provider Information.” There’s two ways to import the SP metadata to your IDP.
- You can use the “Download Metadata” button. This will download an XML file containing all of your WCONLINE site’s SP metadata, which you can then directly upload to your IDP.
- If you’re unsure how to upload a file to your IDP, you can manually copy over the metadata URL’s into the corresponding IDP fields. Every IDP has different names for these URL’s, so we provide multiple titles for each URL in WCO to assist with mapping.
NOTE: When copying over these metadata URL’s, you will see a field in your IDP configuration titled “Relay State.” The Relay State field will remain blank.
Once these are configured within your IDP, you will need to configure “attributes and claims.” Please ensure that the primary NameID being passed to WCONLINE by your IDP is email address. If you are passing a UPN, student/employee ID, or username as the primary NameID, you will need to apply a transformation and ensure it’s passed over in the format of an email address.
WCONLINE can import any piece of information that’s within your IDP. Along with email address, customers most commonly pass first name (givenname), last name (surname), and student/employee ID.
Attributes and Claims are mapped using the “Attribute Mapping” section of WCONLINE.
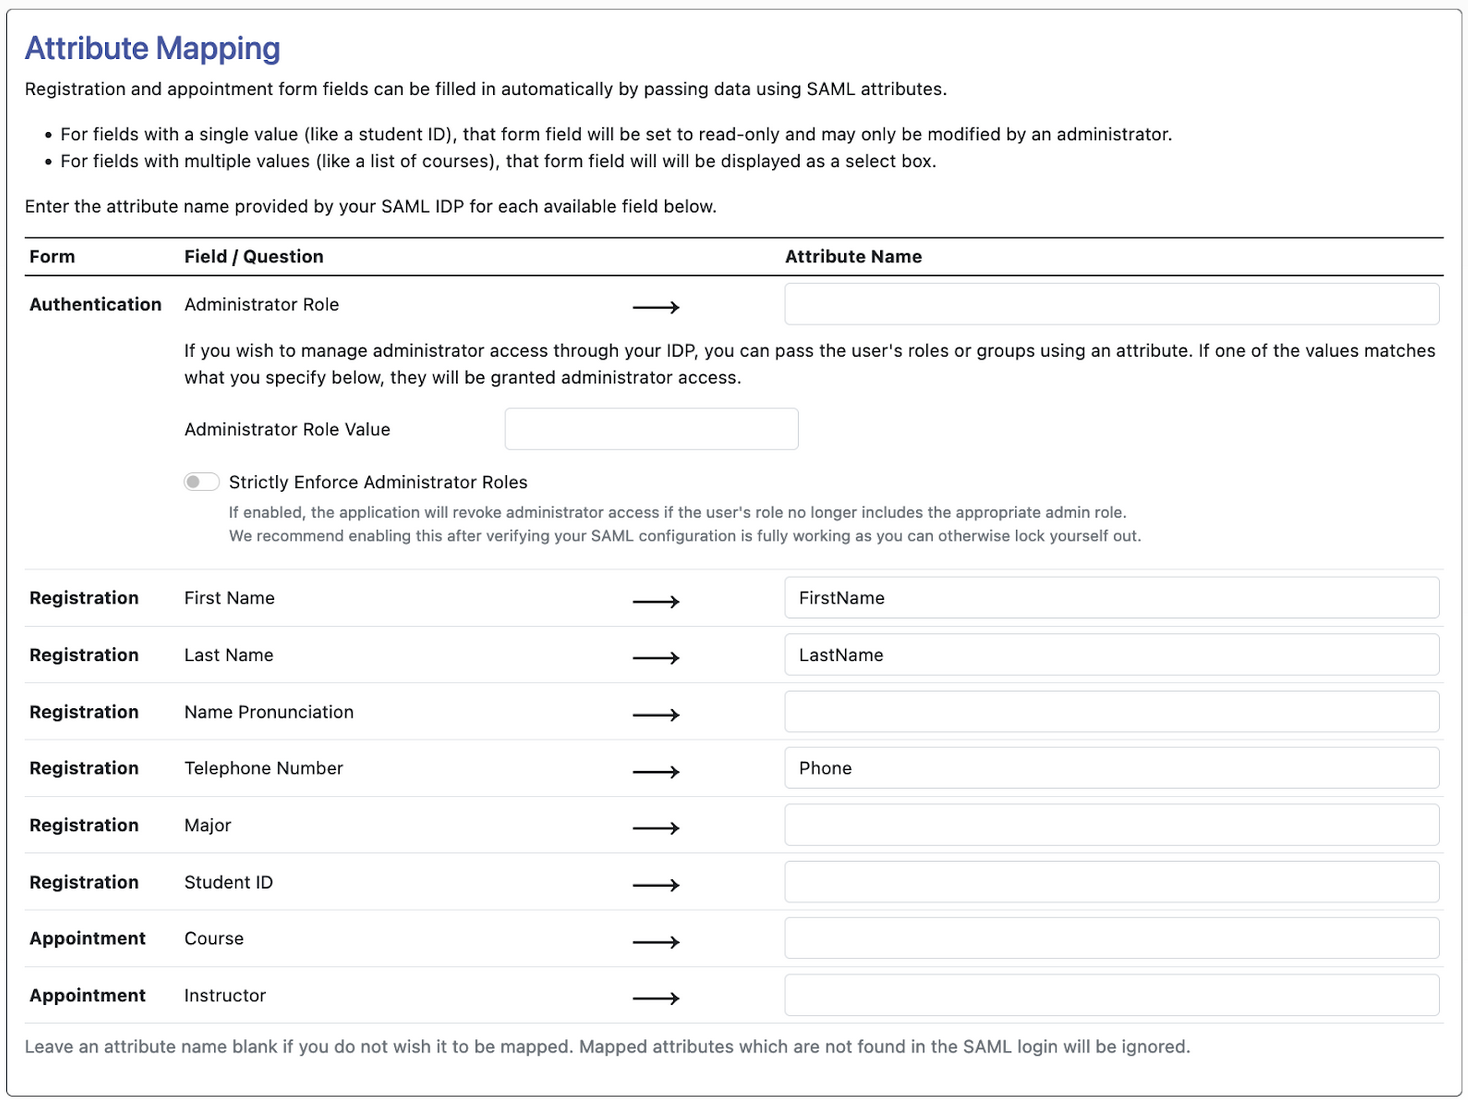
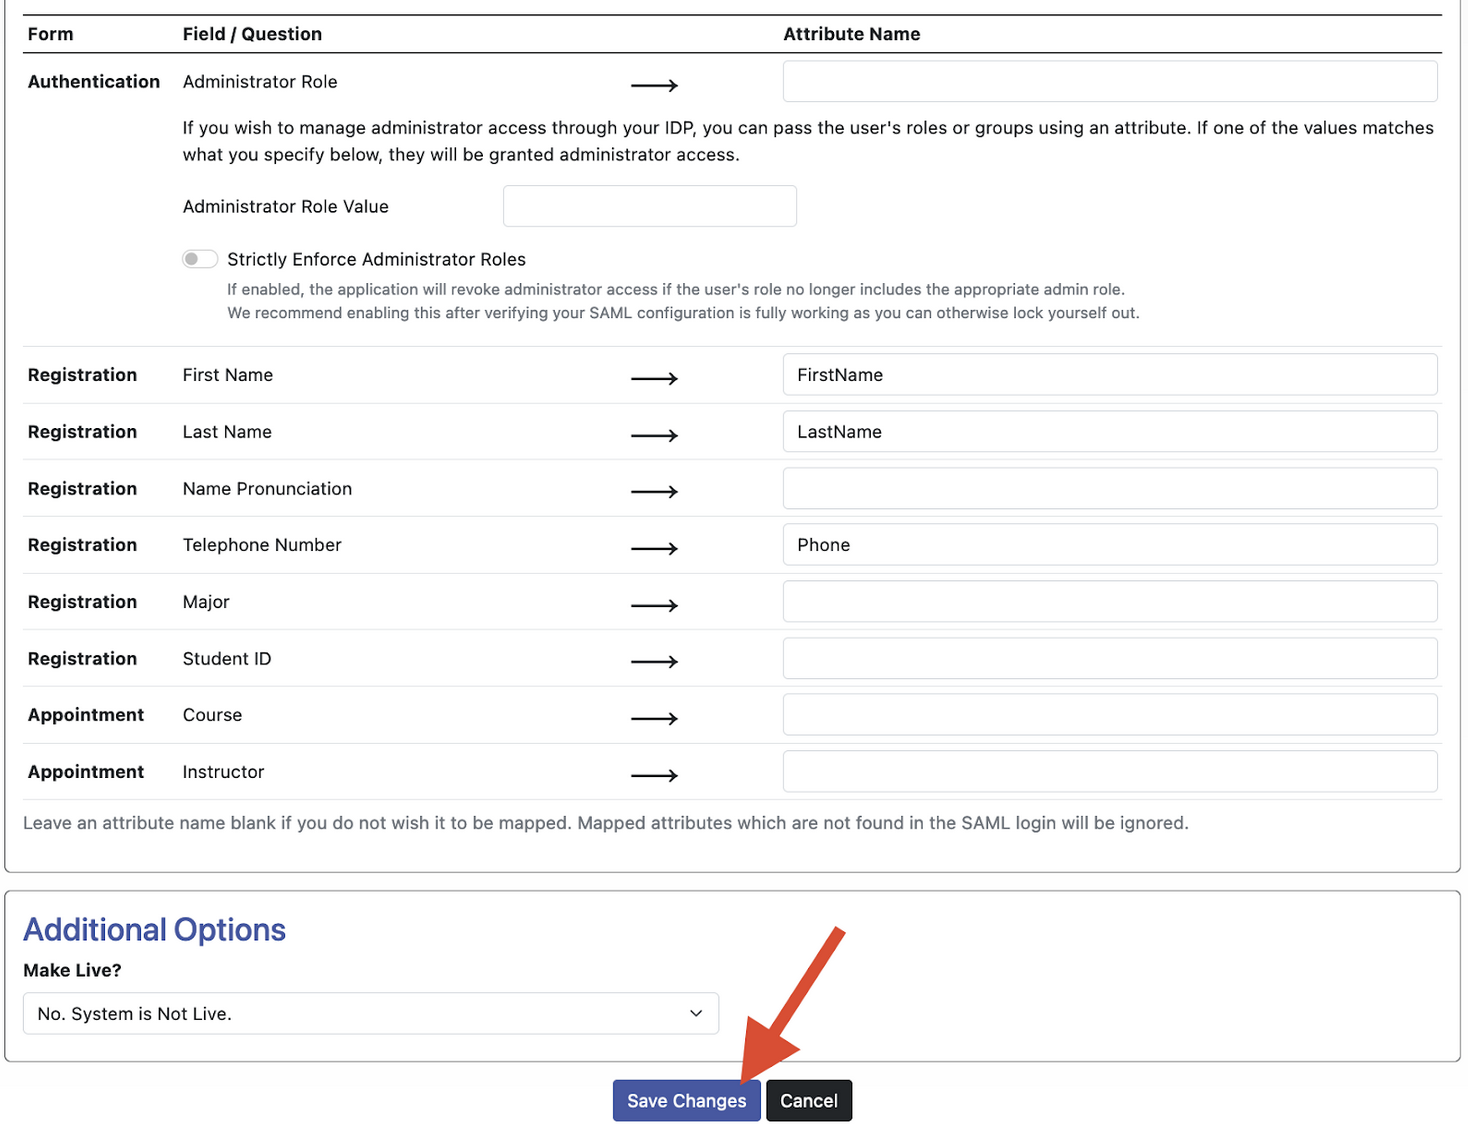
Once your attributes and claims are fully configured, we can scroll to the bottom of the WCONLINE page and click “save changes.”
NOTE: We still need to test this configuration, so before saving, ensure “Make Live?” form is set to “No, system is not live.”
At the top of the WCONLINE SAML configuration page, you’ll see a test URL. We’ll use this URL to test the connection, and ensure all attributes are being passed to the appropriate corresponding field. Open this URL in a private browsing window.
Once you’re at this URL, click the blue “Login (Dry Run) button.”
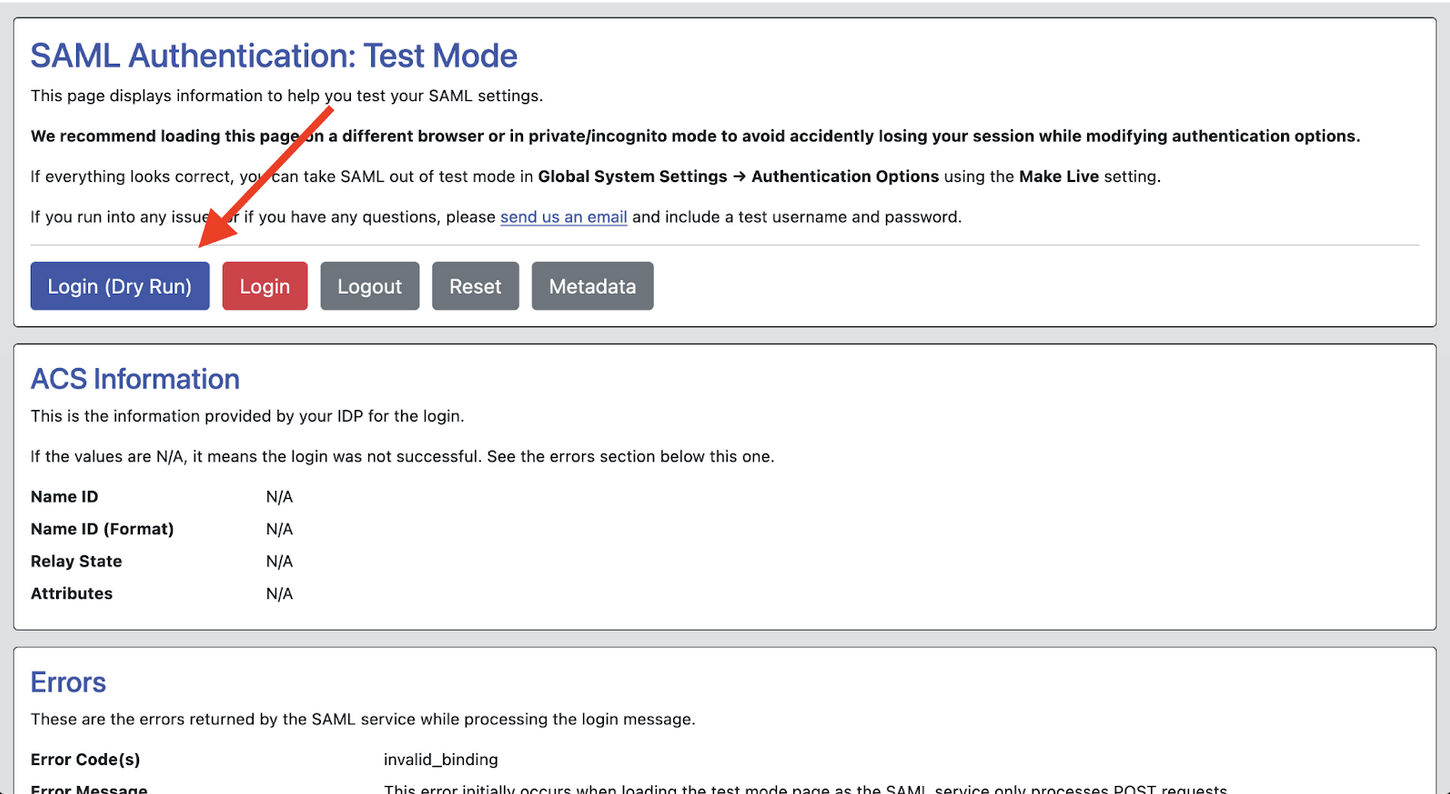
This button will force an authentication through your institution’s familiar SAML login page. Please note that if you receive a 404 error, you have misconfigured the metadata information on the WCONLINE side.
Once you authenticate, you’ll see the following page:

If you’ve configured everything correctly, then you will see the errors listed as “N/A,” the NameID listed as your email address, and the attributes mapped according to plan.
If the login dry-run was successful, navigate back to the top and click on the red “Login” button. This will now re-force a SAML authentication, and successfully log you into WCONLINE.
Once in WCONLINE, navigate to “Profile and communication options” in the welcome menu.

From this page, once again verify that your selected user attributes are correctly populating in WCONLINE.
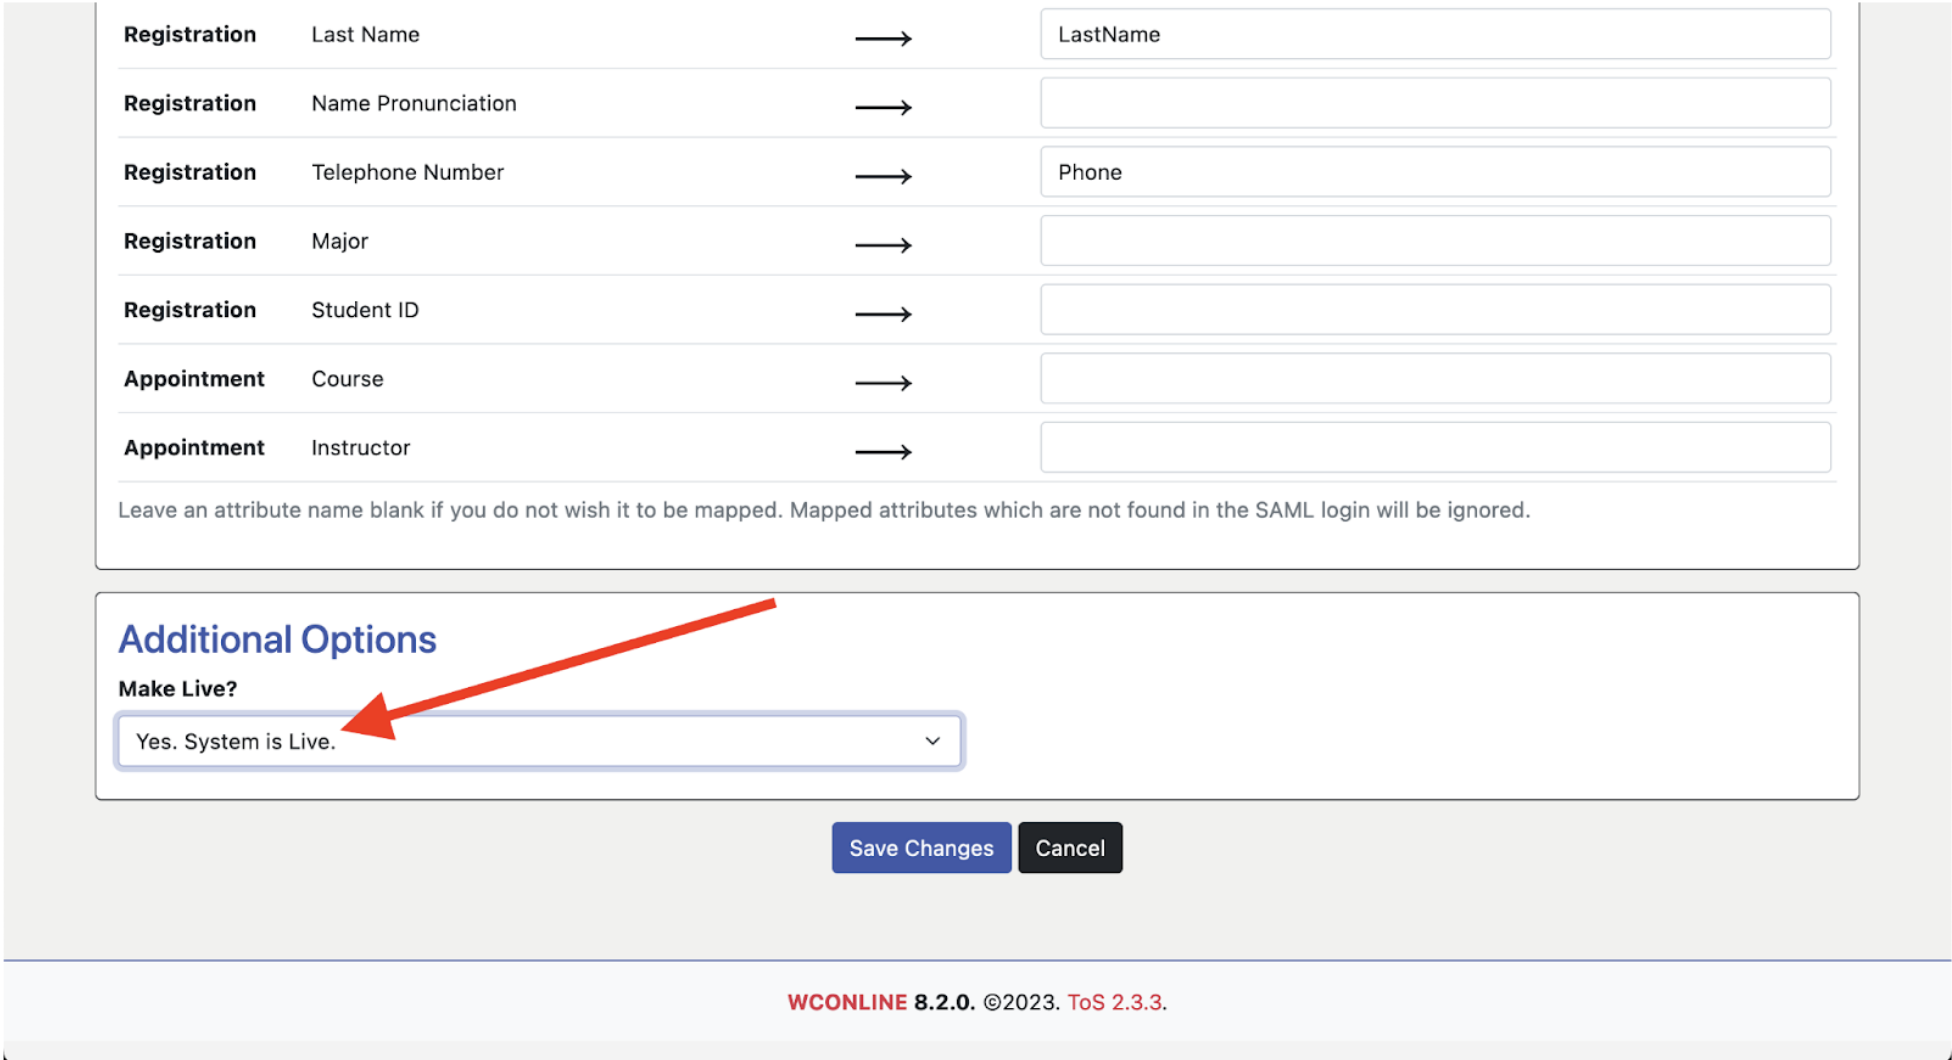
If this all looks good, you can return to the SAML page under “Global System Settings > Area tools > Authentication Options.” Scroll to the bottom of the page and find Additional Options. Click the “Make Live?” drop down menu and switch to “Yes. System is Live.” If ever your institutional users are having issues with SAML authentication, you can return to this setting and set the system to “not live,” and users will be able to log in via the standard login page while you troubleshoot.
That’s all there is to it! You’ve now successfully configured SAML in WCONLINE. If you run into any issues along the way, please reach out to our support team at support@26LLC.com and we will assist right away!
Once you save your changes, SAML authentication will be live!
Single-Sign-On (SSO)
The first step in setting up non-LDAP/S Single-Sign-On through WCONLINE is to figure out what form or portal within your existing infrastructure you want students to log in to and whether that form exists or has to be created. The next step is to create the program (using the complete sample provided through WCONLINE) that creates the hash and sends the clients to WCONLINE. Finally, you will enter the shared key in WCONLINE (as below), test the system using the WCONLINE-provided test information, and then make the system live. Because this option offloads authentication to a system that we do not control, only non-administrators (typically students) will be able to log in to WCONLINE through the SSO form. Administrators will continue to log in to WCONLINE directly.
In order to begin setting up WCONLINE for Single-Sign-On, choose SINGLE-SIGN-ON from the TO GET STARTED drop-down and then select the "Save Selection" button. Next, carefully read the extensive on-screen information. That information provides a process overview, directions for setup and installation, a complete, sample program that can be used to generate the security token, and a form that lets you enter the following variables:
LOGIN URL: This is the URL where non-administrators enter their credentials within your institution's infrastructure. This is used by WCONLINE to tell non-administrators where to log in. Enter the full URL including http:// or https://. WCONLINE uses this to provide a link to your login form from the WCONLINE login page (in order to ensure that clients can easily get to the correct place where they log in).
LOGOUT URL: This is the URL where non-administrators should be directed when logging out of WCONLINE. Enter the full URL including http:// or https://. This can be simply a website that provides information about your center or that gives them access to other institutional services, or it can be a much more complex program within your infrastructure that destroys the client's session and redirects them to a "logout" message.
SECURITY KEY: The security key is a case-sensitive alphanumeric string that is used by WCONLINE and by the institution to construct the hashed security token. This key should be kept secure and be complex and not guessable.
REGISTRATION FORM: DATA MAP: By default, WCONLINE only receives a client's email address from the institution (along with the passed token that enables the client to be logged in). If you would like (and if supported by your institution's IT department), you can automatically fill one answer on the registration from with one piece of data from your institution. For example, this could be used to fill in a single answer, such as a client's major, student ID, or advisor when the client registers or updates their profile.
To implement this option, first create a fill-in question on the appointment form (via Form Setup: Appointment Form) that will collect the client's choice. Then, select that question from the list of questions under REGISTRATION FORM: DATA MAP. Finally, when passing a client to WCONLINE, include a variable in the URL (as discussed in the sample programming at the top of "Authentication Options") that contains the data point. Ensure that data does not contain any ampersands, apostrophes, or quotation marks. (For example, passed data could look like: "®data=Sciences" without quotes.)
APPOINTMENT FORM: DATA MAP: Similar to the above, by default, WCONLINE only receives a client's email address from the institution (along with the passed token that enables the client to be logged in). If you would like (and if supported by your institution's IT department), you can pass a set of data from your institution to WCONLINE and have clients select from the passed options when making an appointment. For example, this could be used to allow clients to select from their current class schedule when making an appointment.
To implement this option, first create a fill-in question on the appointment form (via Form Setup: Appointment Form) that will collect the client's choice. Then, select that question from the list of questions under APPOINTMENT FORM: DATA MAP. Finally, when passing a client to WCONLINE, include a variable in the URL (as discussed in the sample programming at the top of "Authentication Options") that contains the data set with each option separated by a pipe character. Ensure that each option doesn't contain any ampersands, apostrophes, or quotation marks. (For example, a list could look like: "&datastring=BIOL 101|CHEM 101|ENGL 101|HIST 101" without quotes.)
Testing Single-Sign-On (SSO)
Once you've entered the LOGIN URL, LOGOUT URL, and SECURITY KEY in WCONLINE, click the "save changes" button (leaving the MAKE LIVE setting set to "No. System is Not Live." WCONLINE will refresh the page adding a new section that displays something like the following:
SECURITY_KEYhourMONTHdayEMAIL_ADDRESS = jhwe876!!lijwf100202test@26llc.com
MD5 HASHED TOKEN = e89e05926a6687e552bff10c20220478
URL = https://demo.mywconline.com/backdoor.php?email=test@26llc.com&token=e89e05926a6687e552bff10c20220478
In order to test your SSO programming, run the email address "test@26llc.com" through your script. Your script should produce the unencrypted token, MD5 hashed token, and redirect URL that is displayed in WCONLINE. As long as the two displays are identical, you can set the MAKE LIVE? setting to "Yes. System is Live." If the two displays do not match, use the unencrypted token to see where your script is using an incorrect or unexpected value.
Once the system is live, a client (or non-administrator) will log in to your form or portal. They will then be sent to WCONLINE automatically. If it's the first time that that client has accessed WCONLINE, they will be asked to fill out your registration form (without being able to change their email or enter a password). If they've already registered, they'll be logged in immediately.
Troubleshooting Single-Sign-On (SSO)
If clients are being directed to the WCONLINE login page after coming through your form, then that means that the token in the URL that is being sent doesn't match the token that WCONLINE is expecting. The most common reasons for this are:
- The incorrect time is being used to construct the token. WCONLINE's time is static and does not change for daylight savings. Be sure that your script is returning the time that matches the time displayed live in "Authentication Options."
- The time is not in the correct format before being encrypted. WCONLINE uses the hour in 24-hour format with leading zeros for numbers less than 10, and the current month and day both with leading zeros for numbers less than 10.
- The email address isn't being presented in all lowercase or contains an apostrophe that isn't being escaped.
- The system hasn't been set to "Yes. System is Live."
- The person logging in through the institutional form is an administrator in WCONLINE and, therefore, has to log in to WCONLINE through the WCONLINE login form. If an administrator doesn't already have an account in WCONLINE, then they will first log in via your institutional login form. WCONLINE will then have them fill out the registration form. Once they register, WCONLINE will send them a password via email that they can use to log in on the WCONLINE login page.
If you are looking for where to upload or download metadata information, or need SP entityIDs and signing certificate, then it's likely that you are misunderstanding how the WCONLINE Single-Sign-On system works. Please review the information above and in WCONLINE itself as WCONLINE doesn't use metadata or other such credentials--even to support SAML and Shibboleth. This is because the authentication process through WCONLINE's proprietary SSO system offloads the authentication and credentialing process entirely to your servers.
LDAP/S
In order to begin setting up WCONLINE for LDAP/S, choose LDAP/S from the TO GET STARTED drop-down and then select the "Save Selection" button. Next, carefully read the extensive on-screen information. That information provides a process overview, directions for setup and installation, and a form that lets you enter the following variables:
HOST: This is the full URL for your institution's LDAP/S server. Be sure to preface the hostname with either ldap:// or ldaps:// depending on if you want to use SSL-enabled LDAP or not. We strongly recommend using LDAPS as LDAP sends login credentials across the internet without encrypting them, which is a substantial security risk. In keeping with internet security standards, LDAPS does require that a properly credentialed (not self-signed) SSL certificate be installed on your LDAPS server.
PORT: This is the port that WCONLINE should use to connect to your LDAP/S server. Keep in mind that you most likely will need to add a keyhole to your institutional firewall to allow WCONLINE to make queries to your LDAP server via this port. In order to do so, ensure that the following IPs are whitelisted: 205.234.182.252, 204.93.202.186, 204.93.202.224, and 204.93.202.225.
USERNAME FIELD: This is the field in which usernames are stored within your LDAP directory tree. This field is case sensitive and has to match, identically, with whatever is set in your LDAP settings. For WCONLINE, "username" is the field that contains whatever an individual types in as their user credentials when logging in, such as a username, Net ID, or ID number. Most likely, this will be entered in a format similar to "uid" or "samAccountName" or "samaccountname" or "SAMaccountName."
EMAIL FIELD: This is the field in which an individual's email address is stored within your LDAP directory tree. WCONLINE uses email as the key field in keeping track of each individual that uses the system. As such, your directory does have to have an email address associated with each username or user in order to use LDAP/S with WCONLINE.
OU String #1: This is where you will enter the directory structure for where WCONLINE should look for credentials within your LDAP directory tree. Most likely, this will be entered in a format similar to "ou=students,dc=institutionname,dc=edu." Keep in mind that OUs are case sensitive and must be entered exactly as they appear in your LDAP or Active Directory directory tree. In other words, if your directory tree is set to "OU=students,DC=institutionname,DC=EDU," then entering "ou=students,dc=institutionname,dc=edu" will not work.
If your institution uses multiple OUs to cover multiple access or account classes, we first recommend trying using a single OU using the highest level shared directory name (such as "ou=institutioname,dc=edu" in the example above). If that doesn't work, enter the individual OU strings in the OU String #2 to OU String #8 as warranted. For example, if your structure demands, you could enter "ou=students,dc=institutionname,dc=edu" in the first OU, "ou=staff,dc=institutionname,dc=edu" in the second, and "ou=faculty,dc=institutionname,dc=edu" in the third (for example).
OPTIONAL: INITIAL BIND: Some institutions require that WCONLINE bind to the LDAP server using dedicated credentials before being allowed to perform additional directory lookups. If this is the case for your institution, you'll need to enter the INITIAL BIND USER and INITIAL BIND PASSWORD here. Once entered, WCONLINE will first attempt to bind using the supplied initial bind credentials. Once successful, WCONLINE will then attempt to validate the username and password entered by the client when logging into WCONLINE. Keep in mind that the fields are case sensitive and that the INITIAL BIND USER credential must be a fully qualified and complete directory string (such as "CN=wconline_bind,OU=service,DC=institutionname,DC=edu").
Testing LDAP/S
Once you've entered values for the required fields, select the "save changes" button (leaving the MAKE LIVE? setting set to "No. System is Not Live." WCONLINE will refresh the page adding a new section that allows you to test the connection. In order to test the configuration, enter known valid and known invalid usernames and passwords in the LDAP/S Settings Test fields and click "test." WCONLINE will return "success" if the connection can be established and if the credentials are valid; otherwise, the system will return the error that is resulting in the failure (such as "The LDAP/S test failed (RETURNED ERROR: Can't contact LDAP server").
If the connection fails, you will need to use that error to adjust your settings and determine how to move forward, as we have no additional information available to us to help know what is going wrong. For example, the above error most likely means that the firewall isn't letting the connection through. You also might have to correlate an error with the logs from your firewall and LDAP server in order to find the root cause.
As long as you are comfortable with the reliability and accuracy of your tests (in that valid credentials are allowed and invalid credentials are denied), you can set the MAKE LIVE? setting to "Yes. System is Live." Once the system is live, clients (including administrators) will log in to WCONLINE using their institutional credentials on the WCONLINE login page. If it's the first time that that client has accessed WCONLINE, they will be asked to fill out your registration form (without being able to change their email or enter a password). If they've already registered, they'll be logged in immediately.
Troubleshooting LDAP/S
If LDAP/S isn't working, the first step is to check the error being returned by WCONLINE's test tool, as well as to look at the logs from both your firewall and LDAP server. Nearly all LDAP failures are related to one of the following:
- If using LDAPS, you must use a properly credentialed (and not self-signed) SSL certificate.
- If you have a firewall, you must provide keyholes through that firewall for WCONLINE queries across the port that you specify.
- If you are using Active Directory, case is especially important and you must ensure that every credential (including things like "ou=" and "samAccountName") are properly capitalized in exactly the same way as in your institutional configuration.
- If you are using a master bind, that account must have permission to perform queries against the OU or OUs that you enter.
- If your directory listings don't include an email address, then you won't be able to use LDAP/S through WCONLINE.
Sections in this Chapter
SECTION 1: Introductory Settings
SECTION 2: General Settings
SECTION 3: File Upload-Specific Settings
SECTION 4: Registration-Specific Settings
SECTION 5: Cross-Schedule Limits
SECTION 6: System Color Settings
SECTION 7: Social Media
SECTION 8: No-Show Policy and Enforcement
SECTION 9: Cancelation Policy and Enforcement
SECTION 10: Access Control
SECTION 11: API Configuration
SECTION 12: Authentication Options
SECTION 13: Language Options
SECTION 14: Zoom Integration
SECTION 15: Zoom Integration (Beta)